Viewtech MHDV04P Скачать руководство пользователя страница 73


72

3. DVR Configuration 

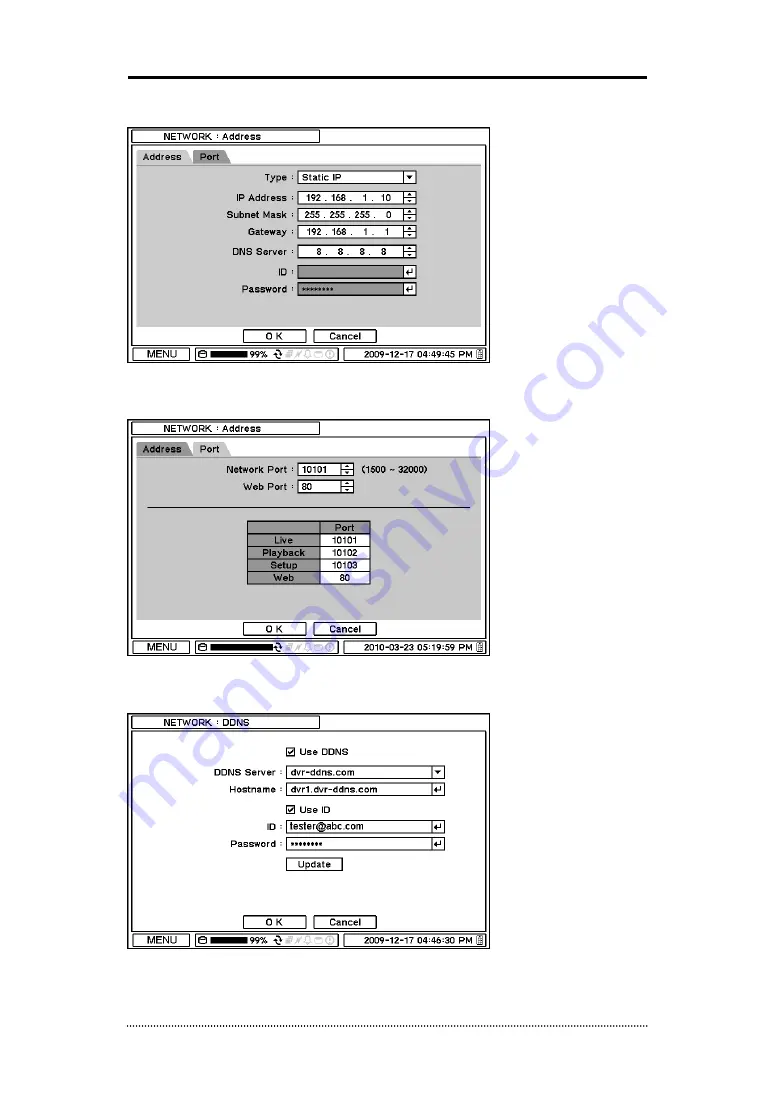
Example of DVR Network setting.   


Select Static IP option and enter following options accordingly. The system should be allocated 
with individual IP address.   


Make sure the ports for DVR are all set accordingly or set network ports according to DVR port 
settings.  


DDNS can be used once the system is registered on DDNS server. ID and PW are required for the 
registered server authentication. 
 

Содержание MHDV04P

Страница 1: ...User s Manual H 264 4 Channel Mobile DVR H 264 4 Ch Mobile DVR Anti Shock Vibration control Built in Heating System 2 5 Mobile HDD SD Card GPS G Sensor ...

Страница 2: ...product The information in this manual is prepared based on the current specifications for the product The manufacturer is currently adding new functions and will continue to upgrade the product with new technology All specifications may be changed without notice to individual users Cautions We strongly recommend that users read all safety cautions carefully before operating the product to operate...

Страница 3: ...wer switch and remove the power cord from the power outlet Failure to do so may result in fire and electric shock Please use only the power cord supplied with the product Use of other power cords may result in fire and electric shock In case of smoke smell or noise immediately turn off the power switch and remove the power cord from the power outlet Continued operation of the product may result in...

Страница 4: ...ecommended to read the relevant details carefully so as to operate the product properly and without harm The product may not work properly if the power source is unstable or and if electric shock occurs Make sure the correct rated power is available The product is designed to be proof against electric power failures however damage may occur as a result of power failure Current data may be damaged ...

Страница 5: ... Admin Login 18 1 6 The Main Menu 19 1 7 Contextual Menu 20 2 DVR Configuration 21 2 1 SYSTEM 21 2 1 1 MENU SYSTEM Information 21 2 1 2 MENU SYSTEM Date Time 22 2 1 3 MENU SYSTEM User 22 2 1 4 MENU SYSTEM Quick Setup 23 2 1 5 MENU SYSTEM System Log 24 2 2 DEVICE 25 2 2 1 MENU DEVICE Camera 25 2 2 2 MENU DEVICE Audio 26 2 2 3 MENU DEVICE Alarm 26 2 2 4 MENU DEVICE Keyboard 27 2 2 5 MENU DEVICE RS23...

Страница 6: ...Starting the Software 46 1 2 Site Set Up 48 1 3 Favorite Set Up 50 1 3 Site List Panel 51 1 4 Tool Panel 52 1 4 1 PTZ 52 1 4 2 DVR Status 52 1 4 3 TEXT IN 53 1 4 4 GPS 53 2 Remote Playback 54 2 1 Calendar Search 54 2 2 Event Search 55 3 3 Text In Search 56 3 4 Saving the recorded data 57 3 5 Play Backup Data 58 3 6 Play Independent HDD Data on PC 59 4 Setup 60 4 1 Nemon Setup 60 4 2 Remote Setup 6...

Страница 7: ... by the most reliable in vehicle device 2 General Features True H 264 Standard Video Compression Embedded Linux System to give you the Ultimate Reliability Dedicated DB Structure for Stability Compact Size For In Vehicle Installation Multi Storage Support 2 5 Removable HDD SD Card and USB Built in GPS for E Map Application Industrial Standard to Stand Harsh Temperatures without Additional Enclosur...

Страница 8: ...ext In Search Go to Time Playback Mode Multi Channel Normal Reverse Play RW FF x2 x4 x8 x16 x32 Frame to Frame Pause Playback Map Associated Google Map Interface Ethernet 10 100 Base Protocol TCP IP HTTP DHCP ADSL PPPoE Application Live Playback Setup Notification Callback E Mail Network Web Browse Internet Explorer 7 or higher Storage Removable Rack 2 5 SATA HDD or SSD SD Card Backup External HDD...

Страница 9: ...lation 1 Package Contents The following components are included in the product DVR Unit Harness Terminal Block Remote Controller CD User s Manual Network S W Quick Guide Bracket Screws Keys GPS Antenna Option SMA type connector ...

Страница 10: ...low Unscrew Rear Cover Screws to remove Rear Cover Unscrew Bracket Screws to remove installation bottom bracket The installation bracket has following sizes and it must be bolt down on the bottom or top surface strongly using the 6 taping screws Rear Cover Rear Cover Screws 3 points Bracket Screws 6 points ...

Страница 11: ... bracket screws to bolt down the unit with the installation bracket as it is To install the unit on the top turn the side bracket upside and bolt down the unit with the installation bracket Note If the unit is installed as show below it might cause abnormal operation or sensor detections due to the instability The Bottom The Top Bracket Screws 6 points ...

Страница 12: ...st before connecting them and lock the Rear Cover for easy arrangement Video Audio Input Camera Power Output The unit has group of 4ch Video Input VI Audio Input AI Camera Power Output PO as shown above Use 24pin connector included in a box to connect cameras Monitor Output The connector for CVBS NTSC or PAL monitor VO refers to Video Out AO refers to Audio Out and The Monitor power 12V needs to b...

Страница 13: ...a control keyboard Alarm alarm output connectors are provided to connect external alarms such as sirens or lights 2 alarm output connectors have internal relays Sensor 2 sensor input connectors are provided to connect external devices You can use sensors to signal the DVR with event Network Port Connect a Cat5 cable with an RJ 45 connector to the DVR connector for remote monitoring remote playback...

Страница 14: ...proper reception of GPS data Reset The DVR has a Reset switch that will only be used to return all the settings to the original factory settings To reset the unit turn the DVR off first Turn it on again while poking the straightened paperclip in the reset hole Hold the switch until the DVR is initializing ...

Страница 15: ... where exposed to rain and wind and water drop May cause fire electric shock and transformation Keep away from fire May cause fire Do not disassemble or remodel on your own May cause malfunction or electric shock Do not put next to flammable materials like flammable spray May cause fire Do not install it at a place with too much dirt May cause fire Do not install it on unstable places like shaking...

Страница 16: ... and Enter button will cause the selected camera to display full screen Buttons are used to enter passwords MENU EXIT Button Enters the Setup Menu User will need to enter the authorized password to assess Setup In Playback mode MENU button displays the Playback Menu DISPLAY Button Changes the screen display mode in the current screen or playback screen SEQUENCE Button Displays live channels sequen...

Страница 17: ...setting the menu Focus on near distance under PTZ mode STEP BACKWARD Button Move backward by one frame under Pause Use this button to move down when setting the menu Zoom In under PTZ mode PTZ Button Changes to the PTZ control mode from the live mode ZOOM Button Zooms the current image on the screen PIP Button Changes to PIP screen mode from live screen AUDIO Button Selects a camera for live playb...

Страница 18: ...hile the ignition is on Note The HDD Rack can be removed and played on PC It is recommended to remove the HDD Rack once the unit is turned off safely But to remove the HDD rack while the system is running open the door and wait for about 10 seconds until the Power LED starts flickering for the safe removal of HDD rack Note When installing the HDD for the first time the HDD should be formatted firs...

Страница 19: ...n menu screen Login in screen appears to enter ID Administrator or User and Password Password can be set up to 8 numbers by the combination of numbers from 0 to 9 The factory default password is none so press OK to log in to the system for a first time log in Password can be set under password set up option MENU SYSTEM User System will be automatically log out if it is not in use for sometime This...

Страница 20: ...te Please make sure the system log out is done when the system setting or operation completed to prevent any unauthorized changes of system settings or operations Information Date Time User Quick Setup SYSTEM System Log Camera Audio Alarm Keyboard DEVICE RS232 RS485 Display DISPLAY Monitoring Storage Record RECORD Record Tools Address DDNS Notification NETWORK Transmission Sensor Motion Video Loss...

Страница 21: ...ly OSD Select OSD display option Text In Info On Off Text In OSD Freeze Pause current image display Sequence Begin sequence display Zoom Zoom in image by X2 PIP Select PIP mode and camera Audio Select Audio outs PTZ Select PTZ options Backup Select backup options Playback Playback recorded data Emergency Record Start Emergency Recording Log Select System Event log Setup Menu Enter Main setup menu ...

Страница 22: ...ring the upgrade Removing USB Flash Memory or Turning off the system during the upgrade may cause system malfunctioning Remote Control ID Enter Remote Control ID to control multiple DVRs individually If Remote Control ID remains as 0 Remote ID does not have to be selected when using remote controller It will work as general ID for any remote controls and a remote control will communicate with any ...

Страница 23: ...rtual keyboard Press Update to synchronize the DVR time with the registered time server Note NTP is not essential for DVR operation Any type of Standard Time Server can be used e g time windows com Time Synch might not be completed due to heavy traffic or delays from the Time Synch server Press Holiday to set specific dates for Holiday setup Set specific date by pressing button Change and delete d...

Страница 24: ...e DO NOT have to enter Current password when setting password for the first time as there is no default password for Administrator User Set user registration and access rights for the system Press Group tap to add and set group Press to add a new group Enter a group name and select access rights for a group To remove an existing Group press next to it 2 1 4 MENU SYSTEM Quick Setup Quick Setup Menu...

Страница 25: ... 1 5 MENU SYSTEM System Log In the System Log full list of system logs can be searched Press Reload button to refresh log list USE button to search log list page by page Log list can be export in txt format ...

Страница 26: ...ra title Press Setup button under Color to adjust video color Click or drag a control box to adjust each color level PTZ Control Select channel connected with PTZ camera Select PTZ from the contextual menu appears by pressing right mouse button Note PTZ can only be controlled in single screen mode Use icons on screen to control PTZ By using a mouse click arrows to move around PTZ and click icons f...

Страница 27: ...d on screen Note Any Covert options will not affect recording data as it only changes monitoring conditions 2 2 2 MENU DEVICE Audio Select Audio for Audio recording Gain Control Menu is available for Mic In inputs only 8 16 ch DVR Only Control Gain value using button 2 2 3 MENU DEVICE Alarm Alarm duration Set Alarm activation time from 5 seconds to 10 minutes Select Schedule tap to schedule Alarm ...

Страница 28: ...m the list 2 2 5 MENU DEVICE RS232 RS485 Press to select a device for each ports RS232 Supports Text In POS device PTZ and Keyboard RS485 Supports Text In POS device PTZ and Keyboard Note Text In devices e g Cash Register needs to use ASCI code for Text In info on DVR ...

Страница 29: ...SD margin position using Freeze Display an image in either Field or Frame format when it is in still freeze mode Layout Allows to change or reallocate video inputs cameras displays PIP Picture In Picture size and its display positions can be selected under PIP menu Please select desired size and positions of PIP display 2 3 2 MENU DISPLAY Monitoring Event Pop up Pops up the camera image in full sc...

Страница 30: ...e boot up and start recording based on the pre set up options If the temperature below 0 C 32 F the unit will start recording after HDD is heat up by our built in heating sensor If SD card is installed with HDD It will start recording on SD Card while HDD is being heat up Once HDD is ready to record the data it will stop the recording on SD and automatically starts recording data on HDD Note Any c...

Страница 31: ... ips quality for emergency recording mode In Event pre and post recording options for Event can be set Pre Event Duration Video Images occurred right before an Event can be recorded by setting Pre Event under Event Mode Duration Pre Event recording can be set using Pre Event sec upto 30 seconds Emergency Record Duration Time duration can be set for Emergency recording from 5 seconds to 30 minute o...

Страница 32: ...31 Use Default Setting Check Use Default Setting to follow main recording setting under Record menu 2 4 3 MENU RECORD Record Tools In Recording Status current recording options and status are displayed ...

Страница 33: ... the IP address can be used during the DVRNS Server setup In Port Select appropriate port number for external access to the system The port list shows necessary ports to be opened for each operations Note ID and Password are required in ADSL with PPPoE type Note Default TCP port is 10101 but it can be set from 1500 to 32000 if it is necessary 2 5 2 MENU NETWORK DDNS In the DDNS network options for...

Страница 34: ... by text message E Mail Interval Select E Mail Interval to set time interval between consequential events being sent to remote site via email Recipient Enter the email address of a recipient Up to 5 recipients can be entered Note Any events occur between the pre set interval time will not be sent to remote site e g If the interval is set as 30 seconds only the events occur every 30 seconds since t...

Страница 35: ...Closed NO Normally Opened In Record each sensor can be synchronized with single and multi cameras Press to select cameras to be synchronized with sensors In Alarm each sensor can be synchronized with single and multi alarms Press to select alarms to be synchronized with sensors In Notification each sensor can be synchronized with single and multi callback or emailing sites Press to enter callback ...

Страница 36: ... system provides Motion Detection function Set Motion Detection using Sensitivity View and Area options Sensitivity Select motion sensitivity from Very Low to Very High View On or Off the appearance of motion zones on screen when motions is detected Area Define the area for motion detection Press Setup under Area to define motions detection areas The blocks indicate the area where is defined for m...

Страница 37: ... and multi alarms Press to select alarms to be synchronized with cameras for motion events In Notification each camera with motion can be synchronized with single and multi callback or emailing sites Press to enter callback or email address to be synchronized with cameras for motion events PTZ can be sync with Motion event using its preset function If Motion is detected PTZ moves to the position w...

Страница 38: ... be synchronized with single and multi alarms Press to select alarms to be synchronized with cameras for video loss In Notification each camera with video loss can be synchronized with single and multi callback or emailing sites Press to enter callback or email address to be synchronized with cameras for video loss PTZ can be sync with Video Loss event using its preset function If Video Loss occur...

Страница 39: ...more line options Ignore String Enter a word to ignore strings includes selected word Line Delimiter Enter a symbol or a word to distinguish the end of lines Case Sensitive Select Case Sensitive option if distinguish a word with case sensitivity In Record text event can be synchronized with single or multi camera record Press to select camera s to be synchronized with text event If RS232 RS485 Por...

Страница 40: ...erable temperature level of storage If HDD temperature increases over pre set temperature it will notify a user in various ways according to following settings In Alarm each system event can be synchronized with single and multi alarms Press to select alarms to be synchronized with each event If Alert is selected system will pop up a warning message on screen In Notification each system events can...

Страница 41: ... using detected information Use G Sensor Enable or Disable to use G Sensor Sensitivity Setup the sensitivity of G Sensor There are five level of Sensitivity Record Associate with G Sensor select the camera that you will record Alarm Associate with G Sensor select the Alarm that you will output Notification Associate with G Sensor select the Address that you will send ...

Страница 42: ...Once desired settings are completed press OK to begin playback Go to Beginning Move to the very first recorded data Go to End Move to the latest recorded data 3 2 Calendar Search Calendar Search provides easy graphical search by displaying numbers dates Dates with recorded data will be highlighted Once you select the date it will display record time table below The numbers on the top of the table ...

Страница 43: ...plays every events related to Emergency Recording G Sensor System displays every events related to G Sensor Once find specific list of event move up and down button to highlight the log and press it to playback the event data 3 4 Text In Search Text In Search provides easy search by transactions Search for Time and Transaction information Press Search for detail information Text In Model Select a ...

Страница 44: ... file to playback it on DVR 3 6 Playback Control R Play Reverse Playback Step Backward Go to the previous image Pause Freeze or Stop current image Step Forward Go to the next image Play Play the data at normal speed To control the backward and forward playback speed press on or repeatedly Playback speed can increase up to x32 ...

Страница 45: ...ckup The files saved backup in DVDMediaPlayer exe format allows multi camera backup and the files would not require any specific codec for playback on PC To open and play a file saved in DVDMediaPlayer exe double click the file and it will automatically be played on Internet Explore window This fuction is supported only on Internet Explorer 7 0 or above Note The backup process could be slowdown if...

Страница 46: ...data backup is being processed It may cause critical damage to either the media or system if the backup media is removed during the backup process Note Playback speed will be slower than usual while instant back up is processing 4 3 Clip Maker Clip Maker allows to create single channel backup file which can be played on PC Select Clip Maker option on the pop up menu during the live or pause mode o...

Страница 47: ...nce the user level is selected as the default password is none Live Click the image to enter the live mode Playback Click the image to enter the playback mode Connect Disconnect Click button to connect a site as live or playback mode Playback Control Use buttons to control playback images Stop Move by Image Play Rewind Forward and Move to First End Display Mode Select display modes single screen 4...

Страница 48: ...ct audio volume and mute options Select a camera to receive Audio of the selected camera highlighted in border lines Full Screen Display image on full screen mode Close Click the icon to close the software The below options are only selectable under playback mode Calendar Search Search data on a graphic calendar and time table Event Search Search data using recorded event logs Text In Search Searc...

Страница 49: ...pecific port to be set for the software Description Enter the description of the site Auto Login If do not want the Log In window to be popped up every time starting the remote S W check Auto Login to skip User Password authentication process User Select the type of user from the list Password Enter the password of DVR Layout Select desired display layout for the site when it is connected Note Lay...

Страница 50: ...ent program on PC start searching each other once they are on the same local network The Auto Detecttion menu shows the DVRS detected on the same local network Note This function is only available on local networks No settings are required if both DVR and PC use DHCP But if the Static IPs are used DVR and PC need to have same subnet info and with different static IP addresses ...

Страница 51: ...allows multi site management Up to 64 different cameras and sites can be monitored and managed on one screen Select Favorite tap Click Add button to group multiple sties as one favorite group Enter the group name and description Up to 64 different cameras or sites can be grouped and displayed together Select sites and cameras from the drop down list by clicking button Note Sites should be register...

Страница 52: ... Each camera can be dragged and dropped to arrange independent displays This allows making a display by a group of cameras from the different sites Once the group of cameras from the different sites has been set move Favorite tap to save this new setting as a new Favorite site Note Each camera can be dragged and dropped onto displays only in Sites not Favorites and Auto Detection Note Camera posit...

Страница 53: ...ers Set Preset Save PTZ camera s current location Up to 16 Presets can be saved Move to Preset Move PTZ cam based on the preset settings 1 4 2 DVR Status tap shows Video Loss Motion Detection Sensor Detection status of currently connected remote site User can activate a remote alarm on DVR Status options Reload Refresh the latest DVR status info Reset Alarms Turn off activated Alarms on the DVR ...

Страница 54: ... info TEXT IN tap is activated under playback mode only 1 4 4 GPS GPS is for Mobile DVR tracking under playback mode GPS data is recorded with images using built in GPS on Mobile DVR This data will be displayed on Google Map under playback mode ...

Страница 55: ...ll appear when the specific time is selected on the time bar Use below buttons to control the playback image Playback Control Button Beginning Reverse Play Rewind Step Backward Stop Step Forward Play Fast Forward End Go To Time Click on icon to display time search window Enter specific time to search the data Click on icon refresh and update the calendar info Calendar Search Fold Calendar Search P...

Страница 56: ...tton to retrieve the search results Select an event from the list for playback Search trough the list using buttons Select the date of event search for from the Date list Select All or specific camera numbers for related event search Type of events can be selected from the list for detail and effective search Event Search Fold Event Search Panel ...

Страница 57: ...ottom of the screen to open TEXT IN Search Panel Enter Date and Text and select SEARCH button to retrieve the search results Select an text in event from the list for playback Search trough the list using buttons Text In Search Fold Text In Search Panel ...

Страница 58: ...ect Save button to save the image The Image can be saved in JPEG BMP and PNG format Save as MP4 Select button during the playback and select Save as MP4 to open the window as shown below to save data in MP4 format Enter file name and select Location Select the time period Select Camera number Press Start to create MP4 file ...

Страница 59: ... time period Select Camera number Press Start to create Backup file 3 5 Play Backup Data Backed up data from the local site can be played on the Nemon software Select button during the playback and above window will appear Select the location where the data is saved Select the file and click Connection to play the video Note Recorded Audio can be played on single screen only ...

Страница 60: ...ave the HDD connected to PC using a SATA to USB connector cable Make sure the HDD is connected to PC properly Select button during the playback Click Storage tap to display HDD information if HDD is not shown please click Reload button to refresh the list Double click the list or highlight and click Connection button ...

Страница 61: ...n Secondary Monitor Select the secondary monitor when using multi monitors on PC Reconnect Automatically Set auto reconnection on Live if the connections is ended by any chances Load Load saved data for settings for remote software Save as Save current settings of remote software Default Set default settings of remote software Log Displays the history of S W usage ...

Страница 62: ...display on the client S W Please do not select this option as it may cause improper live image display Some PC graphic card does not support and comparable with Video Acceleration option Note There are some graphic cards do not support such functions In this case unselect the option as it might result in abnormal system operation Language Select language option for the remote software Date Time Fo...

Страница 63: ... sequence mode and sequential sites from registered individual or Favorite sites Click the site and select button to add the site into the sequencing list button will move the all sites to into the sequencing list Sequence Duration Set sequence interval time ...

Страница 64: ...63 Click on User tap to enter user setup menu Register Nemon Software users Each user needs to use the password they set in registration when they log in Select Add to start new user registration ...

Страница 65: ...ect a DVR for setup and select Connection button Setup menu will appear as show below once it is connected Note The remote software provides interactive setup system that allows easy local DVR settings from remote sites It gets exactly same menu and options as the local system ...

Страница 66: ... Remote Setup to enter remote setup menu Select Information under System Click Upgrade next to S W version to find a file for upgrade Select the file location and the file to upgrade the system Note Please do not close down Nemon S W or power off a computer until the system upgrade is completed ...

Страница 67: ...Nemon Callback2 Nemon Callback icon will be displayed on the bottom right of Window once the program starts Callback message will be displayed notified as shown above Click Nemon Callback icon to display main window of Callback as shown below ...

Страница 68: ...ay log search window as shown below Up to 100 000 log can be saved 1 000 log lists will be displayed per search Click More button to display next 1 000 logs Click Export button to save searched logs in either txt or csv format Setup Click Setup button to set a port for Callback Check Run Callback at Startup of the System box to start Callback program automatically with Window ...

Страница 69: ...nected to DVR Enter ID PW and Port information and select Live or Playback mode to display desired remote control option Please install Active X when Internet Explore displays Active X installation message Remote Monitoring Remote Playback Please refer to the remote program Nemon manual if further instructions on the control option are needed Note Web is supported only on Internet Explorer 7 0 or ...

Страница 70: ... the Diagram and follow this instruction For example If you connect 3 DVRs through local Network 1 Domain Name Creation Go to http www dvr ddns com Click Sign up to make the Account ROUTER DVR 1 DVR 2 DVR 3 EXTERNAL USER Public IP 203 208 1 150 Private IP 192 168 1 1 IP 192 168 1 10 PORT 10101 10103 IP 192 168 1 11 PORT 10104 10106 IP 192 168 1 12 PORT 10107 10109 ...

Страница 71: ...ll out the registration information as below Click Submit to make the account Enter your domain name and click Request Domain to create the domain name You can see the registered dome name dvr1 dvr ddns com ...

Страница 72: ...rer to connect the homepage for the Router Go to Port Forwarding Menu The picture below is for particular Router Please insert the IP address and Port number for DVR in the Port Forward menu The Port number which you insert at this point make it possible to distinguish each of DVRs Specify the WEB port number to access the DVR with Internet Explorer Default port number is 80 ...

Страница 73: ...ons accordingly The system should be allocated with individual IP address Make sure the ports for DVR are all set accordingly or set network ports according to DVR port settings DDNS can be used once the system is registered on DDNS server ID and PW are required for the registered server authentication ...

Страница 74: ... DIGITAL APPARATUS MEETS ALL REQUIREMENTS OF THE CANADIAN INTERFERENCE CAUSING EQUIPMENT REGULATIONS WEEE Waste Electrical Electronic Equipment Correct Disposal of This Product Applicable in the European Union and other European countries with separate collection systems This marking shown on the product or its literature indicates that it should not be disposed with other household wastes at the ...

Отзывы: