background image

71

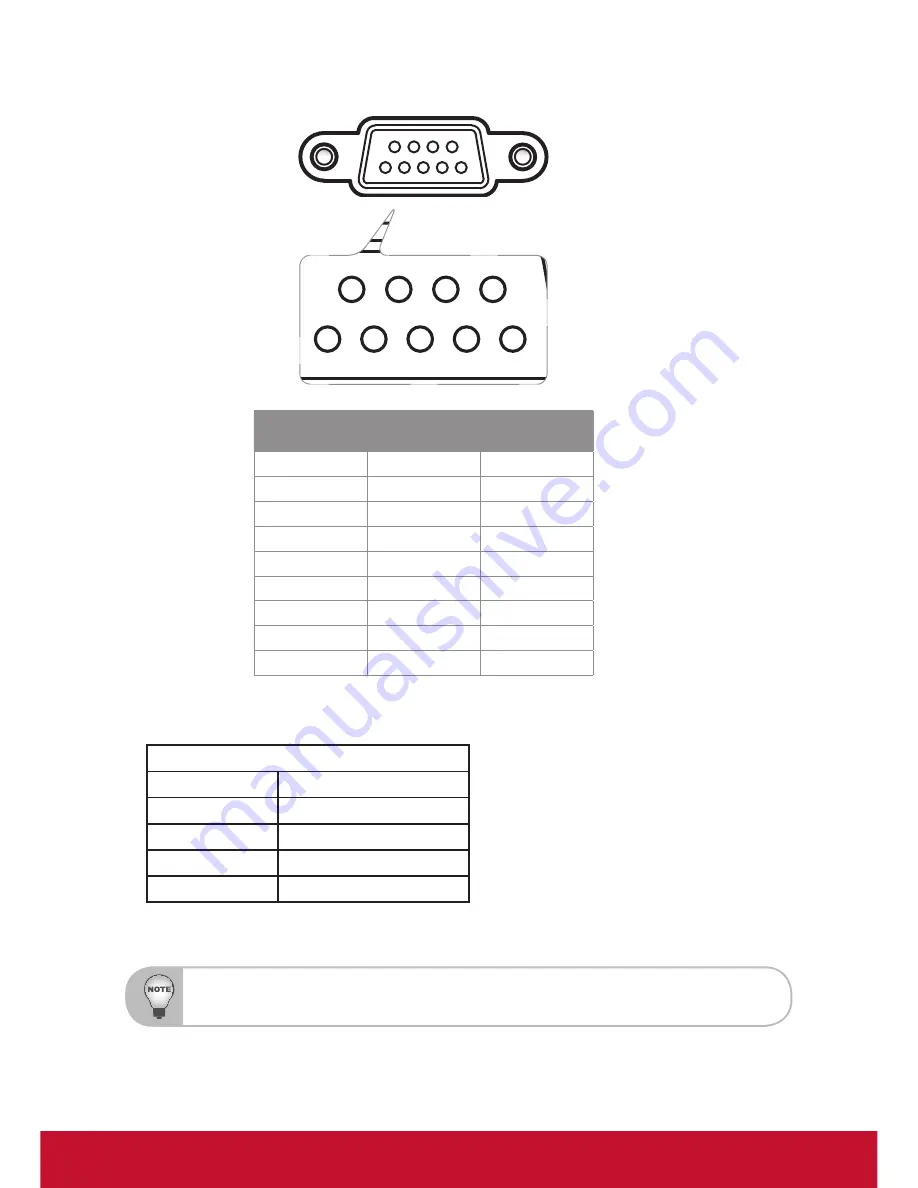
RS232 Pin Assignments

Pin No.

PC Side

Projector Side 

(RS232 Terminal)

1

N/A

N/A

2

RXD

RXD

3

TXD

TXD

4

N/A

N/A

5

GND

GND

6

N/A

N/A

7

N/A

N/A

8

N/A

N/A

9

N/A

N/A

Setup Information

RS-232 protocol

Baud Rate

9600 bps (default)

Data Length

8 bit

Parity Check

None

Stop Bit

1 bit

Flow Control

None

1

2

3

4

5

6

7

8

9


RS232 shell is grounded.


RS232 interface need use swap pin for RS232 communication.

Содержание Pro10 Series

Страница 1: ...ct for future service Warranty information contained in this User Guide will describe your limited coverage from ViewSonic Corporation which is also found on our web site at http www viewsonic com in English or in specific languages using the Regional selection box in the upper right corner of our website Antes de operar su equipo lea cu idadosamente las instrucciones en este manual Model No VS151...

Страница 2: ...B 3 A CE Conformity for European Countries The device complies with the EMC Directive 2004 108 EC and Low Voltage Directive 2006 95 EC Warning This product must not be used in residential areas This product may cause interference if used in residential areas Such use must be avoided unless the user takes special measures to reduce electromagnetic emissions to prevent interference to the reception ...

Страница 3: ...nsult an electrician for replacement of the obsolete outlet 10 Protect the power cord from being walked on or pinched particularly at plugs Convenience receptacles and the point where they exit from the unit Be sure that the power outlet is located near the unit so that it is easily accessible 11 Only use attachments accessories specified by the manufacturer 12 Use only with the cart stand tripod ...

Страница 4: ...der the Annex III of the RoHS2 Directives as noted below Examples of exempted components are 1 Mercury in cold cathode fluorescent lamps and external electrode fluorescent lamps CCFL and EEFL for special purposes not exceeding per lamp 1 Short length 500 mm maximum 3 5 mg per lamp 2 Medium length 500 mm and 1 500 mm maximum 5 mg per lamp 3 Long length 1 500 mm maximum 13 mg per lamp 2 Lead in glas...

Страница 5: ...eceive additional product information as it becomes available please visit your region section on ViewSonic s website to register your product online The ViewSonic CD also provides an opportunity for you to print the product registration form Upon completion please mail or fax to a respective ViewSonic office To find your registration form use the directory CD Registration Registering your product...

Страница 6: ... please contact your sales dealer This projector is equipped with a grounding type AC line plug Please ensure that your outlet fits the plug Do not defeat the safety purpose of this grounding type plug We highly recommend using a video source device also equipped with a grounding type AC line plug to prevent signal interference due to voltage fluctuations Ground Ground Ground Ground For Australia ...

Страница 7: ...ssages Warning Reset the Lamp Reset function from the on screen display OPTIONS Lamp Settings menu after replacing the lamp module refer to page 56 Warning When switching the projector off please ensure the cooling cycle has been completed before disconnecting power Allow 60 seconds for the projector to cool down Warning Do not use lens cap when projector is in operation Warning When the lamp is a...

Страница 8: ...a long period of time Do not y y Block the slots and openings on the unit provided for ventilation y y Use abrasive cleaners waxes or solvents to clean the unit y y Use under the following conditions In extremely hot cold or humid environments Ensure that the ambient room temperature is within 5 C 40 C Relative humidity is 10 85 In areas susceptible to excessive dust and dirt Near any appliance ge...

Страница 9: ...tion 79 Specifications 80 Customer Support 82 Limited Warranty 83 Mexico Limited Warranty 85 Precautions vi Introduction 9 Product Features 9 Package Overview 10 Product Overview 11 Main Unit 11 Control Panel 12 Connection Ports 13 Remote Control 14 Installation 16 Installing the Projector Lens 16 Connecting to Computer Notebook 17 Connecting to Video Sources 18 Powering On Off the Projector 19 Po...

Страница 10: ...UXGA 60Hz Reduced Blanking and UXGA 60Hz Single lamp system Power Zoom Focus Power lens shift Dynamic Aperture 10W x 1 speaker Filter module Support PIP POP function Support network management for remote control and monitoring Introduction Product Features ...

Страница 11: ...o different applications in each Country some regions may have different accessories VGA Cable Remote Control AA AA Pattern VGA BNC Sync Standby HDMI DVI Source Video S Video Blank Vol Vol Exit Mute Menu Memory Focus Shift Zoom Lamp PW Mode RGB Gain PIP Blend Geo MyButton Aspect Keystone RC ID Reset 1 2 3 4 5 6 7 8 9 0 LENS Power On AA Batteries x 2 For remote control Plug for wired remote at proj...

Страница 12: ...ent 7 Kensington Lock 8 Security Bar 9 Power Switch 10 Power Connector Front View Rear View 5 1 4 11 Do not block projector in out air vents and keep 30cm clearance around vents for air flow concern 6 8 7 9 12 13 14 10 11 Connector Panel 12 Inlet Vent Filter 13 Audio Vent 14 Keypad Panel Min 30cm Min 30cm Min 30cm ...

Страница 13: ...Panel 1 Power key Power LED 2 Menu key 3 Enter key 4 Exit key 5 Shift key 6 Sync key 7 Focus key 8 Zoom key 9 Source key 10 Information key 11 Four directional select keys Source Sync Shift 11 9 8 4 10 2 6 5 7 3 1 ...

Страница 14: ...5 Wired Remote Input Connector 6 12V Trigger Relay Connector 7 RJ45 Network Connector 8 S Video Input Connector 9 VGA Input Connector 10 VGA Output Connector 11 Audio Input Connector 12 Audio Output Connector 13 RS232 Connector 9 pin DIN Type Connection Ports 3 2 1 6 4 5 7 9 10 11 13 12 8 ...

Страница 15: ...urce 6 Blank Switch to a blank screen 7 Four Directional Select Keys Press up down left right direction buttons to select items or make adjustments 8 Exit Exit a menu 9 Menu Launch the OSD main menu 10 Focus Adjust the lens focus 11 Lamp PW Adjust lamp power 12 PIP Launch the Picture in Picture function 13 MyButton Launch a user defined setting 14 RC ID Set the remote control ID 15 Reset Reset the...

Страница 16: ...t 27 RGB Gain Enter the color management setting page 28 Mode Select the display mode Presentation Bright Movie sRGB DICOM SIM and User 29 Geo Enable Geo tag information 30 Blend Adjust display blend function 31 Keystone Adjust image distortion caused by tilting the projector 32 Aspect Adjust the aspect ratio of the projected screen 33 Information i Display the projector information 34 Numeric Key...

Страница 17: ...r and push the lens into position 3 4 Lens assembled by clockwise rotation 4 5 Lens ring cover assembled by clockwise rotation 5 Warning Do not transport the projector with any lens installed 1 2 3 4 5 Before installing or replacing the lens switch off the power of the projector Avoid using the remote control or projector keypad button to adjust the lens shift or zoom focus while the lens is being...

Страница 18: ...ifference in applications for each country some regions may have different accessories Plug for 12V DC jack Plug ID Φ 1 7mm OD Φ 4 0mm R Monitor Computer Notebook Power socket 1 7 3 2 4 5 12V Output 8 6 9 Plug for wired remote at projector side Power Signal Ground Φ 3 5mm phone jack Plug for wired remote at remote control side Power Signal Ground Φ 2 5mm phone jack ...

Страница 19: ...ble 3 BNC Cable 4 HDMI Cable 5 Audio Cable 6 Power Cord R DVD player Set top box HDTV receiver S Video output DVD player Audio output 1 5 3 4 2 6 Power socket DVD player Due to the difference in applications for each country some regions may have different accessories ...

Страница 20: ...nt to display on the screen computer notebook video player etc The projector will detect the source automatically If not push the menu button and go to OPTIONS Make sure that Auto Source has been set to Off If you connect multiple sources at the same time press the direct source buttons on the control panel or on the remote control to switch between inputs Powering On Off the Projector 1 Source Sy...

Страница 21: ...jector has entered standby mode If you wish to turn the projector back on you must wait until the projector has completed the cooling cycle and has entered standby mode Once in standby mode simply press the button either on the control panel of the projector or on the remote control to restart the projector 2 3 Power off the switch 3 4 Disconnect the power cord from the electrical outlet and from ...

Страница 22: ...and the FILTER LED indicator flashes red This indicates that the filter needs replacement y y FILTER LED indicator flashes red This indicates that the filter needs to be cleaned Unplug the power cord from the projector wait for 30 seconds and try again If the warning indicator light up again please contact your nearest service center for assistance LED Lighting Message Message Power LED Lamp LED T...

Страница 23: ...eet for adjusting the image height 1 Locate the adjustable foot you wish to modify on the underside of the projector 2 Rotate the adjustable ring clockwise to raise the projector or counter clockwise to lower it Repeat with the remaining feet as needed Adjusting the Projected Image 1 2 ...

Страница 24: ...ection Lens LEN 008 LEN 009 LEN 010 Wide Zoom Standard Long Zoom Throw Ratio 0 99 1 26 1 26 1 58 1 58 3 00 Zoom Ratio 1 28X 1 25X 1 9X Throw Distance 1 01 7 68m 1 28 9 63m 1 61 18 29m Projection screen size Projection distance m Throw Ratio 0 99 1 26 1 26 1 58 1 58 3 00 Diagonal inch Height m Width m Min m Max m Min m Max m Min m Max m 50 0 76 1 02 1 01 1 28 1 28 1 61 1 61 3 05 60 0 91 1 22 1 21 1...

Страница 25: ...WXGA 16 10 DMD 0 65 Projection Lens LEN 008 LEN 009 LEN 010 Wide Zoom Standard Long Zoom Throw Ratio 1 00 1 28 1 28 1 61 1 60 3 07 Zoom Ratio 1 28X 1 25X 1 9X Throw Distance 1 08 8 27m 1 38 10 40m 1 72 19 84m Projection screen size Projection distance m Throw Ratio 1 00 1 28 1 28 1 61 1 60 3 07 Diagonal inch Height m Width m Min m Max m Min m Max m Min m Max m 50 0 67 1 08 1 08 1 38 1 38 1 73 1 72...

Страница 26: ... 5 86 11 24 180 2 42 3 88 3 88 4 96 4 96 6 24 6 20 11 90 190 2 56 4 09 4 09 5 24 5 24 6 59 6 55 12 56 200 2 69 4 31 4 31 5 51 5 51 6 94 6 89 13 23 250 3 37 5 38 5 38 6 89 6 89 8 67 8 62 16 53 300 4 04 6 46 6 46 8 27 8 27 10 40 10 34 19 84 ...

Страница 27: ...tem Four Directional Select Keys 1 Use to select items or make adjustments to your selection 2 act as short hot keys for Keystone adjustment Sync Synchronize the projector with the input source Source Select an input signal Shift Adjust the lens shift up down left right Focus Adjust the lens focus function Zoom Adjust the lens zoom function Information Display the projector s information ...

Страница 28: ...ain menu While making a selection on a particular page press Enter key to enter sub menu 3 Use keys to select the desired item in the sub menu and then press Enter key to view further settings Adjust the settings by key 4 Select the next item to be adjusted in the sub menu and adjust as described above 5 Press Enter to confirm and the screen will return to the main menu 6 To exit press Menu again ...

Страница 29: ... DynamicBlack On Off Color Temp Warm Medium Cool Color Space Auto RGB YUV Color Settings Red Gain Green Gain Blue Gain Red Bias Green Bias Blue Bias Reset Exit Input Source HDMI DVI VGA BNC S Video Video Exit Exit SCREEN Aspect for XGA 4 3 16 9 Native Auto Aspect for WXGA 4 3 16 10 Native Auto Zoom Overscan H Image Shift V Image Shift Geometry PC Mode Off On Warp Off On Keystone Horizontal Vertica...

Страница 30: ...rwegian Exit Projection Front Desktop Rear Desktop Front Ceiling Rear Ceiling Menu Location Top Left Top Right Center Bottom Left Bottom Right Lens Function Zoom Lock Unlock Focus Lock Unlock Lens Shift Lock Unlock Lens Position Set 1 Set 2 Set 3 Lens Calibration Yes No Exit Security Security Timer Month Day Hour Exit Change Password Security On Off Exit Signal RGB Frequency Phase H Position V Pos...

Страница 31: ...osed Captioning CC1 CC2 CC3 CC4 Off Exit Network Network State DHCP IP Address Subnet Mask Gateway DNS Apply Control System IP Address Control System IP ID Control System Port Exit Image Blending Blending On Off Crop On Off Overlap Left Start Left End Right Start Right End Up Start Up End Down Start Down End Bright Adj Overlap Non Overlap Gamma 1 8 2 0 2 2 2 6 ...

Страница 32: ...eminder On Off Lamp Mode Normal ECO Power Lamp Reset Yes No Exit Remote Settings My Button BrilliantColor Gamma DynamicBlack Color Temp Projection Projector ID HDMI Cable Top IR Function On Off Front IR Function On Off Remote Code Exit 12V Trigger On Off Advanced Direct Power On On Off Auto Power Off Sleep Timer Standby Mode LAN On LAN Off Baudrate 9600 19200 38400 Exit HDMI Cable Normal Long Shor...

Страница 33: ...OM IMPORTANT This mode should NEVER be used for medical diagnosis it is for education training purposes only User User s settings Wall Color Select a similar preset color of the colored wall in order to correct the color of the projected image as if it is projected on a white screen Available options White Light Yellow Light Blue Pink Dark Green Brightness Adjust the brightness of the image Press ...

Страница 34: ...Press the button to decrease the sharpness Press the button to increase the sharpness Saturation Adjust a video image from black and white to fully saturated color Press the button to decrease the color saturation in the image Press the to increase the color saturation in the image Tint Adjust the color balance of red and green Press the button to increase the amount of green in the image Press th...

Страница 35: ...Film for home theater Video for video or TV source Graphics for image source Standard for standardized setting DynamicBlack DynamicBlack enables the projector to automatically optimize the display of dark movie scenes enabling them to be shown in incredible detail Color Temp If set to cold temperature the image looks more blueish cold image If set to warm temperature the image looks more reddish w...

Страница 36: ...Red Gain Green Gain Blue Gain Red Bias Green Bias Blue Bias Use or to Red Green or Blue for brightness Gain and contrast Bias Reset Choose Yes to return the factory default settings for color adjustments Input Source Use this option to enable disable input sources Press to enter the sub menu and select which sources you require Press Enter to finalize the selection The projector will not search fo...

Страница 37: ...the button to reduce the size of an image Press the button to magnify an image on the projection screen Overscan Overscan function removes the noise in a video image Overscan the image to remove video encoding noise on the edge of video source Each I O has different settings of Overscan Overscan and Zoom can t work at same time H Image Shift Shift the projected image position horizontally V Image ...

Страница 38: ... function and control by OSD Keystone This allows you to correct the keystone distortion Horizontal Press the or to adjust the keystone horizontally and make a squarer image Vertical Press the or to adjust the keystone vertically and make a squarer image Resolution Degrees of keystone Correction Horizontal Vertical XGA 40 40 ...

Страница 39: ... correction Reset Return to the default setting 4 Corner This allows you to correct the trapezoidal distortion 4 Corner position adjustments Top Left Bottom Left Top Right Bottom Right and All Maximum is 5 Press the or to adjust x y offset of each corner image Curve This allows you to adjust the curve of point 1 9 ...

Страница 40: ...n This allows you to level the rotated image Rotation Press the or to adjust the angle of image Rotation angles can reach to 90 degree Pin Cushion Barrel Press the or to adjust the pincushion barrel distortion 20 pincushion and barrel distortion correction Reset Return to the default setting ...

Страница 41: ... the PIP screen position on the display screen PIP Size Choose the PIP size from 1 16 1 25 or 1 36 on the display screen PIP POP Source Choose the source to switch PIP POP window source Swap Press to swap the sources of main window and PIP POP window Some source signal combinations may not be compatible with PIP POP function Please refer to the table below PIP POP source Main Source HDMI VGA DVI D...

Страница 42: ...ress Enter to finalize the selection Projection Front Desktop This is the default selection The image is projected straight on the screen Rear Desktop When selected the image will appear reversed Front Ceiling When selected the image will turn upside down Rear Ceiling When selected the image will appear reversed in upside down position ...

Страница 43: ...y screen SETTING Lens Function Focus Adjust focus function on the projected image Zoom Adjust zoom function on the projected image Lens Shift Shift the projected image Lock This function can not be used by user Unlock This function can be used by user Lens Calibration Perform calibration and return lens to the center position ...

Страница 44: ...ssword 1 Press to input old password 2 Use number button to enter current password and then press to confirm 3 Enter new password 4 digits in length using the number buttons on the remote then press to confirm 4 Enter new password again and press to confirm If the incorrect password is entered 3 times the projector will automatically shut down If you have forgotten your password please contact you...

Страница 45: ...y Phase Synchronize the signal timing of the display with the graphic card If the image appears to be unstable or flickers use this function to correct it H Position Press the to move the image left Press the to move the image right V Position Press the to move the image down Press the to move the image up Automatic Automatically detects the signal If you use this function the phase frequency item...

Страница 46: ...inputting S Video or Video signals Saturation Adjust a video image from black and white to fully saturated color Press the to decrease the amount of saturation in the image Press the to increase the amount of saturation in the image IRE Adjust measurement of composite video signals IRE is only supported on NTSC signal Projector ID ID definition can be set up by menu range 0 99 to indicate an indiv...

Страница 47: ...tings Internal Speaker Choose the On or Off to turn on or off the internal speaker Mute Choose the On to turn mute on Choose the Off to turn mute off Volume Press the to decrease the volume Press the to increase the volume ...

Страница 48: ...een User Use stored picture from Logo Capture function Logo Capture Press to capture an image of the picture currently displayed on screen Closed Captioning If changes are made they will take effect the next time the projector is powered on Off select off to turn off the closed captioning feature CC1 CC1 language American English CC2 CC3 CC4 CC2 CC3 CC4 language depending on the TV channel of the ...

Страница 49: ...xternal DHCP server automatically When making a connection in the local area network 1 Connect the computer and the projector to your network 2 Press the menu key in the remote controller 3 Select Setting Network DHCP as following 4 DHCP mode selects On If IP Address is 0 0 0 0 please check the connection and try again If still can not get the IP Address please contact your network administrator O...

Страница 50: ...hen choose Yes to apply the selection All of the new settings of the non DHCP mode shall be triggered by Yes Control System IP Address Select an IP address for Crestron Control System Control System IP ID Select an IP ID for Crestron Control System Control System Port Select a connection port for Crestron Control System ...

Страница 51: ...can add delete or edit room information contact information and events which are logged automatically by the software for all users Operation UI as following image Crestron RoomView function support is dependent on models 1 Main Screen 2 Edit Room On the Edit Room page enter the IP Address or hostname as shown on the projector s on screen display OSD menu and 02 for IPID 41794 for the reserved Cre...

Страница 52: ...Attribute 4 Edit Event For more information please visit http www crestron com www crestron com getroomview Network supports Crestron Room View AMX Device Discovery Beacon Validation Tool PJLink and RS232 control ...

Страница 53: ...he Off to turn blending off Crop Choose the On to turn crop on Choose the Off to turn crop off Overlap This allows you to set the overlap edge of blending area Bright Adj This allows you to adjust the brightness of the blending area Gamma This allows you to select the gamma mode ...

Страница 54: ...e When On is selected the fans will spin faster This feature is useful in high altitude areas where the air is thin Status Hide On Choose On to hide the info message Off Choose Off to show the searching message Keypad Lock When the keypad lock function is On the control panel will be locked however the projector can be operated by the remote control By selecting Off you will be able to reuse the c...

Страница 55: ...trigger provides a standard trigger for motorized screens HDMI Cable Specify the HDMI cable length Available options Normal Long Short Information Display the projector information for source resolution and software version on the screen ...

Страница 56: ...amp Hours Display the projection time Lamp Reminder Choose this function to show or to hide the warning message when the changing lamp message is displayed The message will appear 30 hours before suggested replacement of lamp Lamp Mode Normal Choose Normal to increase the brightness ECO Choose ECO to dim the projector lamp which will lower power consumption and extend the lamp life Power Power imp...

Страница 57: ...IR receiver By selecting Off you will be able to use the control panel keys or operate by the remote control from front IR receiver Front IR Function When this function is On the projector can be operated by the remote control from front IR receiver By selecting Off you will be able to use the control panel keys or operate by the remote control from top IR receiver Remote Code Set remote code of t...

Страница 58: ...ector will automatically power off when the countdown has finished in minutes Sleep Timer Sets the countdown timer interval The countdown timer will start with or without a signal being sent to the projector The projector will automatically power off when the countdown has finished in minutes Standby Mode LAN On Choose LAN On when you control the projector via the LAN terminal during power standby...

Страница 59: ...he remote control If you are using a PC For Windows 95 98 2000 XP Windows 7 1 Open the My Computer icon the Control Panel folder and then double click on the Display icon 2 Select the Settings tab 3 Verify that your display resolution setting is lower than or equal to UXGA 1600 x 1200 4 Click on the Advanced Properties If the projector is still not projecting the whole image you will also need to ...

Страница 60: ...rror display If you experience difficulty changing resolutions or your monitor freezes restart all equipment including the projector The screen of the Notebook or PowerBook computer is not displaying your presentation Some Notebook PCs may deactivate their own screens when a second display device is in use Each has a different way to be reactivated Refer to your computer s documentation for detail...

Страница 61: ...n the OSD If you play 4 3 format DVD titles please change the format to 4 3 in the projector OSD If the image is still stretched you will also need to adjust the aspect ratio by referring to the following Please setup the display format as 16 9 wide aspect ratio type on your DVD player Image is too small or too large Move the projector closer to or further from the screen Press Menu on the control...

Страница 62: ...the projector Make sure there is no obstruction between the remote control and the projector Move to within 12 m 0 of the projector Make sure the batteries are inserted correctly Replace batteries if they are exhausted Ensure that you have set your remote to the correct IR code setting When making a direct connection from your computer to the projector If you have network connection problem from y...

Страница 63: ...connection use the following items click Internet Protocol TCP IP and then click Properties Step 5 Click Use the following IP address and type in as below 1 IP address 192 168 0 101 2 Subnet mask 255 255 255 0 3 Default gateway 192 168 0 254 ...

Страница 64: ...ick Internet Options click the Connections tab and click LAN Setting Step 7 All items in the Local Area Network LAN Setting window must unchecked Then click OK button twice Step 8 Connect a cat5 Ethernet cross over cable between the projector and the computer ...

Страница 65: ...64 On Screen Messages y y Power off confirm y y Lamp error y y Lamp Life warning y y Filter error ...

Страница 66: ...ing If ceiling mounted please use caution when opening the lamp access panel It is recommended to wear safety glasses if changing the bulb when ceiling mounted Caution must be used to prevent any loose parts from falling out of projector Warning Lamp compartment is hot Allow it to cool down before changing lamp Warning To reduce the risk of personal injury do not drop the lamp module or touch the ...

Страница 67: ...crews on the lamp door 1 5 Open and pull up the lamp door 2 6 Unscrew the three screws on the lamp housing 3 7 Pull out the lamp module slowly and carefully 4 To replace the lamp module reverse the previous steps 8 Turn on the projector and use Lamp Reset after the lamp module is replaced Lamp Reset i Press Menu ii Select OPTIONS iii Select Lamp Settings iv Select Lamp Reset v Select Yes 1 2 3 4 ...

Страница 68: ...g the button 2 Allow the projector to cool down for at least 30 minutes 3 Disconnect the power cord 4 Unscrew the four screws on the filter cover and pull out the cover 1 5 Remove the old filter and replace it with the new one 2 6 Attach the filter cover and secure it with the four included screws 2 1 ...

Страница 69: ...00 37 9 60 3 60Hz SVGA 800 x 600 46 9 75 SVGA 800 x 600 48 1 72 2 72Hz SVGA 800 x 600 53 7 85 1 85Hz 832 x 624 75 XGA 1024 x 768 48 4 60 XGA 1024 x 768 56 5 70 1 70Hz XGA 1024 x 768 60 75 XGA 1024 x 768 68 7 85 1152 x 864 75 HD720 1280 x 720 50 HD720 1280 x 720 60 WXGA 1280 x 768 47 4 60 WXGA 1280 x 768 75 WXGA 1280 x 768 85 WXGA 800 1280 x 800 60 SXGA 1280 x 1024 64 60 SXGA 1280 x 1024 80 75 SXGA...

Страница 70: ...720 x 480i 60 720 x 480p 60 Computer Compatibility for MAC Resolution Refresh Rate Hz Macbook compatibility Macbook Pro Intel compatibility Power Mac G5 compatibility Power Mac G4 compatibility Digital Analog Digital Analog Digital Analog Digital Analog 800x600 60 800x600 72 800x600 75 800x600 85 1024x768 60 1024x768 70 1024x768 75 1024x768 85 1280x720 60 1280x768 60 1280x768 75 1280x768 85 1280x8...

Страница 71: ...wer 9A 65 Source 40 bf PIP 9B 64 VGA PC 41 be Blend Image blending 9C 63 Video 52 ad GEO Geometry 9D 62 S Video 53 AC Blank 07 f8 Remote operation 1 Under below conditions the remote will enter sleep mode after 60 seconds a No button pressed b Multi keys pressed simultaneously c One key pressed continuously over 60 seconds 2 Remote ID switching Press RC ID key for 3 seconds to enter switching mode...

Страница 72: ...D TXD 4 N A N A 5 GND GND 6 N A N A 7 N A N A 8 N A N A 9 N A N A Setup Information RS 232 protocol Baud Rate 9600 bps default Data Length 8 bit Parity Check None Stop Bit 1 bit Flow Control None 1 2 3 4 5 6 7 8 9 RS232 shell is grounded RS232 interface need use swap pin for RS232 communication ...

Страница 73: ...00 0x04 0x00 0x34 0x11 0x03 0x01 0x61 Off Off 0x06 0x14 0x00 0x04 0x00 0x34 0x11 0x03 0x00 0x60 Status Read 0x07 0x14 0x00 0x05 0x00 0x34 0x00 0x00 0x11 0x03 0x61 Gamma Film 0x06 0x14 0x00 0x04 0x00 0x34 0x11 0x05 0x00 0x62 Film Curve 0x06 0x14 0x00 0x04 0x00 0x34 0x12 0x45 0x00 0xA3 Film Curve 0x06 0x14 0x00 0x04 0x00 0x34 0x12 0x45 0x01 0xA4 Film Curve Type Read 0x07 0x14 0x00 0x05 0x00 0x34 0x0...

Страница 74: ...0 0x04 0x00 0x34 0x11 0x09 0x03 0x69 8 0x06 0x14 0x00 0x04 0x00 0x34 0x11 0x09 0x04 0x6A 10 0x06 0x14 0x00 0x04 0x00 0x34 0x11 0x09 0x05 0x6B H Image Shift Write 0x06 0x14 0x00 0x04 0x00 0x34 0x11 0x08 0x21 0x86 H Image Shift Write 0x06 0x14 0x00 0x04 0x00 0x34 0x11 0x08 0x20 0x85 H Image Read 0x07 0x14 0x00 0x05 0x00 0x34 0x00 0x00 0x13 0x08 0x68 H Image V Image Shift Write 0x06 0x14 0x00 0x04 0x...

Страница 75: ...x01 0x0A Point 8 0x06 0x14 0x00 0x04 0x00 0x34 0x11 0xAC 0x00 0x09 Point 8 Read 0x07 0x14 0x00 0x05 0x00 0x34 0x00 0x00 0x13 0xAC 0x0C Point 9 0x06 0x14 0x00 0x04 0x00 0x34 0x11 0xAD 0x01 0x0B Point 9 0x06 0x14 0x00 0x04 0x00 0x34 0x11 0xAD 0x00 0x0A Point 9 Read 0x07 0x14 0x00 0x05 0x00 0x34 0x00 0x00 0x13 0xAD 0x0D Reset 0x06 0x14 0x00 0x04 0x00 0x34 0x13 0xAE 0x00 0x0D Rotation Rotation Status ...

Страница 76: ...01 0xB3 Read 0x07 0x14 0x00 0x05 0x00 0x34 0x00 0x00 0x12 0x59 0xB8 Zoom 0x06 0x14 0x00 0x04 0x00 0x34 0x12 0x59 0x01 0xB8 Zoom 0x06 0x14 0x00 0x04 0x00 0x34 0x12 0x59 0x00 0xB7 Focus Lock Lock 0x06 0x14 0x00 0x04 0x00 0x34 0x12 0x55 0x00 0xB3 Unlock Unlock 0x06 0x14 0x00 0x04 0x00 0x34 0x12 0x55 0x01 0xB4 Read 0x07 0x14 0x00 0x05 0x00 0x34 0x00 0x00 0x12 0x5A 0xB9 Focus 0x06 0x14 0x00 0x04 0x00 0...

Страница 77: ... 0x00 0x05 0x00 0x34 0x00 0x00 0x12 0x33 0x92 IRE 0 0x06 0x14 0x00 0x04 0x00 0x34 0x13 0x34 0x00 0x93 7 5 0x06 0x14 0x00 0x04 0x00 0x34 0x13 0x34 0x01 0x94 Read 0x07 0x14 0x00 0x05 0x00 0x34 0x00 0x00 0x12 0x34 0x93 Exit 0x02 0x14 0x00 0x04 0x00 0x34 0x02 0x04 0x0A 0x5C Projector No Projector ID 0x06 0x14 0x00 0x04 0x00 0x34 0x12 0x38 0x00 0x96 Projector ID 0x06 0x14 0x00 0x04 0x00 0x34 0x12 0x38 ...

Страница 78: ...10 0x6E Read Power value 0x07 0x14 0x00 0x05 0x00 0x34 0x00 0x00 0x12 0x2A 0x89 Lamp Reset Yes No 0x06 0x14 0x00 0x04 0x00 0x34 0x15 0x01 0x00 0x62 Exit 0x02 0x14 0x00 0x04 0x00 0x34 0x02 0x04 0x0A 0x5C Remote Settings Top IR Function On Off Top IR OFF 0x06 0x14 0x00 0x04 0x00 0x34 0x13 0x51 0x00 0xB0 Top IR ON 0x06 0x14 0x00 0x04 0x00 0x34 0x13 0x51 0x01 0xB1 Read 0x07 0x14 0x00 0x05 0x00 0x34 0x...

Страница 79: ...0x00 0x34 0x00 0x00 0x0C 0x37 0x90 Information Write 0x06 0x14 0x00 0x04 0x00 0x34 0x20 0x01 0x00 0x6D Reset Yes No No 0x06 0x14 0x00 0x04 0x00 0x34 0x11 0x02 0x00 0x5F 0x06 0x14 0x00 0x04 0x00 0x34 0x11 0x02 0x00 0x5F Additional commands Not in OSD Main Menu Sub Menu Sub Menu 2 Sub Menu 3 Sub Menu 4 Value RS232 Command Power Turn On 0x06 0x14 0x00 0x04 0x00 0x34 0x11 0x00 0x00 0x5D Turn Off 0x06 ...

Страница 80: ... the screws which are used to attach a mount to the projector meet the following specifications y y Screw type M6 x 4 Please note that damage resulting from incorrect installation will invalidate the warranty Ceiling Mount Installation 452 80 212 00 160 00 95 00 241 20 ...

Страница 81: ... 720p 50 60Hz 1080i p 50 60Hz 1080p 24 25 30 50 60Hz SDTV 480i p 576i p Horizontal scan rate 15 k 100 kHz Vertical scan rate 24 87Hz Keystone correction V 20 degrees H 20 degrees optional warping board Weight Net weight w o lens 13 9 kg Weight with package w o lens 17 3 kg Dimensions W x D x H 453mm W x 390mm D x 212mm H without lens with elevators 17 83 W x 15 35 D x 8 34 H Power supply 100 240VA...

Страница 82: ...1 y y Audio output x 1 y y RS232 x 1 y y 12V Trigger x 1 y y RJ45 x 1 y y Wired remote port In x 1 Standard package contents y y AC power cord x 1 y y VGA cable x 1 y y Remote control with batteries x 1 y y User Manual CD x 1 y y Lens mount cover x 1 y y Quick Setup Card x 1 y y Warranty Card x 1 China only Design and specifications are subject to change without prior notice ...

Страница 83: ...a Columbia www viewsonic com la T 01800 9 157235 soporte viewsonic com Latin America Mexico www viewsonic com la T 001 8882328722 soporte viewsonic com Renta y Datos 29 SUR 721 COL LA PAZ 72160 PUEBLA PUE Tel 01 222 891 55 77 CON 10 LINEAS Electroser Av Reforma No 403Gx39 y 41 97000 Mérida Yucatán Tel 01 999 925 19 16 Other places please refer to http www viewsonic com la soporte index htm Mexico ...

Страница 84: ...g the lamp one 1 year for labor and ninety 90 days for the original lamp from the date of the first consumer purchase Other regions or countries Please check with your local dealer or local ViewSonic office for the warranty information Lamp warranty subject to terms and conditions verification and approval Applies to manufacturer s installed lamp only All accessory lamps purchased separately are w...

Страница 85: ...amages based upon inconvenience loss of use of the product loss of time loss of profits loss of business opportunity loss of goodwill interference with business relationships or other commercial loss even if advised of the possibility of such damages 2 Any other damages whether incidental consequential or otherwise 3 Any claim against the customer by any other party Effect of local law This warran...

Страница 86: ... service charges How to get service For information about receiving service under warranty contact ViewSonic Customer Support Please refer to the attached Customer Support page You will need to provide your product s serial number so please record the product information in the space provided below on your purchase for your future use Please retain your receipt of proof of purchase to support your...

Страница 87: ...globales com Cuernavaca Compusupport de Cuernavaca SA de CV Francisco Leyva 178 Col Miguel Hidalgo C P 62040 Cuernavaca Morelos Tel 01 777 3180579 01 777 3124014 E Mail aquevedo compusupportcva com Distrito Federal QPLUS S A de C V Av Coyoacán 931 Col Del Valle 03100 México D F Tel 01 52 55 50 00 27 35 E Mail gacosta qplus com mx Guadalajara Jal SERVICRECE S A de C V Av Niños Héroes 2281 Col Arcos...

Страница 88: ......

Отзывы: