background image

Quick Installation

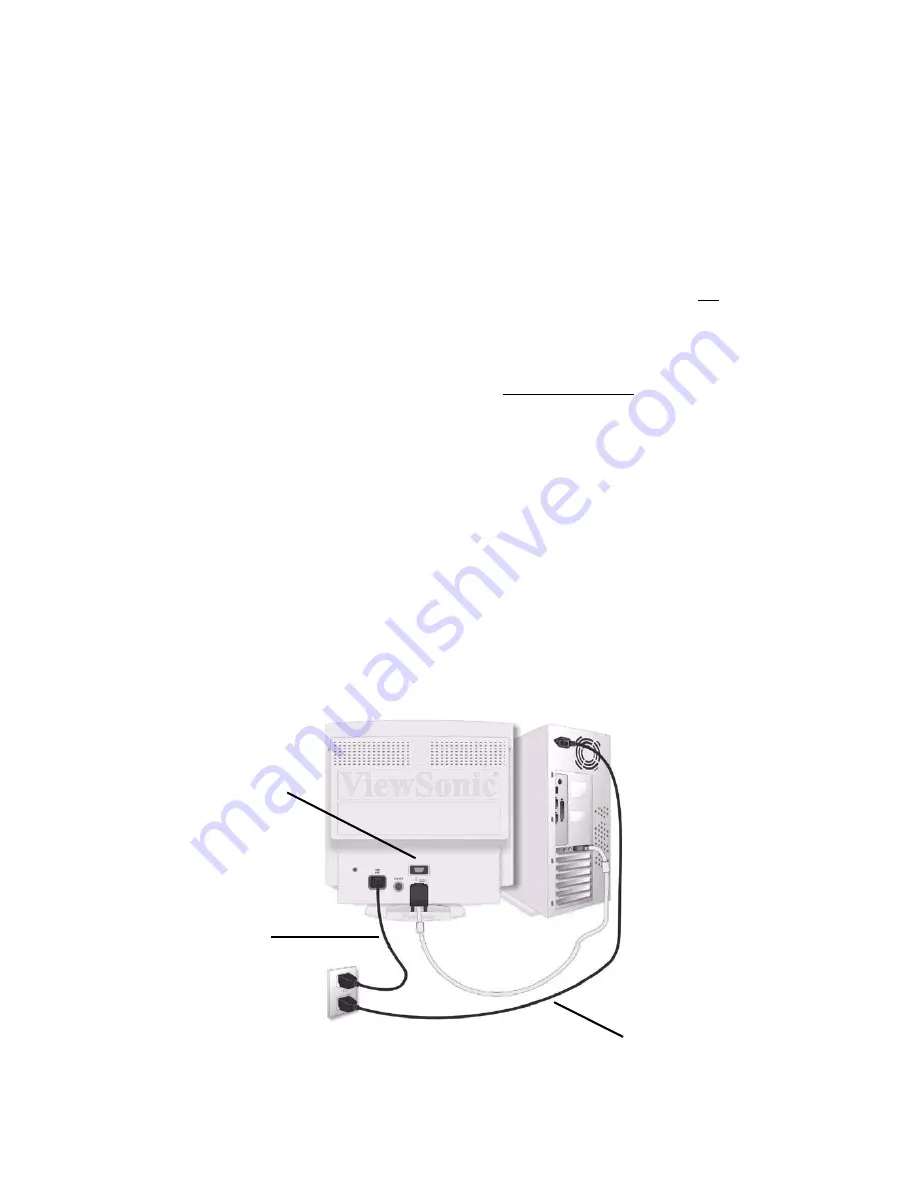
1 Connect video cable(s)

Make sure both the monitor and computer
are powered OFF.

The monitor can be connected to one or two
computers using either the DB-15 video
cable (included) or a BNC video cable
(purchased separately). To toggle between
two computers: connect the DB-15 video
cable from the monitor to the first computer,
and the BNC video cables from the monitor
to the second computer.

Macintosh users:

Models older than G3

require a ViewSonic Macintosh adapter.
Attach the adapter to the computer and plug
the video cable into the adapter.

To order a ViewSonic

®

Macintosh adapter,

contact ViewSonic. See

Customer Support

in this user guide.

2 Connect power cord

Connect the power cord from the monitor to
a properly grounded AC outlet.

3 Power-ON monitor and computer

Power-ON the monitor, then power-ON the
computer. This sequence (monitor before
computer) is very important.

NOTE:

At this point Windows users may

receive a message asking them to install the

P220f

INF file.

4 Install Display Optimization files

(1) Insert the ViewSonic wizard CD-ROM
into your computer’s CD-ROM drive.

NOTE:

if your computer does not have a

CD-ROM drive, see the Customer Support
section of this user guide.

(2) Wait for the CD-ROM to auto-start.

NOTE:

if the CD-ROM does not auto-start:

double-click on the CD-ROM icon in
Windows Explorer, then double-click on

viewsonic

.exe

(3) Follow the on-screen instructions.

5 Windows users: Set the Timing

Mode (resolution and refresh rate)

Example:

1600 X 1200 @ 85 Hz.

For instructions on changing the resolution
and refresh rate, see the user guide for your
computer's graphics card.

Installation is complete. Enjoy your new

P220f

monitor

!

To be best prepared for any future customer
service needs:

Write the serial number (see back of the
monitor) in

“For your Records”

on page 2

of this guide.

Register the warranty of your monitor on the
Internet at:

www.viewsonic.com

Port for DB-15
video cable

Power Cord

from monitor
to AC outlet

Power Cord

from computer
to AC outlet

ViewSonic

P220f

        4

Содержание P220f - 22" CRT Display

Страница 1: ...ser Guide Guide de l utilisateur Bedienungsanleitung Gu a del usuario Guida dell utente Guia do usu rio Anv ndarhandbok Podr cznik u ytkownika With Plug Play 22 20 Viewable Diagonal P220f Color Monito...

Страница 2: ...k Installation 4 Using the Monitor Setting the Timing Mode 5 Adjusting the Screen Image 7 Other Information Specifications 12 Troubleshooting 13 Customer Support 14 Cleaning the Monitor 15 Limited War...

Страница 3: ...mages resulting from furnishing this material or the performance or use this product In the interest of continuing product improvement ViewSonic Corporation reserves the right to change product specif...

Страница 4: ...ct sunlight or another heat source The monitor should be facing away from direct sunlight to reduce glare Do not place your monitor near a source of water or moisture Place your monitor in a well vent...

Страница 5: ...point Windows users may receive a message asking them to install the P220f INF file 4 Install Display Optimization files 1 Insert the ViewSonic wizard CD ROM into your computer s CD ROM drive NOTE if...

Страница 6: ...card s user guide for instructions NOTE To minimize the adjustments required for an optimal screen image select a timing mode from the Preset Timing Modes table below WARNING Do NOT set the graphics...

Страница 7: ...e settings OSD Lock Press and hold the 1 and buttons on the face of the monitor for 5 seconds The message OSD LOCK will then display briefly indicating that the OSD image settings are now locked OSD U...

Страница 8: ...10 IMPORTANT The monitor should be warmed up for 30 minutes prior to making any adjustments Main Menu with OnView controls ViewSonic P220f 7 Power Light Power On Off Displays control screen for highl...

Страница 9: ...n 2 NOTE Some controls on the Main Menu are listed in pairs such as Contrast Brightness Press button 2 to toggle between control pairs after displaying a control screen 3 To adjust the selected contro...

Страница 10: ...ight of the screen image Vertical Position moves the screen image up or down Pincushion straightens curves along the vertical edges of the screen image that bow inward or outward Pin Balance straighte...

Страница 11: ...gnal coming from your computer s graphics card This includes the refresh rate or Vertical Frequency and the scan rate or Horizontal Frequency OSD Position allows you to move the on screen menus and co...

Страница 12: ...oking straightens the bottom corners of the screen image Purity adjusts the uneven color of the overall image For example if one area of a color appears darker than another area first use the degauss...

Страница 13: ...1280 x 1024 NI 101 Hz 1920 x 1440 NI 73 Hz 1152 x 864 NI 118 Hz 1856 x 1392 NI 75 Hz 1024 x 768 NI 132 Hz 1792 x 1344 NI 78 Hz 800 x 600 NI 160 Hz 1600 x 1200 NI 87 Hz 640 x 480 NI 160 H Power Voltag...

Страница 14: ...or higher See Specifications on page 12 Remove any devices from the area around the monitor that emit magnetic fields such as radios surge protectors unshielded speakers fluorescent lights AC power c...

Страница 15: ...com T 0800 833 648 F 01293 643910 service eu viewsoniceurope com Europe Middle East Baltic countries and North Africa viewsoniceurope com Contact your reseller service eu viewsoniceurope com Australi...

Страница 16: ...h and wipe the screen To clean the case 1 Use a soft dry cloth 2 If still not clean apply a small amount of a non ammonia non alcohol based mild non abrasive detergent onto a clean soft lint free clot...

Страница 17: ...o provide your product s serial number 2 To obtain service under warranty you will be required to provide a the original dated sales slip b your name c your address d a description of the problem and...

Страница 18: ...he letter L or coloured RED IMPORTANT NOTICE CONCERNING POWER CORD SELECTION The power cord set for this unit has been enclosed and has been selected according to the country of destination and must b...

Страница 19: ...Warning To assure continued FCC compliance the user must use grounded power supply cord and the provided shielded video interface cable with bonded ferrite cores If a BNC cable is going to be used us...

Страница 20: ...ViewSonic Corporation...

Отзывы: