

10)
On the Video tab, set video
Input
to
Composite
.
11)
Click the Audio tab and set audio
Input
to
Unbalanced
.
Click
Save Settings
.
12)
To enable streaming, ensure the
Enable Streaming
box
is selected. Enter the proper address for the server
in the
Destination IP
field and the port number in the
Port
field.
13)
Click
Save Settings
. Click
OK
after the operation is
successful.
14)
Your streaming content is now available through your
server. To stream a live video, a CDN account is required.
4.
First start setup
continued
Quick Start Guide
Niagara
®
2200
Contact ViewCast Technical Support at
40-03330-01-A
© 2012 ViewCast Corporation. ViewCast
®
, Niagara
®
(and design)
TM
are registered trademarks of ViewCast Corporation
or its subsidiaries. All other trademarks are the property of their respective owners. Product specifications and availability
may change without notice.
A
:
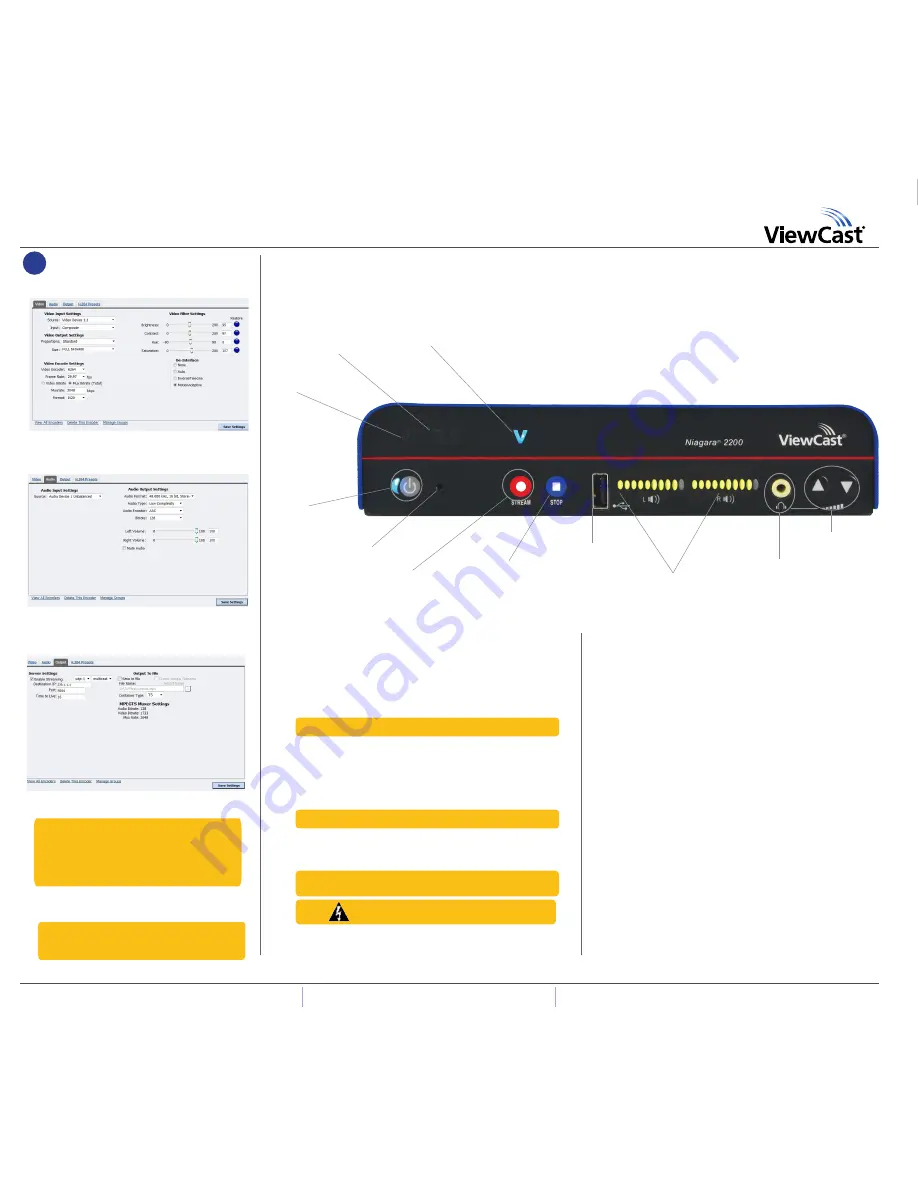
Power Button and Indicator Light
• Press this button once to start the Niagara 2200.
• Press this button once to turn off the Niagara 2200 when it is on.
• Press and hold for 5 seconds to execute an immediate power off.
NOTE:
Do NOT attempt to encode while light continues blinking
.
B
:
Reset Button
•
Resets the Niagara 2200.
• Use a pointed device to insert in the hole and press the reset button.
• This button has three different options:
1.
Press and release after the first set of 10 LEDs start to light
(approximately 1 to 3 seconds) to reboot the Niagara 2200.
NOTE
: The lights on the volume indicator will illuminate in one-second intervals.
2.
Press and release after the second set of 10 LEDs
start
to light
(
approximately 4 to 6 seconds
) to keep all set profiles and restore
the Niagara 2200 operating system.
NOTE:
The lights on the volume indicator will illuminate in one-second
intervals, but do NOT progress all the way to the far right.
Warning!
Option 3 deletes all previously set profiles.
3.
Press and hold for approximately 10 seconds until all 20 LEDs
remain lit to restore the Niagara 2200 to complete factory defaults.
C
:
Stream Button and Indicator Light
• Initiates streaming of all profiles assigned to the button.
D
:
Stop Button
• Stops the encoder streaming activity when you press this button once.
E
:
USB Port
• Allows the export of files to USB storage devices, installing updates
or firmware, or connecting USB devices.
F
:
Audio Lever Meters (
Activity Feedback
)
• Audio feedback meters.
• Shows incoming left and right audio channel input.
G
:
Stereo Headphone Connection
•
The headphone output connection is for audio monitoring.
H
:
Volume Button (
Up/Down
)
•
Audio level headphone control.
• This control changes the volume on the headset output only.
I
:
Alarm/Status Indicator
•
Indicator light remains solid when an application alert has occurred.
J
:
Remote Control
•
Indicator light remains solid when another user is accessing the
Niagara 2200 across the network from a computer.
K
:
Video Confidence Indicator
• Video encoding status (active). The indicator will stay lit (blue) only
while streaming. If the video input is lost it will not be lit.
Use the front panel picture to familiarize yourself with the controls of the
Niagara 2200.
The Niagara 2200 Front Panel
A
:
Power Button
and Indicator Light
J
:
Remote Control
K
:
Video Confidence Indicator
I
:
Alarm/Status Indicator
C
:
Stream Button
and Indicator Light
F
:
Audio Level Meters
(
Activity Feedback
)
H
:
Volume Button
(
Up/Down
)
G
:
Headphone Connection
D
:
Stop Button
E
:
USB Port
B
:
Reset Button
NOTE:
You may also use the front panel
Streaming
button to start streaming.
NOTE:
You can easily test this streaming profile
from the Encoders window by clicking the blue circle
Streaming
button on the right side of the encoder. The
button changes from a red circle to a blue circle when
you start streaming. The status changes from
Stopped
to
Encoding Live
.
US / Canada
+800-540-4119 | Europe / Middle East / 44 1256 345610 |
Asia / P852 2251 8778


