


19
ENGLISH
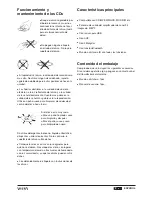
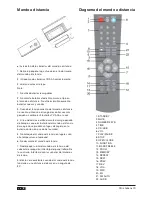
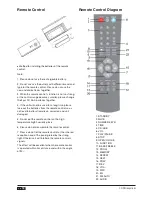
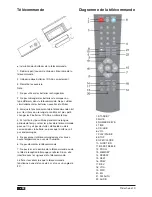
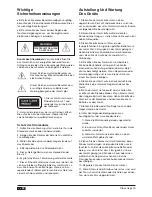
Function Instruction For Remote Control
1. STANDBY:
Press this key to choose the unit POWER ON or
STANDBY status.
2. MUTE:
Press it will make sound off; press it again will make
sound on.
3. NUMBER KEYS:
It includes 0-10 number keys and 10+/10- keys. You
can press them to select the file which you want
directly.
4. TIME:
Press this key to design the time.
5. CD/USB
Press this key, can change the CD mode to USB
mode, or change the USB mode to CD mode.
6. VOL -:
Press this key to decrease the volume.
7. PLAY/PAUSE :
Press this key to make the music play or pause.
8. STOP:
Press it to stop the file playing.
9. OPEN/ CLOSE:
Open or Close the disc tray.
10. FUNCTION:
Turn on the unit, press this key to begin to play the
CD disk.
Press this key, change the mode from CD Disk to FM
radio/ AUX/Bluetooth
11. BASS/TREBLE:
Press this key and Vol+/- key, you can adjust the
BASS/TREBLE volume as you like.
12. PROG:
During CD playback, press stop, and then press
PROG, it will show the numbers on the LED display.
13. MOMORY:
Press this key, to make the FM station no.
14. REPEAT:
Press this key, it will repeat the file playing.
15. NEXT:
Press this key to select the next file or channel.
16. PREV:
Press this key to select the last file or channel.
17. REV:
Press this key to enter into the fast backward status,
press it repeatedly, it will show.
2X: The program will be played at 2 times speed
of backward.
4X: The program will be played at 4 times speed
of backward.
8X: The program will be played at 8 times speed
of backward.
16X: The program will be played at 16 times speed
of backward.
32X: The program will be played at 32 times
speed of backward.
18. VOL+
Press this key, it will increase the volume.
19. FWD:
Press this key to enter into the fast forward status,
press it repeatedly, it will show:
2X: The program will be played at 2 times speed
of forward.
4X: The program will be played at 4 times speed
of forward.
8X: The program will be played at 8 times speed
of forward.
16X: The program will be played at 16 times
speed of forward.
32X: The program will be played at 32 times
speed of forward.
20. EQ:
Press this key, can choose the music mode you like.
21. FM AUTO:
Press this key, can search the radio station auto.
22. AUDIO:
This key is R/L Channel for sound.
Содержание VH-MS170BK
Страница 42: ...www vieta es...


