VIETA VH-MS170BK Скачать руководство пользователя страница 14

CD Microsystem

14

Important safety instruction

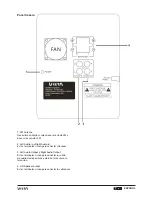
Placement and maintain for the unit 
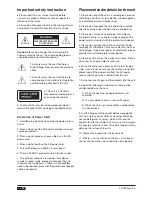
WARNING

RISK OF ELECTRIC SHOCK 

DO NOT OPEN

2. To prevent the laser from being exposed, do not 
remove the cover. Refer servicing to qualified person.


Please read this user manual carefully before 

you use this product. Please reserve it properly for 
reference in the future. 


Please do not expose the unit in the raining or moist 

environment to avoid fire hazard or electric shock. 

Caution: Please do not open the unit to avoid fire 
hazard or electric shock. The corresponding repairs 
should be done by professional person,

This mark warns the user that there is 
High Voltage, Please prevent from electric 
shock.

This mark warns the user that there are 
some important instructions for Operation 
and Maintaining attached to the unit. 

Protection of Power Cord

1. Hold the plug well when you plug the power cord in 
or out. 

2. Please do not put the AC power cord near any heat 
source equipment.

3. Please do not place any heavy objects on the AC 
power cord. 

4. Please do not overhaul the AC power cord. 

5. This unit belongs to CLASS 1 laser product. 

6. There is CLASS 1 product mark on the rear panel.

7. This product contains a low power laser device. 
In order to keep safety, please do not open the unit 
to expose the inside parts. If there is some problem 
need to be repaired, please let the professional people 
check and repair it. 

1. Please do not put the unit in a sealed place or cover 
something onto the unit, to avoid the unit damaged by 
its inside temperature’s abrupt rising. 

2. Please do not expose the unit under the sunshine 
directly or place it near the heat source equipments. 

3. Please do not place any container with water or 
fire liquid. If there is any liquid in, please plug out the 
power cord and contact with the professional repairer. 

4. Please do not open the unit to contact the inside 
components. Otherwise it may cause electric shock or 
unit damage. If need any repairs or adjustment, please 
provide this unit to the professional person. 

5. Please put the unit on the horizontal surface. Please 
do not put any heavy object on the unit. 

6. When the unit pauses, please set it to the standby 
state. If you do not want to use the unit for a long time, 
please take off the power cord from the AC power 
socket, and take out the Li-battery from the unit. 

7. Do not put your fingers or other objects into the unit. 

8. Under the following circumstances, there will be 
condensed dew on the Lens: 

  1). When the heat source equipment was just  
 activated. 

  2). In a very damp room or a room with vapor.

  3). When the unit is just moved from a colder place  
  to a hotter place. 

9. Pull the plug out of the socket before cleaning the 
unit. Use a piece of wet cloth for cleaning. Please do 
not use detergents or sprays, which will cause the 
liquid enter into the inside unit and cause unit damage, 
fire hazard or electric shock. This kind of liquid will also 
damage the surface of the unit. 

10. Please do no repair the unit by yourself. 

11. If there is Dirt or Friction on the Lens, It will impair 
sound, or even make it no sound when disc playing.

1. This unit is a CLASS 1 
Laser product and employs a 
laser inside the cabinet.

Содержание VH-MS170BK

Страница 1: ...do la que pueda causar su operaci n no deseada Please read the user manual first before using the product keep well for future referring Por favor leia o manual de utilizador antes de utilizar o produ...

Страница 2: ...mpo de vida depende de la frecuencia de uso 11 Fallos menores o variaciones en la calidad del producto que no afecten a su valor o el prop sito para el cual fue creado 12 Negligencia 13 Accesorios Est...

Страница 3: ...nto y mantenimiento de los CDs 5 Caracter sticas principales 5 Contenido del embalaje 5 Interfaz de funcionamiento 6 7 Mando a distancia 8 Diagrama del mando a distancia 8 Instrucciones del mando a di...

Страница 4: ...de la temperatura interior no coloque la unidad en un lugar cerrado ni la cubra 2 No exponga la unidad a la luz solar directa ni la coloque cerca de una fuente de calor 3 No coloque ning n recipiente...

Страница 5: ...ayado agrietado o doblado para evitar posibles da os en la unidad Las huellas dactilares o la suciedad de un disco afectar n a la luz reflectante del disco y a la calidad de la se al directamente Cuan...

Страница 6: ...ara subir o bajar el volumen 5 OPEN CLOSE Pulse este bot n abrir o cerrar la bandeja del disco 6 NEXT Pulse este bot n para seleccionar la pr xima canci n o archivo 7 USB Conecte un USB aqu 8 FUNCTION...

Страница 7: ...FM 2 Left Audio in y Right Audio in Estos terminales sirven para conectar altavoces 3 Left Audio Output y Right Audio Output Estos terminales sirven para conectar la salida de audio de dispositivos e...

Страница 8: ...te un largo periodo de tiempo saque las bater as del mando a distancia para que no se produzcan fugas de l quido en la bater a corrosi n o se da e la unidad 5 No coloque el mando a distancia en lugare...

Страница 9: ...hivo o canal 16 PREV Pulse este bot n para seleccionar el ltimo archivo o canal 17 REV Pulse este bot n para entrar en estado de reproducci n r pida hacia atr s p lselo repetidamente y aparecer 2X El...

Страница 10: ...m sica ampliada saldr de esta unidad V BLUETOOTH Pulse el bot n function para entrar en estado Bluetooth A continuaci n haga lo siguiente 1 Active la funci n Bluetooth en su tel fono m vil u otro disp...

Страница 11: ...no estaba bien colocado 3 El cabezal ptico est empa ado 1 Limpie y revise el disco 2 Coloque el disco de nuevo con la etiqueta hacia arriba 3 Abra el compartimento del disco s quelo y mant ngalo abier...

Страница 12: ...to use and wear and tear 10 Rechargeable and or disposable batteries life cycle depends on usage frequency 11 Small faults or variations in the quality of the product that do not affect its value or t...

Страница 13: ...t 14 Operation and Maintenance of CD Discs 15 Main Characteristics 15 Packing Content 15 Operation Interface 16 17 Remote Control 18 Remote Control Diagram 18 Function Instruction For Remote Control 1...

Страница 14: ...id the unit damaged by its inside temperature s abrupt rising 2 Please do not expose the unit under the sunshine directly or place it near the heat source equipments 3 Please do not place any containe...

Страница 15: ...cked or bent discs to avoid causing unit damaged Fingerprints or Dirt on a disc will impair the reflective light of the disc and will affect the signal s quality directly The poorer the signal s quali...

Страница 16: ...ease the volume 5 OPEN CLOSE Press this key to open or close the disc tray 6 NEXT Press this key to choose next song or file 7 USB Connect a USB Driver here 8 FUNCTION 1 Turn on the unit press this ke...

Страница 17: ...d to use it 2 Left Audio in and Right Audio in These terminals are for connecting speakers 3 Left Audio Output and Right Audio Output These terminals are for connecting audio output of external device...

Страница 18: ...te control so as not lead to battery liquid leak corrosion and unit damaged 5 Do not put the remote control on the high temperature high humidity place 6 Please do not disassemble the remote control 7...

Страница 19: ...ey to make the FM station no 14 REPEAT Press this key it will repeat the file playing 15 NEXT Press this key to select the next file or channel 16 PREV Press this key to select the last file or channe...

Страница 20: ...t and then the enlarged music signal will come out from this unit at the same time V BLUETOOTH Press the function key to enter into the Bluetooth status And then please do as follows 1 Open the Blueto...

Страница 21: ...is not properly placed 3 Optical header dew 1 Clean the disc and deal with the disc 2 Put in disc again lable upwards 3 Open the power switch remove disc and then hold about 1 hour Remote control fail...

Страница 22: ...eries rechargeables et ou jetables dont le temps de vie d pend de la fr quence d utilisation 11 Les d fauts mineurs ou variations de la qualit du produit n affectant par sa valeur ou l objectif pour l...

Страница 23: ...ent et maintenance des CD 25 Caract ristiques principales 25 Contenu de l emballage 25 Interface de fonctionnement 26 27 T l commande 28 Diagramme de la t l commande 28 Consignes de la t l commande 29...

Страница 24: ...int rieure ne pas placer l unit dans un lieu ferm ni la couvrir 2 Ne pas exposer l unit la lumi re solaire directe ni la placer pr s d une source de chaleur 3 Ne pas placer de r cipient avec de l eau...

Страница 25: ...r viter un dommage possible de l unit Les empreintes digitales ou la salet d un disque touchent directement la lumi re r fl chissante du disque et la qualit du signal Plus pauvre est la qualit du sign...

Страница 26: ...ara subir o bajar el volumen 5 OPEN CLOSE Pulse este bot n abrir o cerrar la bandeja del disco 6 NEXT Pulse este bot n para seleccionar la pr xima canci n o archivo 7 USB Conecte un USB aqu 8 FUNCTION...

Страница 27: ...e des cha nes FM 2 Left Audio in et Right Audio in Ces terminaux servent connecter des haut parleurs 3 Left Audio Output et Right Audio Output Ces terminaux servent pour connecter la sortie audio de p...

Страница 28: ...ndant une longue p riode de temps retirer les piles de la t l commande pour qu il n y ait pas des fuites de liquide ou de la corrosion dans la batterie ou pour que l unit ne soit pas endommag e 5 Ne p...

Страница 29: ...T Appuyer sur ce bouton pour s lectionner le prochain fichier ou cha ne 16 PREV Appuyer sur ce bouton pour s lectionner le dernier fichier ou cha ne 17 REV Appuyer sur ce bouton pour effectuer une lec...

Страница 30: ...cette unit V BLUETOOTH Appuyer sur le bouton function pour passer en mode Bluetooth Ci dessous proc der comme il suit 1 Activer la fonction Bluetooth sur le t l phone mobile ou un autre dispositif Blu...

Страница 31: ...3 La t te optique est embu e 1 Nettoyer et r viser le disque 2 Placer le disque de nouveau avec l tiquette vers le haut 3 Ouvrir le compartiment du disque le sortir et le tenir ouvert pendant 1 heure...

Страница 32: ...t der Benutzung ab 11 Kleinere Fehler oder Ver nderungen der Qualit t des Produktes die den Wert bzw den Zwecke f r den es geschaffen wurde nicht beeinflussen 12 Fahrl ssigkeit 13 Zubeh rteile Etuis u...

Страница 33: ...Des Ger ts 34 Betrieb und Wartung von CDs 35 Hauptmerkmale 35 Inhalt der Verpackung 35 Betriebsinterface 36 37 Funktionsanleitung f r die fernbedienun 38 bersicht Fernbedienung 38 Funktionsanleitung...

Страница 34: ...ird 2 Setzen Sie das Ger t bitte nicht der direkten Sonneneinstrahlung aus stellen Sie es bitte auch nicht neben Hitzequellen 3 Stellen Sie bitte keine mit Wasser oder feuergef hrlichen Fl ssigkeiten...

Страница 35: ...nen Discs um zu vermeiden dass das Ger t besch digt wird Fingerabdr cke oder Verschmutzungen auf der Disc verschlechtern die Reflektion des Lichts auf der Disc und beeinflussen direkt die Signalqualit...

Страница 36: ...e heraufzusetzen oder zu verringern 5 OPEN CLOSE Dr cken Sie diese Taste um den Disc Einschub zu ffnen oder zu schlie en 6 NEXT Dr cken Sie diese taste um den n chsten Song oder die n chste Datei anzu...

Страница 37: ...tzen 2 Audio Ein und Ausgang links und rechts Diese Stecker sind f r Kopfh rer gedacht 3 Audio Ausgang links und Rechter Audio Ausgang Diese Steckverbindungen dienen dazu einen Audio Ausgang externer...

Страница 38: ...Wenn das Ger t ber l ngere Zeit nicht benutzt wird nehmen Sie die Batterien bitte aus der Fernbedienung sodass ein Auslaufen der Batterien nicht zu Korrosion und Sch den f hren kann 5 Bewahren Sie die...

Страница 39: ...n Sie diese Taste wenn die Datei wiederholt werden soll 15 NEXT n chster Titel Dr cken Sie diese Taste um die n chste Datei oder den n chsten Kanal anzuw hlen 16 PREV vorheriger Titel Dr cken Sie dies...

Страница 40: ...des Ger ts und das erweiterte Musik Signal kommt zur gleichen Zeit aus diesem Ger t V BLUETOOTH Dr cken Sie die Taste Function um zum Bluetooth Status zu gelangen Fahren Sie dann wie folgt fort 1 Akti...

Страница 41: ...ierte Disc 2 Disc nicht korrekt eingelegt 3 Optischer Lesekopf beschlagen 1 Reinigen und behandeln Sie die Disc 2 Legen Sie die Disc erneut ein Etikett nach oben 3 Hauptschalter ausschalten Disc entne...

Страница 42: ...www vieta es...

Отзывы: