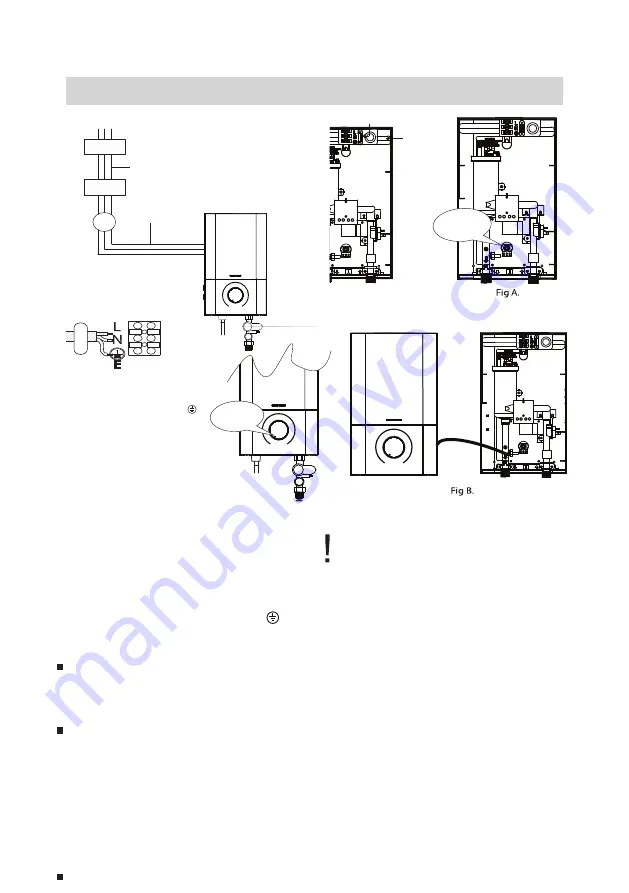
PROCEDURE:
Insert the cable through ‘A’ for side
entry or ‘B’ for wall embedded cable by
cutting a hole through the source cord
rubber holder.
Connect the cable to Terminal Block
and fully tighten them as follow
BROWN or RED —
LIVE (L)
BLUE or BLACK
— NEUTRAL (N)
GREEN/YELLOW — EARTH ( )
When replace back the Front Cover,
please take note the below procedure:
To ensure the correct position, turn
the Temperature VR Knob insert to
OFF position as shown in Fig A. (at the
Heater Base)
To install the Front Cover, turn the
Temperature Control Knob to OFF
position to align with the VR Knob
connect the LED display cable from
front cover to the Main Control PCB.
Clamp the cable to the correct position.
CHECK IF THE WIRING CONNEC-
TION IS CORRECT and replace the
cover.
Fix back the Screw A.
Position
At Off
Electrical Installation
FUSE
ON/OFF
Fuse Distributor Board
Miniature Circuit Breaker (MCB)
Double PVC cable over 2.5mm²
ON/OFF Double Pole Switch
Cable
NOTE:
Refer to Table 1. for
electrical loading
and correct size of
wire conductor.
BROWN —
LIVE (L)
or RED
BLUE or BLACK
— NEUTRAL (N)
GREEN — EARTH ( )
or GREEN/YELLOW
This appliance must be
EARTHED. Improper grounding
could cause electrical shock.
Remember to SWITCH OFF at
mains before carrying out any
electrical work.
Refer to the Electrical Loading
Table for the correct cable size.
Use double coated flexible cable
having nominal cross-sectional
area 2.5mm².
Lead the power cable from the
MCB to a “ON/OFF” double pole
linked switch having a contact
separation of at least 3mm in all
poles outside the bathroom, then
lead a cable connected to
Terminal block inside the unit.
Position
At Off
B
A
Содержание VITOWELL EASY P1
Страница 1: ...VITOWELL EASY P1 117 mm VITOWELL EASY P1 Instant Water Heater Operation Manual ...
Страница 13: ......
Страница 14: ......
Страница 15: ......
Страница 16: ... 04 01 02 ...


