


Vitosol 100-FM/200-FM Installation, Operating and Service
31
5786 604 - 02
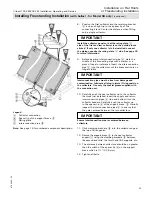
CAUTION
The collectors may be damaged if the solar heating
system is not filled with heat transfer medium
immediately after installation. Therefore protect the
collectors against insolation by covering them up.
Refer to page 41 for information on venting the
solar heating system.
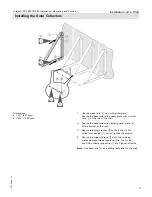
Installing the General Connection Set and Collector Temperature Sensor
Hydronic Connections
1. Insert the plugs
qZ
until they bottom out, and secure
with profile clips
qE
.
2. Insert the supply and return connection pipes
qT
until
they bottom out and secure them with pipe clips
qE
.
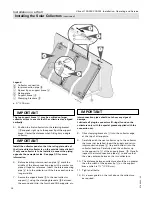
3. Fit the 90° elbow
qU
onto the return connector at the
bottom of the collector.
4. Fit the tee
qO
onto the supply connector at the top of
the
collector.
5. Insert the sensor well
wP
into the tee
qO
. Hold the tee
tightly.
6. Insert the strain relief fitting
wQ
into the sensor well.
7. Insert the collector temperature sensor
B
(supplied
with solar controller) until it bottoms out inside the
sensor
well
wP
and secure with strain relief fitting
wQ
.
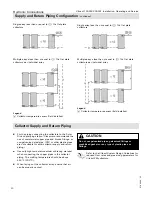
8. Insert the 4” long, 3” Ø to 22 mm Ø adaptor
qI
into
the compression fittings of elbow
qU
and tee
qO
and
make the connection between the panel array and the
supply and return piping.
9. Install the insulation
wW
and secure with adhesive on
its cut faces.
Note:
Connection pipes and plugs must not display
any damage. Lubricate O-ring seals only with the
special grease supplied. Never fit annealed (soft)
copper pipes onto the elbow
qU
and tee
qO
.
When assembling the 22 mm metric compression fittings
qU
and
qO
, observe the following:
All pipe ends must be square and deburred.
Push the union nut and the compression ring onto the
pipe adaptor and lightly lubricate the threads with
special grease supplied.
Push the pipe into the compression fitting as far as it
will
go.
Initially, turn the union nut by hand, then tighten with
an open ended spanner by another ¾ turn.


