background image

-7-

SETUP INSTRUCTIONS

Functions Setting Up

KEY_1

KEY_2

KEY_3

KEY_4

KEY_SET

LED_UNLOCK

LED_TALK

LED_NAME

RF CARD

This section explains the settings of each 

function,please refer to the following table:

To perform the settings for the function 

you want,you should move away the metal 

front panel. Please refer to the sketch 

map.

Each operation is indicated by the lighting 

up of the LED indicator on the unit, and by 

the sounding of the buzzer.

Order

Setting items

Setting range

Default value

1

Setting door station address

0~3

0

2

Setting door station 

calling mode

Standard/Group calling mode

Standard calling mode

3

Setting camera resolution

High/Low

High

4

Setting the unlock mode

0:opened/1:closed

0:opened

5

Setting the unlock time

01 to 99 seconds

3

 seconds

6

Setting the nameplate 

illumination mode

On/Off/Auto

On

7

Setting night view LED 

illumination mode

On/Off/Auto

Auto

8

Setting ring-back tone

Ringing one time

Ring continuously

No ring-back tone

Ringing one time

9

Setting image display mode

Alternate switching mode

Zoom mode

Full screen mode

Alternate switching mode

-8-

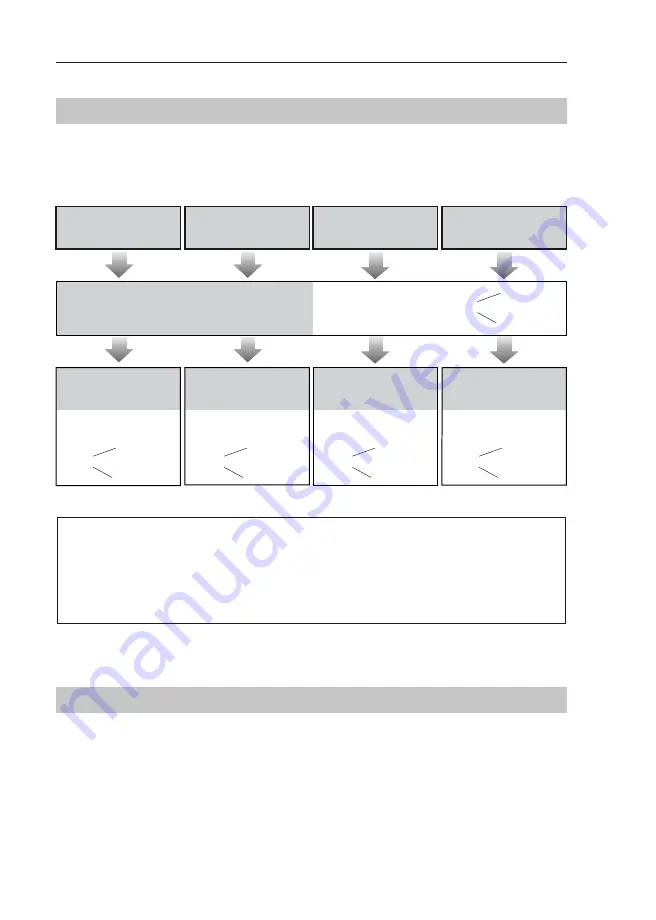
Setting Door Station Address

Setting Door Station Calling Mode

Total 4 addresses can be confi gured. It can be modifi ed either before or after installation.

0 is default, to change the setting, please follow the steps:

UNLOCK Indicator:OFF

TALK Indicator:OFF

Buzzer

Beep+, Beep

UNLOCK Indicator:OFF

TALK Indicator:OFF

Buzzer

Beep+

In standby mode, press 
KEY_SET button once

Press KEY_1 button to set 
the first door station.

Press KEY_2 button to set 
the second door station.

Press KEY_3 button to set 
the third door station.

Press KEY_4 button to set 
the fourth door station.

UNLOCK Indicator:OFF

TALK Indicator:OFF

Buzzer

Beep,Beep

UNLOCK Indicator:OFF

TALK Indicator:OFF

Buzzer

Beep,Beep,Beep

UNLOCK Indicator:OFF

TALK Indicator:OFF

Buzzer

Beep,Beep,Beep,Beep

ID=0,1

st

 door station

ID=1,2

nd

 door station

ID=2,3

rd

 door station

ID=3,4

th

 door station

SETUP INSTRUCTIONS

•  If setting mode has not been exited, you can change the address of door station by pressing KEY1~4 
freely.

•  The LED_NAME  indicator will always blink until exit out the setting mode.

•  If without any operation in 10 seconds, it will exit out setting mode automatically.

•  In this step,press KEY_SET button four times to exit out the setting mode manually.

There are two calling modes for door station,Standard calling  mode and Group calling  mode.

Please know that the door station work in Standard calling mode by default.


Содержание Duo S1101A

Страница 1: ...duo 2 wire system video door intercom W 20180828ENG USER S MANUAL Door station S1101A S1102A S1201A S1202A S1103A S1203A S1104A S1204A...

Страница 2: ...based on the simplicity of connection through 2 non polarity wires only It can be extended with additional options by using dedicated modules which are also connected with 2 wires Thanks to the appli...

Страница 3: ...ting Camera Resolution 10 Setting Unlock Mode 10 Setting Unlock Time 11 Setting Nameplate Illumination Mode 11 Setting Night View LED Illumination Mode 12 Setting Ring back Tone 12 Setting Image Displ...

Страница 4: ...urface mounted S1101A S1102A S1103A S1104A Flush mounted S1201A S1202A S1203A S1204A 1 Microphone 2 UNLOCK indicator 3 CALL indicator 4 Call button 5 Nameplate 6 Front panel 7 Speaker 8 Night view LED...

Страница 5: ...top of main unit and rain cover should be not less than 3mm 3 Install the name plate 4 Attach the front panel to the main unit 5 Use the special screwdriver and the screws to x the panel 1 Drill a ho...

Страница 6: ...and the electronic locks L1 L2 Connect to the bus line no polarity PL External lock power input connect to the power positive power S Lock power output S Lock power output connect to the power input o...

Страница 7: ...uals up close via indoor monitor with sheye function The door station is equipped with a terminal to connect external motion detector If the external motion detector is connected to the system followi...

Страница 8: ...Order Setting items Setting range Default value 1 Setting door station address 0 3 0 2 Setting door station calling mode Standard Group calling mode Standard calling mode 3 Setting camera resolution...

Страница 9: ...TALK Indicator OFF Buzzer Beep Beep UNLOCK Indicator OFF TALK Indicator OFF Buzzer Beep Beep Beep UNLOCK Indicator OFF TALK Indicator OFF Buzzer Beep Beep Beep Beep ID 0 1st door station ID 1 2nd doo...

Страница 10: ...address 02 by default Call buttonC call the monitor with address 03 by default Call buttonD call the monitor with address 04 by default Call buttonA Call all monitors in group address from 00 15 one...

Страница 11: ...ode press KEY_SET button three times UNLOCK Indicator ON TALK Indicator OFF Buzzer Beep Press KEY_1 button to set the unlock mode to Normally opened UNLOCK Indicator ON TALK Indicator OFF Buzzer Beep...

Страница 12: ...ion mode to Normally on UNLOCK Indicator ON TALK Indicator OFF Buzzer Beep Beep Press KEY_3 button again to set the nameplate illumina tion mode to Normally o UNLOCK Indicator ON TALK Indicator OFF Bu...

Страница 13: ...uto Press KEY_4 UNLOCK Indicator ON TALK Indicator ON Buzzer Beep Beep In standby mode press KEY_SET button four times UNLOCK Indicator ON TALK Indicator ON Buzzer Beep Press KEY_1 button to set the r...

Страница 14: ...g mode When answering the call image switching reminder is not e ective Zoom mode When answering the call the image will be display d eon full screen for 5 sec onds then switch to Zoom image to remind...

Страница 15: ...Hz Authorizing master cards By default there are two master cards marked MASTER CARD ADD and MASTER CARD DELETE but you should know that the master card can be authorized by users at any time That mea...

Страница 16: ...e card of MASTER CARD ADD UNLOCK Indicator Blink three times TALK Indicator OFF Buzzer Beep Beep Beep Show the second card to ID card window set the card of MASTER CARD DELETE UNLOCK Indicator OFF TAL...

Страница 17: ...card of MASTER CARD ADD again format is activated Show the master card of MASTER CARD ADD to ID card window If without any operation in 10 seconds it will exit out setting mode automatically To add us...

Страница 18: ...lock Mode must be set to 0 by default 1 The external power supply must be used according to the lock 2 The inside relay contact is restricted to 230Vac 1A or 24Vdc 1A 3 The jumper must be taken o befo...

Страница 19: ...t door station ID 1 2nd door station ID 2 3rd door station ID 3 4th door station L1 L2 PL S S L1 L2 PL S S L1 L2 PL S S L1 L2 PL S S RF CARD RF CARD RF CARD RF CARD The door station work in Standard m...

Страница 20: ...nitors as SLAVE 1 2 3 In this way we will get the internal unaddressed intercom Second house the rst monitor must have the address 16 another set from 17 to 28 In this we will get the addressed interc...

Страница 21: ...dstiributor for the extension WIRING M SM4 A B C D B5 M SM4 OFF ON Impedance switch BUS IM BUS DS Code 0 DIP6 on Code 1 DIP6 on Code 2 DIP6 on Code 3 DIP6 on ID 0 RF CARD P26 40 AC 100 240VAC Optional...

Страница 22: ...re or approved by the manufacture Pay attention to the high voltage inside the products please refer service only to a trained and quali ed professional APPENDIX Power supply DC 24V Power consumption...

Страница 23: ...tance of the wiring is limited in the system we recommend using twisted cable type YTKSY Cable and distance unit m Cable Usage A B 2 IM B 16 IM Twisted cable 2x0 75mm2 60 100 40 Twisted cable 2x1mm2 8...

Страница 24: ...23 B A C 2 2 DBC4A1 RF CARD PC6A Cable and distance unit m Cable Usage A B C Twisted cable 2x0 75mm2 60 60 30 Twisted cable 2x1mm2 80 80 40 APPENDIX Star Topology Wiring Mode With M SM4...

Страница 25: ...perly or inconsistently with the product operating instructions the product has been used or left in improper conditions excessive humidity too high or low temperature sunlight etc maintenance and ope...

Страница 26: ...Firma Handlowa Wena Al Jerozolimskie 311 05 816 Regu y near Warsaw Poland tel 48 228 370 286 48 228 174 008 e mail biuro vidos pl www vidos pl...

Отзывы: