


320W FINISHING SANDER ENG
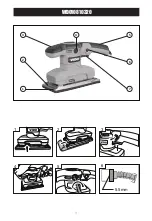
3) Always ensure the sanding sheet is tight over the sanding base and secured underneath both locked
clamps. This will ensure safe and efficient sanding performance.
4. Switching On and Off
1) To start the sander, simply depress the switch trigger. Release the switch trigger to stop your sander.
2) If you wish to use the sander continuously, depress switch trigger and then lock on button, release
switch trigger first and lock on button second (See Fig 3). Your switch is now locked on for continuous
use. To turn off your sander just depress and release the switch trigger. The switch will return to "off"
position automatically.
5. Operation
1) Always hold the sander firmly while it is on and apply it gently to the workpiece, it may kickback
slightly on first contact. Hold the sander so that it is flat on the workpiece and move the sander slowly,
preferably in parallel lines, circles or crosswise movements (See Fig 4). Upon completion of sanding,
release the switch trigger and wait until the sander comes to a complete stop before lifting it from the
workpiece.
2) For a finer finish, always use a fine grain sanding sheet and only move the sander in the direction of
the grain and never across the grain. Do not allow your sander to remain in the same position otherwise
you will remove material and create an uneven surface.
Note:
If the workpiece is small or it may move during sanding, it must be held in a vice or suitably
clamped.
WORKING HINTS FOR YOUR POWER TOOL
1. Use coarse grit sanding sheet to sand rough surfaces, medium grit for smooth surfaces and fine grit
for the final surfaces. If necessary, first make a test on scrap material. Use only good quality sanding
sheet.
2. A sanding sheet that has been used for metal should not be used for other materials.
3. Do not start sanding without sanding sheet fitted.
4. Start your sander before sanding and turn off only after stopping sanding.
5. For best results sand wood in the direction of the grain.
6. Pay attention to apply uniform sanding pressure, this increases the working life of the sanding
sheets.
7. Intensifying the sanding pressure does not lead to an increase of the sanding capacity, but to
increased wear of the machine and the sanding sheet.
8. Replacing the sanding sheet regularly will maintain optimum sanding efficiency.
9. Do not sand in one spot for too long because the sander’s rapid action may remove too much
material and make the surface uneven.
9
Содержание WD010810320
Страница 1: ...Finishing sander WD010810320 320W...
Страница 3: ...WD010810320 1 2 3 6 4 5 5 5mm 3 2 1 3 4 5 6 7...
Страница 11: ...11 320W FINISHING SANDER ENG EXPLOSIVE VIEW...
Страница 13: ...13 WD010810320...
Страница 14: ...14 WD010810320...
Страница 15: ...15 WD010810320...
Страница 16: ...MADE IN CHINA Copyright WIDO Machinery Co Ltd All rights reserved www widopt com...