Vidifox PV 700ST Скачать руководство пользователя страница 24


24 

7.3.2.2. PREPARATION FOR INSTALLATION


To install and uninstall, please login in as system administrator, otherwise, the install/uninstall 

will fail.


Please connect the unit to the PC before starting installation. 

Please select the right software to install: Visualizer_USB(x32): 

Windows XP, 32bit. Visualizer_USB(Windows7 x64): Windows 

7, 64bit.


Visualizer_USB(Vista x64): Windows Vista, 64bit.


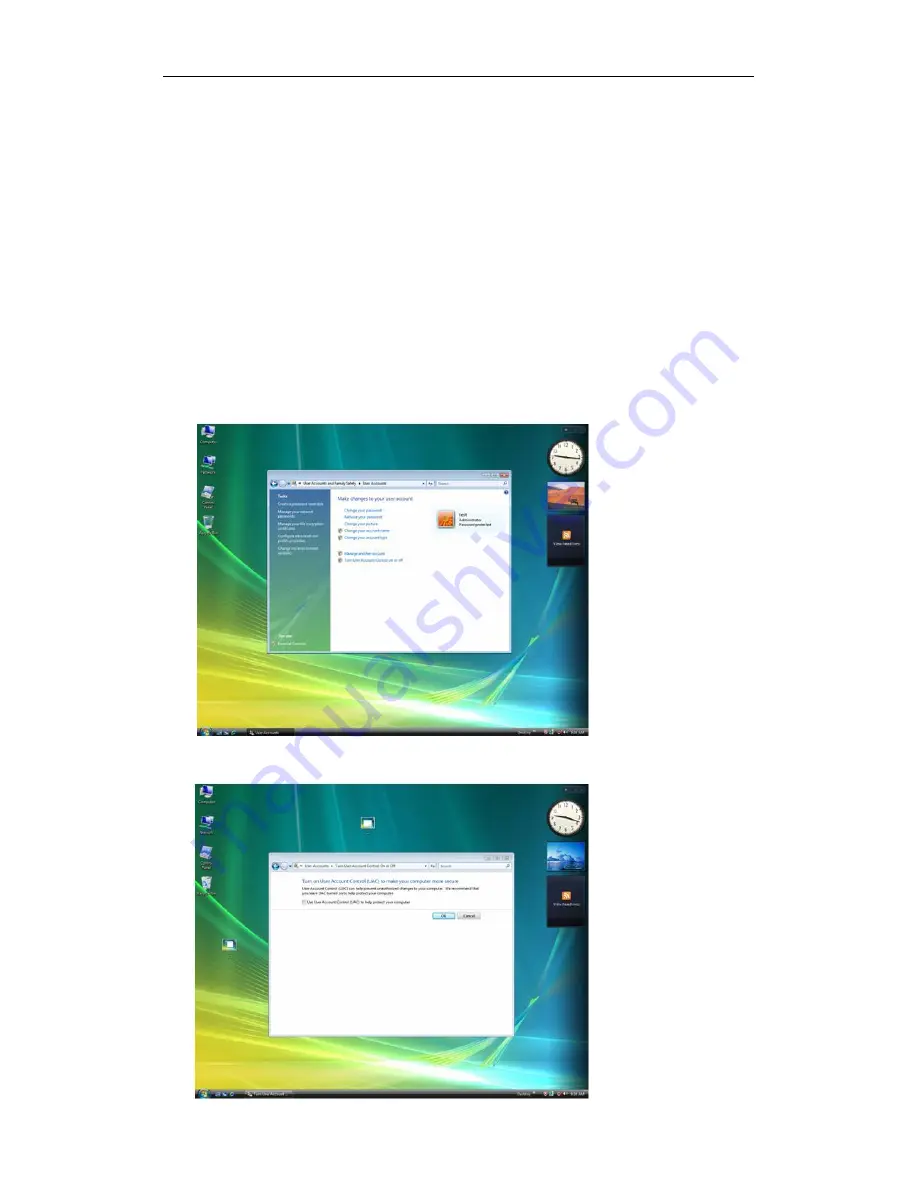
For Vista system, please do not choose “Use User Account Control (UAC) to help protect your 

computer”, follow the step to complete the setting:


1.  Open the control panel, then click User accounts: 


2.


Click on “Turn User Account Control on or off”, you will see: 


Содержание PV 700ST

Страница 1: ...before you use the document camera Keep the CD ROM in a convenient place so you can use it quickly if you need to Please visit us at http www waninusa com where you can get product support the latest...

Страница 2: ...the document camera or shut off the power when not in use Legal Notice FCC Part 15 This device complies with Part 15 of the FCC Rules Operation of this product is subject to the following two conditio...

Страница 3: ...WITH COMPUTER 17 7 1 COMPUTER REQUIREMENTS 17 7 2 CONTROL VIA RS232 17 7 3 USB FUNCTION 22 7 3 1 USB A 22 7 3 2 USB B 22 7 3 2 1 COMPUTER REQUIREMENTS 20 7 3 2 2 PREPARATION FOR INSTALLATION 20 7 3 2...

Страница 4: ...CTURE IN PICTURE FUNCTION 42 IMAGE SAVE 42 IMAGE RECALL 42 RGB INPUT SWITCH 43 OUTPUT SWITCH 43 USB IMAGE CAPTURE AND VIDEO RECORDING 43 RS232 CONTROL 43 9 SPECIFICATION 43 10 TROUBLE SHOOTING 44 11 P...

Страница 5: ...5 1 PARTS IDENTIFICATION 1 Remote control IR receiver 2 Camera 3 LED light box 4 Upper mechanical arm 5 Main mechanical arm 6 Side panel 7 Back panel 8 Control panel 9 LCD...

Страница 6: ...cted image in Image Recall mode 3 PC CAM Press this button to toggle between the image from the Camera and the VGA input 4 AUTO a Carry out automatic adjustment for focus color and white balance b Whe...

Страница 7: ...ghtness 5 Image freeze 6 Image rotate 7 Focus 8 Focus 9 Image capture 10 Text Picture function 11 Lamp on off 12 Image mirror 13 Picture in picture function 14 Negative positive conversion 15 Image re...

Страница 8: ...8 7 Select the pen s color Yellow 8 Select the pen s color Blue 9 Select the thickness of writing 10 Select the thickness of writing 11 Select the thickness of writing...

Страница 9: ...RGB signal output 15 pin D SUB 6 PC OUT VGA RGB signal output 15 pin D SUB 7 VGA IN VGA RGB signal input 15 pin D SUB 8 AUDIO IN Audio input 9 USB A Communicate with a USB device such as a USB mouse o...

Страница 10: ...10 5 REMOTE CONTROL 1 Turn the document camera on or off 2 PC CAM Press this button to toggle the output image between the document camera and VGA IN...

Страница 11: ...to select USB Disc USB Video or Exit press MENU ENTER button to confirm 9 Save Capture the current image If a USB drive is connected to the document camera the image will be saved to the USB drive oth...

Страница 12: ...us manually focus far and focus near 19 Rotate the image by 90o 180o 270o 20 Sharp Adjust sharpness of the image 21 Neg Switch the image between positive and negative colors 22 PIP Active the Picture...

Страница 13: ...13 6 CONNECTIONS 6 1 COMPUTER CONNECTION...

Страница 14: ...14 6 2 USB A CONNECTION...

Страница 15: ...15 6 3 VGA OUTPUT CONNECTION...

Страница 16: ...16 6 4 DVI OUTPUT CONNECTION...

Страница 17: ...Operating system Windows XP CPU 1 8 GHz Physical memory 512M Video memory 64M 7 2 CONTROL VIA RS232 PV 700ST can be controlled from a computer via RS232 1 Double click the RS232 software in provided...

Страница 18: ...18 Click Change to change the installation directory if needed then click Next Click Install to install the software to the computer...

Страница 19: ...to the PV 700ST with a RS232 cable turn on the power of PV 700ST 3 Double click on or click start All Programs Visualizer_RS232 Visualizer_RS232 exe to run the RS232 software you will see the icon on...

Страница 20: ...20 Zoom Auto Display all functions Minimize Close 4 Click on you will see the following control panel 5 Properly set the software Select the corresponding model number Select the right COM port...

Страница 21: ...nstruction Button Function Power On Power on the unit Power Off Stand by PC In Home Switch between PC and Visualizer inputs VGA Video Out Switch between VGA and Video outputs reeze Image Freeze ight T...

Страница 22: ...ss and color ave Save image Recall Recall saved images NEG Switch between negative and positive image modes B W Switch between color and black white modes plit Split screen irror Mirror image T P Swit...

Страница 23: ...ccess the USB drive Use the left and right arrows to exit or enter a folder Use the up and down arrows to select an image Press Menu Enter to display the selected image Press Recall button to exit 7 3...

Страница 24: ...ase select the right software to install Visualizer_USB x32 Windows XP 32bit Visualizer_USB Windows7 x64 Windows 7 64bit Visualizer_USB Vista x64 Windows Vista 64bit For Vista system please do not cho...

Страница 25: ...e User Account Control UAC to help protect your computer For Windows 7 please change the User account control setting to Never Notify Follow the step to complete the setting 1 Click on the right key o...

Страница 26: ...26 2 Click on Action center 3 Click on Change User Account Control Setting then choose Never notify...

Страница 27: ...WARE INSTALLATION Double click to run the software installation package the following dialogue appears click Next Read the terms select I accept the terms in the license agreement Click Next as the fo...

Страница 28: ...28 The following dialogue box appears click Next The default installation directory is Program Files C Program Files you can select a different installation directory as shown...

Страница 29: ...29 Click on Change to change the directory as shown Click on OK the following figure appears Click Next...

Страница 30: ...30 Click on Install to complete installation as shown Click on Finish to complete the installation as shown...

Страница 31: ...t to USB Video mode Please follow the instruction below A Make sure the USB cable is disconnected from the unit B Press the USB button on the remote a dialog box appears on the screen under which you...

Страница 32: ...ideo Play you will see the interface 7 3 2 5 IMAGE CONTROL Zoom in and Zoom out Zoom In Ctrl I Left click the Zoom In command button to enlarge the image Zoom Out Ctrl O Left click the Zoom Out comman...

Страница 33: ...the sharpness Sharp Less Left click the Sharp Less button to reduce the sharpness Auto focus Auto Ctrl U Left click the Auto button to auto adjust the focus Mirror adjustment Mirror Ctrl M Left click...

Страница 34: ...ND VIDEO RECORDING Left click on to capture images The captured images will be automatically saved into the default destination folder The path and file name are displayed in software status bar on th...

Страница 35: ...the select a folder to save picture files text box to set the path for captured images Save the recorded video into a different folder and set up parameters for videos Click on the button next to the...

Страница 36: ...lick on you will see the interface Grapic selection and move Click on to choose a line circle rectangle or curve that placed in the image then move to another place Line Click on to place a beeline in...

Страница 37: ...change the width of the line X Y change the position of the line Color change the color of the line Width Height Change the angle of the line Rectangle Click on to place a rectangle in the image shown...

Страница 38: ...the rectangle Color change the line color of the rectangle Fill Color Tick it to fill color in the rectangle Width Height Change the shape of the rectangle by changing the angle of two adjacent lines...

Страница 39: ...change the line width of the circle X Y change the position of the circle Color change the line color of the circle Fill Color Tick it to fill color in the circle Width Height change the size of the c...

Страница 40: ...rve Line width change the line width of the curve X Y change the position of the curve Color change the line color of the curve Graphic default setting Click on to change the setting of the graphic Gr...

Страница 41: ...TIVE CONVERSION Press the Neg button on the remote control the output image will be converted to negative color Press it again the output image will be converted back to original color FOCUS ADJUSTMEN...

Страница 42: ...e without interrupting current presentation Press Freeze on remote control to freeze and unfreeze the image IMAGE ROTATE Press Rotate on the control panel to rotate the image by 90o 180o 270o SPLIT SC...

Страница 43: ...minal allows you to integrate the PV 700ST into any sophisticated central control system RS232 also enable you to control the PV 700ST via computer 9 SPECIFICATION Model PV 700ST Sensor 1 3 CMOS Pixel...

Страница 44: ...adapter Weight net 6 2lbs 2 8kg 10 TROUBLE SHOOTING Symptoms Possible causes counter measures No image 1 Power cord is not properly connected 2 Cables are not properly connected 3 Power switch is not...

Страница 45: ...king the above consult your dealer or authorized service personnel 11 PACKING LIST Item Quantity Power cord 1 Power adaptor 12V 2A 1 VGA cable 1 Mini jack audio cable 1 Switch cable 1 USB cable 2 0 1...

Страница 46: ...llowing information before calling Product model name s and numbers Product serial number s Detailed questions or problem descriptions Online Technical support is also available online at Wanin USA s...

Отзывы: