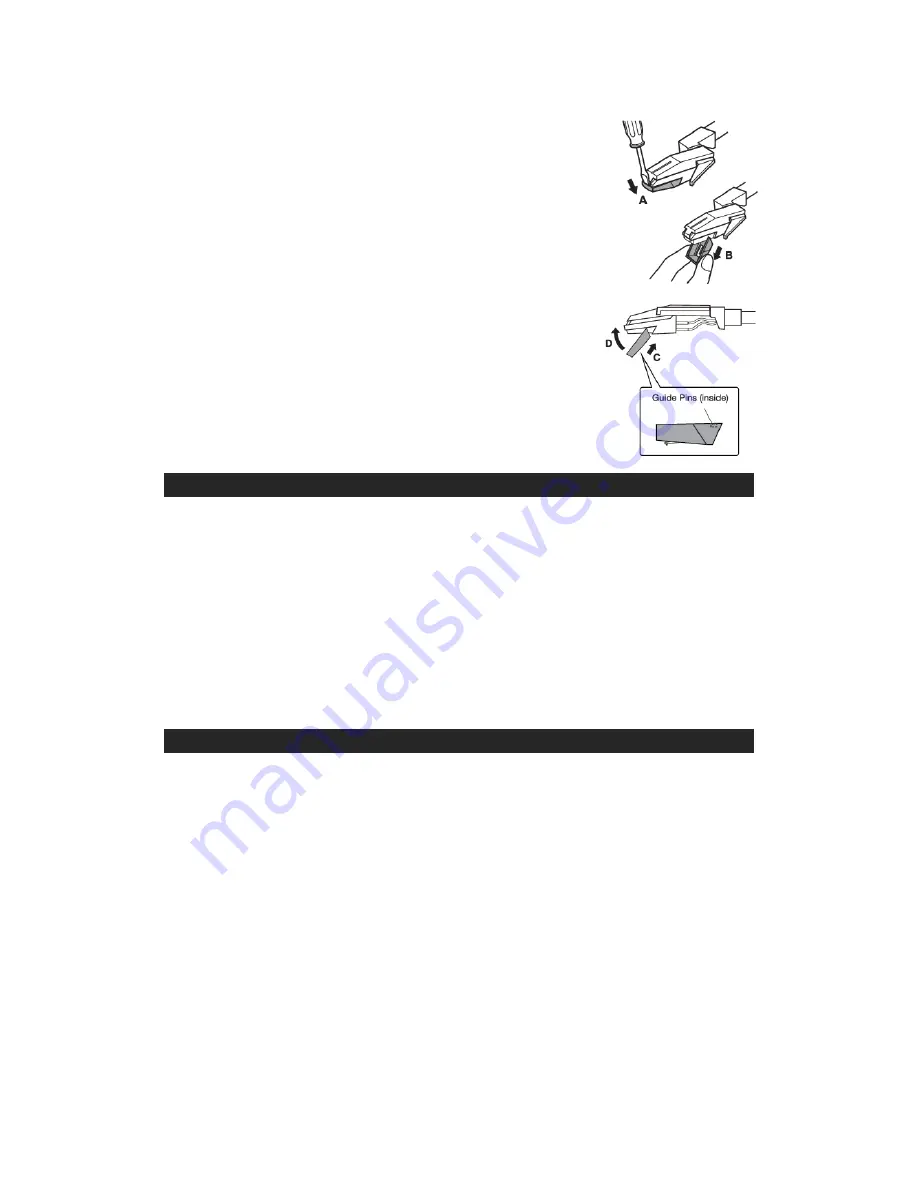
Removing the Stylus from the Cartridge
1. Set a screwdriver at the tip of the stylus and push
down to the direction “
A
”.
WARNING:
When applying force to stylus,
too much may damage or break the stylus.
2. Pull the stylus out toward the direction “
B
”.
Installing the Stylus
1. Hold the tip of the stylus and insert the other
edge by pressing toward direction “
C
”.
2. Push the stylus up toward direction “
D
” until
it locks at the tip.
Caution:
•
Do not remove or bend the stylus needle.
•
Do not touch the needle to avoid injury to your hand.
•
Turn off the unit’s power before you replace the stylus.
•
Keep out of reach of children.
RADIO OPERATION
1. Press the MODE BUTTON to RADIO mode, the LED DISPLAY will indicate
“rA”. The DIAL SCALE backlight will light up.
2. Turn the RADIO DIAL KNOB to tune to the station you want to listen to.
3. Rotate the VOLUME CONTROL KNOB to the desired volume level.
4. To turn off the Radio press the POWER BUTTON to turn off the unit or
press the MODE BUTTON to switch to a different mode.
Tips for Best Reception:
The receiver has a build-in FM PIGTAIL ANTENNA hanging on the back of the
unit. This wire should be unraveled and extended for best reception.
BLUETOOTH OPERATION
1. Press the MODE BUTTON to Bluetooth mode, the LED DISPLAY will
indicate “bt”. The BLUETOOTH LED INDICATOR will flash in blue color.
2. Turn on your external Bluetooth device to pair with the unit. Go to your
device’s Bluetooth Menu and select Bluetooth pairing name “
VTA-60
” to
connect the unit. Once connected, the blue Led light will stop flashing.
3. Select desired songs on your Bluetooth device.
4. To select the volume level, either turn the VOLUME CONTROL KNOB to
adjust the volume or adjust from your Bluetooth device.
5. If you want to disconnect the Bluetooth connection, you can press and hold
the PROG/PAIR BUTTON for 3 seconds.
NOTE: Playback functions such as Prev, Next and Play/Pause on the main
unit can be used in Bluetooth mode.


