


Installing the Kollectors
After the recorder is mounted permanently, follow the steps in this section to install the Kollector unit
hardware.
•
Step 1: Connecting the Hardware
, below
•
Step 2: Connecting External Hardware to the Kollector
•
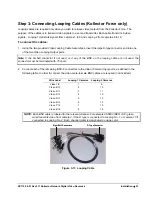
Step 3:
Connecting Looping Cables
•
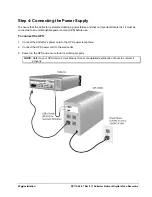
Step 4: Connecting the Power Supply
IMPORTANT NOTES:
The connection of external hardware may require simple hand tools. Do not apply power or plug-in the
recorder to any outlet until instructed to do so.
Disable the AC power to prevent installer injury and damage to the unit.
Before beginning the hardware installation, ensure that the following environmental conditions have been met:
•
The surface on which the ViconNet hardware is to be placed must be level.
•
The room or area designated for the ViconNet hardware installation must be well ventilated.
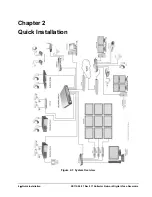
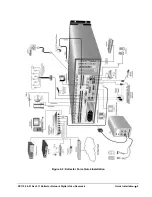
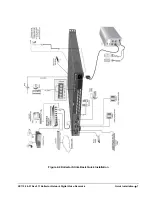
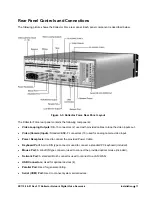
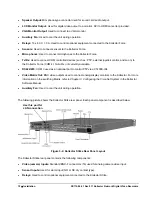
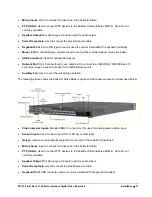
Step 1: Connecting the Hardware
This procedure describes the various hardware connections that must be performed in order to operate the
system.
To connect the ViconNet hardware:
1. Perform the following connections: (refer to Front and Rear Panel diagrams for appropriate Kollector).
1.1 Locate the keyboard on a flat surface near the recorder. Connect the keyboard by inserting its
connector into the correct port.
1.2 Locate the mouse on a flat surface near the recorder. Connect the mouse by inserting its connector
into the correct port.
1.3 Position the monitor in a permanent fixed location near the recorder. Connect the monitor by inserting
its VGA connector into the VGA Monitor Output port.
1.4 Insert one side of a standard LAN cable to the Network Port’s RJ-45 connector. Insert the other RJ-45
connector into the LAN side of the network.
1.5 Gather and locate all camera video input cables near the rear of the recorder. Insert each BNC-M into
its respective Video (Camera) Input port (1 – 16).
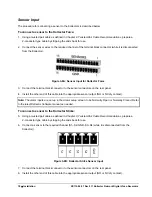
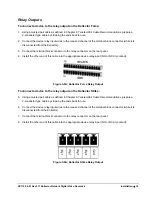
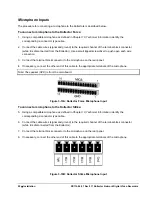
1.6 Connect external hardware devices to the Kollector’s relevant terminal connectors.
1.7 Insert the female end of the provided 120 VAC Power Cable into the recorder's Power Receptacle.
Do not connect the remaining end to a power receptacle until instructed. If using 230 VAC power, it is
necessary to obtain a suitable power cord for use. This cable is a standard computer 230 VAC power
cord.
2. Connect the monitor to the power source and power on.
XX112-06-01 Rev 911 Kollector Network Digital Video Recorders
Installation
•
15
Содержание Kollector Fore
Страница 2: ......
Страница 3: ......
Страница 42: ...Notes 32 Technical Information XX112 06 01 Rev 911 Kollector Network Digital Video Recorders ...


