ASSEMBLY INSTRUCTIONS INSTRUCCIONES DE MONTAJE MONTAGEANLEITUNG
1.
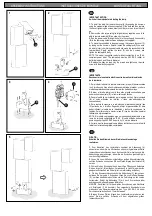
Para instalar la bombilla, primero desmontar la tapa (A) desenroscando
los 4 tornillos con llave allen mediana suministrada, proceder y volver a
montarla apretando uniformemente los tornillos hasta hacer tope.
2.
Extraer el tornillo lateral con la llave allen grande suministrada, para
poder extraer el conjunto (B), tal como indican las flechas.
3.
Pasar el cable de su instalación por el agujero central y fijar el conjunto
(B) al suelo utilizando los tornillos y tacos más adecuados (no
suministrados).
4.
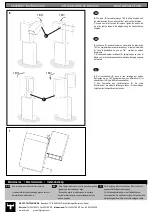
Para realizar la conexión a la red eléctrica, primero desmontar la tapa
(C) quitando los 4 tornillos. Segundo, aflojar el prensacables (D) para
poder introducir el cable de su instalación y realizar la conexión en las
regletas. Por último volver a montar la tapa (C) con los 4 tornillos, y apretar
fuertemente el prensacables.
NOTA: El modelo va preparado para ser conectado directamente a una
toma de corriente cumpliendo un IP 66. El cable utilizado debe ser de
goma o superior tipo H05 RN-F de entre 5 y 10 mm. de diámetro.
5.
Volver a montar el cuerpo tal como indican las flechas y roscar el tornillo
lateral con la llave allen grande suministrada.
EN
ES
D
1.
Zum Einsetzen des Leuchtmittels zunächst die Abdeckung (A)
abmontieren, indem Sie die 4 Schrauben mit dem mitgelieferten mittleren
Inbusschlüssel abschrauben, dann das Leuchtmittel einsetzen und die
Abdeckung wieder anbringen, indem Sie die Schrauben gleichmäßig bis
zum Anschlag festdrehen.
2.
Lösen Sie nun mithilfe des mitgelieferten großen Inbusschlüssels die
seitliche Schraube und nehmen Sie den Pfeilen folgend das Innenteil (B)
heraus.
3.
Führen Sie das Stromkabel durch die mittlere Öffnung und befestigen
Sie das Innenteil (B) am Boden. Verwenden Sie hierfür die am besten
geeigneten Schrauben und Dübel (nicht im Lieferumfang enthalten).
4.
Für den Stromanschluss zunächst die Abdeckung (C) abmontieren,
entfernen Sie hierzu die 4 Schrauben. Lösen Sie nun die Kabelklemmen
(D), um dann das Kabel einzuführen und die Verbindung an den Leisten
herzustellen. Zuletzt die Abdeckung (C) mit den 4 Schrauben wieder
anbringen und die Kabelklemmen festdrehen.
HINWEIS: Das Modell ist für den direkten Anschluss an eine Steckdose
mit Schutzgrad IP 66 konzipiert. Das verwendete Stromkabel muss
mindestens eine Gummiummantelung des Typs H05 RN-F mit einem
Durchmesser zwischen 5 und 10 mm aufweisen
.
5.
Bringen Sie den Pfeilen folgend den Leuchtenkörper wieder an und
ziehen Sie die seitliche Schraube mit dem mitgelieferten großen
Inbusschlüssel fest.
1.
To install the bulb, first remove the cover (A) by undoing the 4 screws
using the medium-sized allen key supplied, fit the bulb and then replace
the cover, tightening the screws evenly until they are in as far as they will
go.
2.
Remove the side screw using the large allen key supplied, so as to be
able to remove assembly (B), as shown by the arrows.
3.
Run the power cable through the hole in the centre and fix assembly
(B) to the floor using suitable screws and plugs (not supplied).
4.
To make the connection to the power supply, first remove the cover (C)
by taking out the 4 screws. Second, loosen the cable gland (D) so as to
be able to insert your mains power cable and make the connection in the
terminal block. Finally, replace the cover (C) with the 4 screws, and
tighten the cable gland firmly.
NOTE: The model is supplied ready for direct connection to an IP 66-
compliant power point. The cable used must be H05 RN-F rubber or
better, between 5 and 10mm in diameter.
5.
Replace the body as shown by the arrows and tighten up the side
screw with the allen key supplied.
A
1
3
IMPORTANT NOTICE:
Switch of the mains before installing the lamp.
IMPORTANTE:
Desconectar el suministro eléctrico antes de realizar la instalación
de la luminaria.
WICHTIG:
Schalten Sie den Strom ab. bevor Sie die Leuchtenmontage
realisieren.
B
1
st
2
nd
3
rd
2
B
C
D
4
3
rd
1
st
2
nd
5


