background image

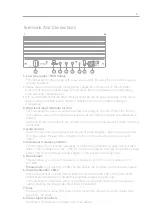
1. Low level input / RCA Cables

    For connection to any source with a low level output. Connect this to the RCA outputs  

    on your headunit.

• Please take extra care when running RCA cables from the source to the amplifier.  

   Ensure that they are placed away from all items that can generate any interference,  

   such as wiring harnesses etc.

• It is recommended that the RCA cables should be run on opposite sides of the car to 

   the previously installed power cables if possible, to avoid the cable picking up 

   interference.

2. High level input / Remote turn on

    For connection to a source unit without low level outputs. Connect this to the front or   

    rear speaker wires of the headunit ensuring that the polarity (positive and negative) is 

    correct.

    REM should be connected to the remote turn on wire from the headunit when not using 

    Autosense.

3. Gain control

    Used to match the input signal of the headunit to the amplifier. See the setup section   

    for more details. Please note – the gain control is not a volume control it is a level  

    match.

4. Crossover frequency control

    This will allow you to set the frequency at which the amplifiers low pass filter will take  

    affect. This is variable from 50 – 250 Hz. 50 Hz will produce only low frequencies (deep  

    bass), 250 Hz will produce low and higher, more punchy bass response.

5. Bass boost

    This will allow you to boost the bass at a frequency of 45 Hz and is variable from 

    0 –12dB


Please note

 – by bo12dB you are asking the amplifier to work 8 times harder.

6. Power/protection LED’s

    When the amplifier is wired and installed correctly the white LED on the front of the  

    amplifier will illuminate to indicate the amplifier is operating correctly.

    If the amplifier is incorrectly wired or an abnormal situation occurs such as speaker 

    cables shorting the blue protection LED will illuminate.

7. Fuse

    Ensure the correct value ATC fuse is fitted, never fit a fuse with a rating higher than 

    specified : 20 amps .

8. Power Input Terminals

    See Power Connections on Page 4 for more details.

R E M

1

2

3

4

5

7

6

8

6

Terminals And Connections

Содержание PULSE Series

Страница 1: ...Bass Enclosures PULSEV8 V4 VENTED 8 PULSEV12 V4 VENTED 12 ...

Страница 2: ...ing up make sure that your vehicle is stationary and in a safe location Keep the volume at a level so you can still hear outside noise failure to do this may result in an accident VIBE equipment is capable of producing sound levels that can permanently damage your hearing VIBE recommends caution when listening at high volume For safe and enjoyable listening the sound should be comfortable and clea...

Страница 3: ...names or the abbreviations of product names as logos are all trademarks of VIBE Graphics and logos are trademarks or trade dress of VIBE Technologies Ltd or its subsidiaries VIBE s trademarks and trade dress may not be used in connection with any product or service that is not VIBE s in any manner that is likely to cause confusion among customers or in any manner that disparages or discredits VIBE...

Страница 4: ...lly damage the amplifier Before fixing the enclosure in place please ensure that there is sufficient air flow around the exterior of the amplifier casing at least two inches is sufficient 4 R E M Battery High Level Input Connections Speaker Output From Headunit NOTE When using high level input it is not necessary to connect the remote turn on wire Do not connect both high level and low level input...

Страница 5: ...r cable and is no further than 18 inches away from the battery Please ensure that the fuse is not fitted until the entire installation procedure is complete The PULSE active enclosures feature an auto turn on circuit called Autosense This circuit allows the amplifier to switch on and off without a remote turn on wire when using high level input for low level input RCA it will still be necessary to...

Страница 6: ...on for more details Please note the gain control is not a volume control it is a level match 4 Crossover frequency control This will allow you to set the frequency at which the amplifiers low pass filter will take affect This is variable from 50 250 Hz 50 Hz will produce only low frequencies deep bass 250 Hz will produce low and higher more punchy bass response 5 Bass boost This will allow you to ...

Страница 7: ...s produced will be noticeably deeper than if it is fired into the rear seat Do not be afraid to experiment with positioning as a little time and effort can yield great improvements in sound NOTE When you have chosen your mounting position please ensure that the enclosure is securely mounted and cannot move or come into contact with objects in the luggage area Damage to the enclosure or subwoofer c...

Страница 8: ...lst 250 Hz will produce low and higher punchy bass frequencies In the correct set up the bass should not be overly prominent although some users may wish to have a bigger bass presence To set this correctly follow the following routine Firstly set the gain control correctly as described above Play a known piece of dynamic music through the entire system Use the frequency control to blend the frequ...

Страница 9: ...ck for shorts on all cables The amplifier is designed to shut down once automatically when the temperature reaches 80 C if the amplifier heatsink is very hot this may be the reason for the amplifier shutting down Remove the signal cables and try to restart the amplifier if the amplifier will not restart then it is possible that the amplifier has been damaged This damage may have been as a result o...

Страница 10: ...io co uk for more details Call 09067031420 Calls cost 50p per minute Call costs correct at date of publication 01 02 12 Hours of business 9 00am 5 30pm GMT Monday Friday All calls are recorded for training purposes MIDBASS Distribution PO Box 11000 B75 7WG 10 UK Technical Enquiries International Technical Enquiries ...

Страница 11: ... 16 6 422mm Width 11 8 300mm 14 6 370mm Depth 12 7 322mm 15 2 385mm RMS Power 200 watts 300 watts Peak Power 600 watts 900 watts Impedance 4Ω 4Ω Configuration 4th order bass reflex 4th order bass reflex Recommended Amplifier Powerbox bass 1 included Powerbox bass 1 included Recommended Fuse 20A 20A ...

Страница 12: ...ww vibeaudio co uk www youtube com vibeaudio www facebook com vibeaudio www twitter com vibecaraudio Designed and engineered in England www vibeaudio co uk www youtube com vibeaudio www facebook com vibeaudio www twitter com vibeaudio www vibeaudio co uk www youtube com vibeaudio www facebook com vibeaudio www twitter com vibecaraudio ...

Отзывы: