4 — © 2020 Viavi Solutions (21 Jan 2020)
GS-8P-384T installation
Getting your appliance installed is the first step to greater
visibility of your network. This topic covers installing your
appliance in the cabinet and connecting it to your network.
Caution:
Do not attempt in-cabinet repairs of your
appliance. The appliance is very heavy! Always use
a server lift or work with a partner to install or
remove the appliance from the cabinet to perform any
maintenance.
1.
Take the appliance and all other components out of the
packing materials.
2.
Attach the
official rail kits
to your server rack or cabinet.
3.
Install the empty head unit (A1) into your server rack or
cabinet.
4.
Install the empty JBOD unit(s) into your cabinet. Use a
server lift if necessary. Do not remove the RAID drives from
the chassis. Do not connect the power cables yet!
6.
Using the SAS cables, connect the RAID ports from the
JBOD unit(s) to the head unit and to other JBOD unit(s).
See image on previous page.
Close inspection of the RAID ports on the JBOD unit(s) show
two ports labeled
OUT
and one port labeled
IN
. All ports are
bi-directional. Our recommendation is to use the left two
ports as
IN
and the rightmost port as
OUT
.
7.
Install the
The RAID is pre-built at the factory for you and each drive
must be installed in a very specific location.
8.
Connect all power cables for each JBOD unit. Do not turn on
yet!
9.
Using an Ethernet cable, connect the
10/100/1000
port to
the network.
Connecting the 10/100/1000 port allows you to use
Windows Remote Desktop or other tools to control or
configure Windows or Windows applications, such as
Observer Analyzer.
10.
(Optional) Connect an Ethernet cable from your router or
switch to the LOM or IPMI port.
(Optional) A Lights Out Management or IPMI port
provides you a dedicated management channel for device
maintenance. It allows you to monitor, start, stop, and
manage your appliance remotely regardless of whether the
appliance is powered on.
11.
Install
into the open slots on
the back of the capture card(s).
12.
If you are connecting to SPAN/mirror ports of a network
switch
: connect a straight-through Ethernet cable from the
SPAN/mirror ports on your switch to the SFP transceivers on
the capture card.
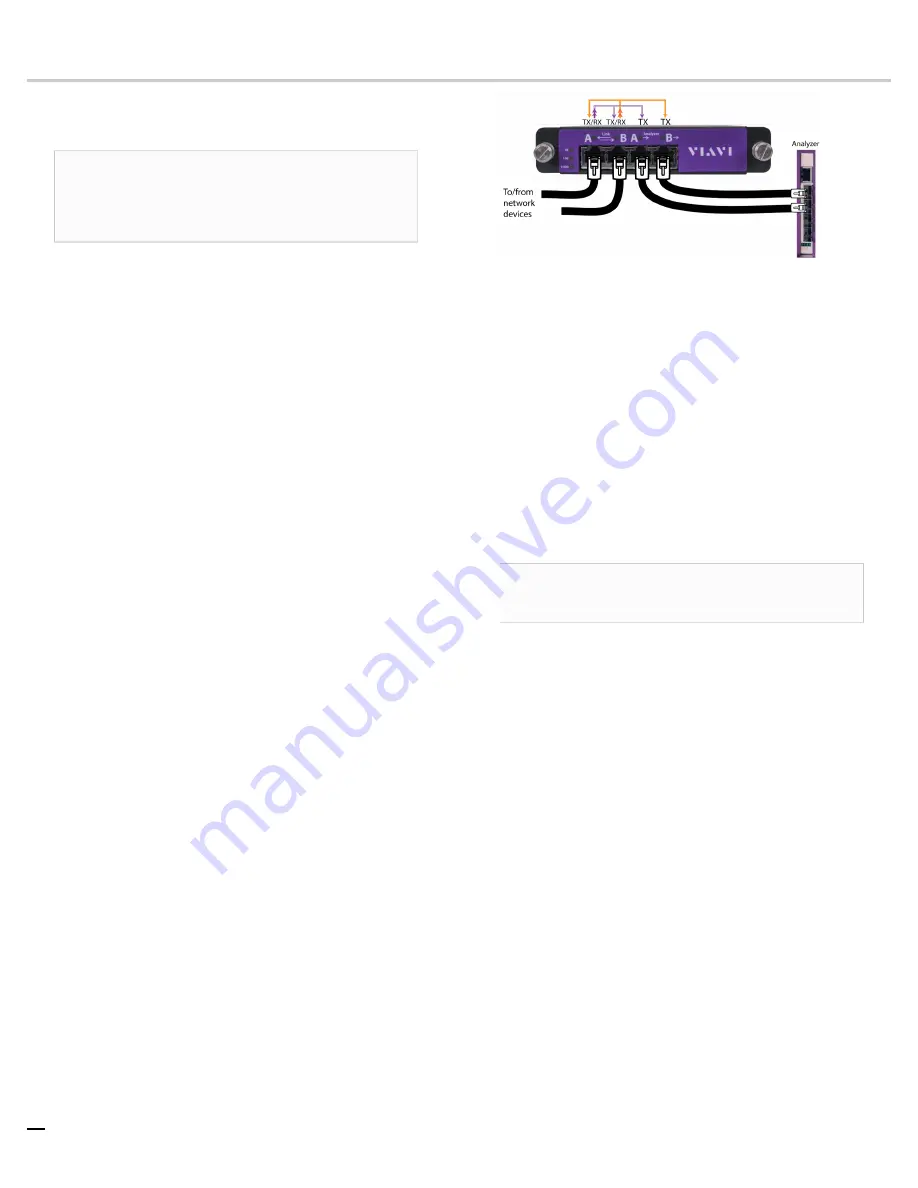
13.
If you are connecting to a network TAP (sold separately):
a.
Connect the TX port from your server, firewall, router,
or switch to the Link
A
port on the TAP.
b.
Connect the TX port from your other switch to the Link
B
port on the TAP.
c.
Use two analyzer cables to connect the analyzer port
on the TAP to the SFP transceivers in the capture card.
d.
If you have more than one TAP to connect, repeat the
process for each TAP.
14.
Connect a monitor, keyboard, and mouse to the hardware
switch if desired. (The KVM must
be compatible with the operating system used on the
appliance.) The user input devices or KVM switch are
only temporarily needed to set the IP address, so you can
disconnect them after the IP address is set.
15.
Turn on all JBOD unit(s).
Caution:
The drive does not properly initialize if the
JBOD unit(s) are not started first. If this happens, restart
the head unit.
16.
Turn on the head unit (A1) and wait for the RAID to initialize.
17.
In Windows, change the
IP address
for the
10/100/1000
port (shown as
OnBoard LAN 2
in
Network Connections
in Windows) using information supplied to you by your
network administrator.
The default IP address (
192.168.1.10
) is printed on a
sticker attached to the top of the appliance.
18.
Ensure the time zone settings match your environment.
19.
(Optional) Change the
LOM port
in the BIOS using a static
IP address provided by your network administrator.
20.
Double-click the Observer icon on the Desktop to start
Observer.
Next, give the
10/100/1000
IP address and LOM port address, if
using, to the Observer administrator. They need the addresses
to add this GigaStor probe to Observer to capture network
traffic with a probe instance.
Your hardware appliance is installed and on your network.
Next, give the
ETH0
IP address and IPMI port address, if using,
to the Observer administrator. They need the addresses to add
this GigaStor probe to Observer to capture network traffic with
a probe instance.
1. SFP, SFP+, QSFP+, and QSFP28 transceivers are sold separately.


