background image


AMOS

AMOS

AMOS

AMOS-

--

-5002

5002

5002

5002    User Manual

User Manual

User Manual

User Manual    


13


2.1.6.


VGA Connector 

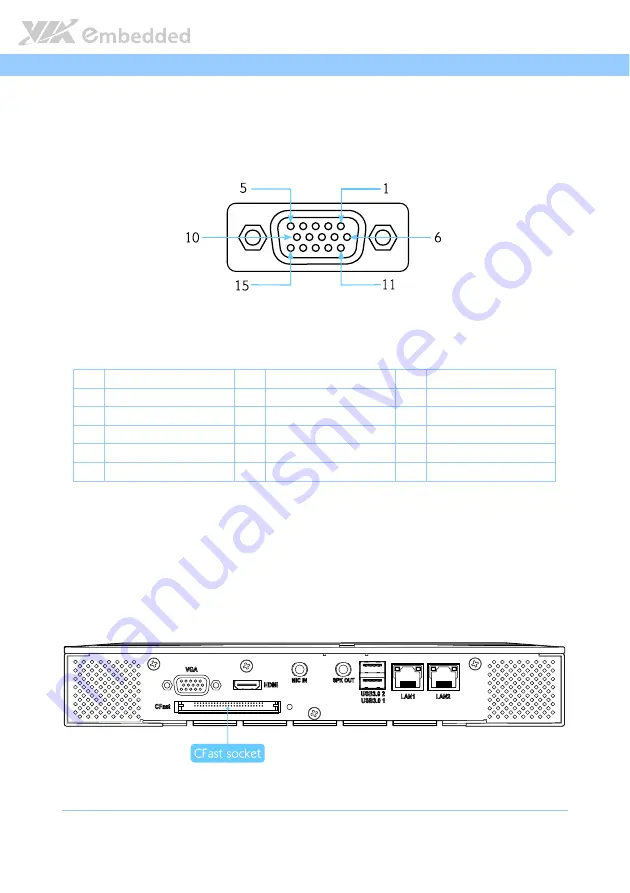
The AMOS-5002 provides a high resolution VGA interface through DE-15 

female connector on the rear I/O panel. It supports resolutions up to 2560 x 

1600. The pinout of the VGA connector is shown below. 


Figure 

Figure 

Figure 

Figure 9

9

9

9: VGA 

: VGA 

: VGA 

: VGA connector

connector

connector

connector pinout diagram

 pinout diagram

 pinout diagram

 pinout diagram    


Pin

Pin

Pin

Pin    

Signal

Signal

Signal

Signal    

Pin

Pin

Pin

Pin    

Signal

Signal

Signal

Signal    

Pin

Pin

Pin

Pin    

Signal

Signal

Signal

Signal    

RED 

Ground 

11 

NC 

GREEN 

Ground 

12 

DDC_SPD 

BLUE 

Ground 

13 

HSync 

NC 

+5V 

14 

VSync 

Ground 

10 

Ground 

15 

DDC_SCL 

Table 

Table 

Table 

Table 4

4

4

4: VGA 

: VGA 

: VGA 

: VGA connector

connector

connector

connector pinout

 pinout

 pinout

 pinout    


2.1.7.


CFast Socket 

The AMOS-5002 has CFast socket located on the rear panel. The CFast socket 

is compatible with Type I and Type II.  


Figure 

Figure 

Figure 

Figure 10

10

10

10: 

: CFast socket

CFast socket

CFast socket

CFast socket diagram

 diagram

 diagram

 diagram    

Содержание AMOS-5002

Страница 1: ...1 01 07022012 151400 USER MANUAL AMOS 5002 Compact Fanless Embedded System For product Part Number of AMOS 5002 1D10A1 and AMOS 5002 1D12A1 ...

Страница 2: ...ime without notice and without obligation to notify any person of such change VIA Technologies Inc reserves the right the make changes to the products described in this manual at any time without prior notice Regulatory Compliance FCC FCC FCC FCC A Radio Frequency Interference Statement A Radio Frequency Interference Statement A Radio Frequency Interference Statement A Radio Frequency Interference...

Страница 3: ...ace the power cord in such a way that people cannot step on it Always unplug the power cord before inserting any add on card or module If any of the following situations arises get the equipment checked by authorized service personnel The power cord or plug is damaged Liquid has penetrated into the equipment The equipment has been exposed to moisture The equipment has not worked well or you cannot...

Страница 4: ...MOS AMOS 5002 5002 5002 5002 User Manual User Manual User Manual User Manual iv Revision History Version Version Version Version Date Date Date Date Remarks Remarks Remarks Remarks 1 00 12 30 2011 Initial release ...

Страница 5: ...th 1 2 GHz Nano X2 CPU EITX 3002 Em ITX Board 1 x VGA 1 x HDMI 2 x RS 232 422 485 2 x GigaLAN 2 x USB 2 0 1 x CFast 1 x MIC in and 1 x Speak out Optional Accessories Peripherals Peripherals Peripherals Peripherals Model Number Model Number Model Number Model Number Description Description Description Description EMIO 1530 A5A1 802 11b g Wireless LAN USB module USA EMIO 1530 A6A1 802 11b g Wireless...

Страница 6: ...re Compatibility 5 1 3 Product Dimensions 6 2 2 2 2 I O Interface I O Interface I O Interface I O Interface 7 7 7 7 2 1 External I O Ports 7 2 1 1 Power Button 9 2 1 2 DC In Power Input Connector 9 2 1 3 USB 2 0 Ports 10 2 1 4 COM Connector 11 2 1 5 LED Indicators 12 2 1 6 VGA Connector 13 2 1 7 CFast Socket 13 2 1 8 HDMI Port 14 2 1 9 Audio Jacks 15 2 1 10 USB 3 0 Ports 16 2 1 11 Gigabit Ethernet...

Страница 7: ...ng the BIOS Setup Menu 37 5 2 Control Keys 37 5 3 Getting Help 38 5 4 System Overview 39 5 4 1 AMIBIOS 39 5 4 2 Processor 39 5 4 3 System Memory 39 5 4 4 System Time 40 5 4 5 System Date 40 5 5 Advanced Settings 41 5 5 1 CPU Configuration 42 5 5 2 SATA Configuration 43 5 5 3 SuperIO Configuration 44 5 5 4 Hardware Health Configuration 45 5 5 5 ACPI Configuration 46 5 5 6 APM Configuration 48 5 5 7...

Страница 8: ...uth Bridge VIA VX900 Configuration 65 5 9 Exit Options 66 5 9 1 Save Changes and Exit 66 5 9 2 Discard Changes and Exit 66 5 9 3 Discard Changes 66 5 9 4 Load Optimal Defaults 66 6 6 6 6 Driver Installation Driver Installation Driver Installation Driver Installation 67 67 67 67 6 1 Microsoft Driver Support 67 6 2 Linux Driver Support 67 Appendix A Accessories Appendix A Accessories Appendix A Acce...

Страница 9: ...Figure 16 CLEAR CMOS jumper 34 Figure 17 JCOMV1 and JCOMV2 voltage select jumpers 35 Figure 18 Illustration of the Main menu screen 39 Figure 19 Illustration of the Advanced Settings screen 41 Figure 20 Illustration of the CPU Configuration screen 42 Figure 21 Illustration of SATA Configuration screen 43 Figure 22 Illustration of Primary IDE Master screen 43 Figure 23 Illustration of SuperIO Confi...

Страница 10: ... 35 Illustration of Advanced Chipset Settings screen 61 Figure 36 Illustration of North Bridge VIA VX900 Configuration screen 61 Figure 37 Illustration of DRAM Frequency Timing Configuration screen 62 Figure 38 Illustration of OnChip VGA Configuration screen 63 Figure 39 Illustration of South Bridge VIA VX900 Configuration screen 65 Figure 40 Illustration of Exit Options screen 66 Figure 41 2 pole...

Страница 11: ...ort pinout 10 Table 3 COM connector pinout 11 Table 4 VGA connector pinout 13 Table 5 HDMI port pinout 14 Table 6 Audio jack receptacle pinout 15 Table 7 USB 3 0 port pinout 16 Table 8 Gigabit Ethernet port pinout 17 Table 9 CLEAR CMOS jumper settings 34 Table 10 JCOMV1 and JCOMV2 voltage select jumper settings 35 Table 11 Serial port addresses IRQs and types 44 ...

Страница 12: ...uminum alloy with wall mountable or table mountable feature for easy setup and maintenance 1 1 Key Features Fanless Compact and Fanless Compact and Fanless Compact and Fanless Compact and Ultra Ultra Ultra Ultra Slim Slim Slim Slim Rugged Chass Rugged Chass Rugged Chass Rugged Chassis is is is The AMOS 5002 features fanless operation in a sealed and slim aluminum chassis that does double duty as a...

Страница 13: ...for a Wide Range of Power Sources The AMOS 5002 supports a wide range of input power from DC 7V 36V The flexibility of power input enables the AMOS 5002 to be deployable for various automation environments Optimized Integration Optimized Integration Optimized Integration Optimized Integration Optimized integration enables a quick setup and simplifies maintenance Systems are supplied ready to run w...

Страница 14: ...anagement System Power Management System Power Management System Power Management Timer Power on ACPI Supported 1 2 2 System Memory Technology Technology Technology Technology 1 x 204 pin SODIMM socket supporting DDR3 1066 SDRAM Maximum Maximum Maximum Maximum Capacity Capacity Capacity Capacity Supports memory sizes up to 4 GB 1 2 3 Graphics Controller Controller Controller Controller Integrated ...

Страница 15: ...HDMI port 1 x CFast socket 2 x 3 5 Ø audio jacks Mic In and Speaker Out 2 x USB 3 0 ports 2 x RJ 45 connectors 2 GigaLAN connectors as LAN 1 and LAN 2 1 2 5 Mechanical Characteristics Chassis Chassis Chassis Chassis Construction Construction Construction Construction Front and rear I O metal face plates Aluminum top cover Aluminum bottom chassis housing with cooper heat pie and fins installed with...

Страница 16: ...mperature Storage Temperature Storage Temperature 20 C up to 60 C Relative Humidity Relative Humidity Relative Humidity Relative Humidity 0 to 90 45 C non condensing Vibration Vibration Vibration Vibration During O During O During O During Operation peration peration peration with CFa with CFa with CFa with CFast card st card st card st card 5Grms IEC 60068 2 64 random 5 500Hz 1 Oct min 1hr axis S...

Страница 17: ...AMOS 5002 5002 5002 5002 User Manual User Manual User Manual User Manual 6 1 3 Product Dimensions Figure Figure Figure Figure 1 1 1 1 AMOS AMOS AMOS AMOS 5002 Dimensions 5002 Dimensions 5002 Dimensions 5002 Dimensions ...

Страница 18: ...ne 2 1 External I O Ports The AMOS 5002 has external I O ports placed along both faces of the chassis Figure Figure Figure Figure 2 2 2 2 Front I O panel Front I O panel Front I O panel Front I O panel Item Item Item Item Description Description Description Description Item Item Item Item Description Description Description Description 1 Power button On Off 6 COM2 connector 2 DC power input connec...

Страница 19: ...Rear I O panel Rear I O panel Rear I O panel Rear I O panel Item Item Item Item Description Description Description Description Item Item Item Item Description Description Description Description 10 VGA connector 15 USB 3 0 port 2 11 CFast socket 16 USB 3 0 port 1 12 HDMI port 17 Gigabit Ethernet port 2 LAN2 13 Mic In jack 18 Gigabit Ethernet port 1 LAN1 14 Speaker Out jack ...

Страница 20: ... diagram diagram 2 1 2 DC In Power Input Connector The AMOS 5002 comes with a 2 pole Phoenix connector on the front panel that carries 7VDC 36VDC external power input Figure Figure Figure Figure 5 5 5 5 Power Power Power Power input input input input connector pinout diagram connector pinout diagram connector pinout diagram connector pinout diagram Pin Pin Pin Pin Signal Signal Signal Signal 1 GND...

Страница 21: ...e complies with USB UHCI Rev 2 0 Figure Figure Figure Figure 6 6 6 6 USB USB USB USB 2 0 2 0 2 0 2 0 port port port port pinout diagram pinout diagram pinout diagram pinout diagram USB1 USB1 USB1 USB1 USB2 USB2 USB2 USB2 Pin Pin Pin Pin Signal Signal Signal Signal Pin Pin Pin Pin Signal Signal Signal Signal 1 VCC 1 VCC 2 USB data 2 USB data 3 USB data 3 USB data 4 GND 4 GND Table Table Table Table...

Страница 22: ... the BIOS Figure Figure Figure Figure 7 7 7 7 COM connector pinout diagram COM connector pinout diagram COM connector pinout diagram COM connector pinout diagram Pin Pin Pin Pin RS RS RS RS 232 Signal 232 Signal 232 Signal 232 Signal RS RS RS RS 422 Signal 422 Signal 422 Signal 422 Signal RS RS RS RS 485 Signal 485 Signal 485 Signal 485 Signal 1 DCD Tx DATA 2 RxD Tx DATA 3 TxD Rx NC 4 DTR Rx NC 5 ...

Страница 23: ...the front panel of the AMOS 5002 that indicate the status of the system PWR LED is green and indicates the status of the system s power status HDD LED is red and indicates any storage activity for the CFast disk Figure Figure Figure Figure 8 8 8 8 System LED indicators System LED indicators System LED indicators System LED indicators ...

Страница 24: ...am pinout diagram Pin Pin Pin Pin Signal Signal Signal Signal Pin Pin Pin Pin Signal Signal Signal Signal Pin Pin Pin Pin Signal Signal Signal Signal 1 RED 6 Ground 11 NC 2 GREEN 7 Ground 12 DDC_SPD 3 BLUE 8 Ground 13 HSync 4 NC 9 5V 14 VSync 5 Ground 10 Ground 15 DDC_SCL Table Table Table Table 4 4 4 4 VGA VGA VGA VGA connector connector connector connector pinout pinout pinout pinout 2 1 7 CFast...

Страница 25: ...hown below Figure Figure Figure Figure 11 11 11 11 HDMI port pinout diagram HDMI port pinout diagram HDMI port pinout diagram HDMI port pinout diagram Pin Pin Pin Pin Signal Signal Signal Signal Pin Pin Pin Pin Signal Signal Signal Signal 1 HDMITX2 2 GND 3 HDMITX2 4 HDMITX1 5 GND 6 HDMITX1 7 HDMITX0 8 GND 9 HDMITX0 10 HDMITXC 11 GND 12 HDMITXC 13 CEC 14 NC 15 SPCLK 16 SPDAT 17 GND 18 PVDD5 19 DP1_...

Страница 26: ...al speakers or headphones Figure Figure Figure Figure 12 12 12 12 Audio jack receptacle stack Audio jack receptacle stack Audio jack receptacle stack Audio jack receptacle stack Jack Jack Jack Jack Description Description Description Description Mic In TRS jack 3 5mm Ø 5P 90 Degree Female shielded Speaker Out TRS jack 3 5mm Ø 5P 90 Degree Female shielded Table Table Table Table 6 6 6 6 Audio jack ...

Страница 27: ...vious USB 2 0 specifications Each USB 3 0 port uses USB Type A receptacle connector The pinout of the typical USB 3 0 port is as shown below Figure Figure Figure Figure 13 13 13 13 USB USB USB USB 3 3 3 3 0 port pinout diagram 0 port pinout diagram 0 port pinout diagram 0 port pinout diagram Pi Pi Pi Pin n n n Signal Signal Signal Signal 1 5V 2 Data 3 Data 4 GND 5 Rx 6 Rx 7 GND 8 Tx 9 Tx Table Tab...

Страница 28: ..._TD3 7 LAN2_TD3 8 LAN1_TD3 8 LAN2_TD3 Table Table Table Table 8 8 8 8 Gigabit Ethernet port pinout Gigabit Ethernet port pinout Gigabit Ethernet port pinout Gigabit Ethernet port pinout Both LAN1 and LAN2 are equipped with two LED indicators located to show its active link status and speed status LAN LED Status LAN LED Status LAN LED Status LAN LED Status Link LED Link LED Link LED Link LED Left L...

Страница 29: ...AMOS AMOS AMOS AMOS 5002 5002 5002 5002 User Manual User Manual User Manual User Manual 18 ...

Страница 30: ...h information about hardware installation procedures It is recommended to use a grounded wrist strap before handling computer components Electrostatic discharge ESD can damage some components 3 1 How to remove the cover Step 1 Step 1 Step 1 Step 1 Remove the eight screws on the top of the chassis US B2 US B1 DC IN 7 36V CO M2 CO M1 PW R HDD ON O FF Step 2 Step 2 Step 2 Step 2 Lift up the cover slo...

Страница 31: ...ch on the memory module with the notch on the SODIMM socket Step 2 Step 2 Step 2 Step 2 Insert the memory module into the SODIMM socket at the 30 degree angle Then push down until the memory module snaps into place The SODIMM socket has two locking mechanisms that will click once the memory module has been fully inserted US B2 US B1 DC IN 7 36V CO M2 CO M1 PW R HDD ON O FF 1 2 ...

Страница 32: ...l User Manual User Manual 21 Step 3 Step 3 Step 3 Step 3 Flip over the top cover chassis Install the memory heatsink with thermal pad then secure it with four screws Step 4 Step 4 Step 4 Step 4 Remove the thermal pad protective cover plastic of the memory heatsink ...

Страница 33: ...er Manual 22 3 3 How to install the WLAN module Step 1 Step 1 Step 1 Step 1 Connect the mini coaxial antenna cable to the mini RF MAIN connector on Wi Fi module Step 2 Step 2 Step 2 Step 2 Flip over the Wi Fi module Install it over the module plate and secure it with three screws ...

Страница 34: ...dule Remove the two screws on the mainboard and replace it with two standoff hex screws provided with the WLAN kit Step 4 Step 4 Step 4 Step 4 Align the two mounting holes on the Wi Fi module plate with the mounting holes on the standoffs hex screws Step 5 Step 5 Step 5 Step 5 Secure the Wi Fi module plate with Wi Fi module in place with the screws provided x2 ...

Страница 35: ...ep 6 6 6 6 Attach the board to board cable to the Wi Fi USB pin header J5 USB2 0 on the mainboard The red wire of the cable should be on pin number 2 of the pin header J5 USB2 0 Step 7 Step 7 Step 7 Step 7 Gently attach the other end of the board to board cable to the Wi Fi mini connector on the Wi Fi module ...

Страница 36: ...r Manual User Manual User Manual User Manual 25 Step Step Step Step 8 8 8 8 Remove the Wi Fi antenna hole cover from the front chassis To facilitate removing the cover use a pair of needle nose pliers to depress both locking clips simultaneously ...

Страница 37: ...ep Step 9 9 9 9 Insert the antenna cable provided with the WLAN kit into the WLAN antenna hole from the inside Make sure the flat side of the antenna jack matches the flat side of the antenna hole Step Step Step Step 10 10 10 10 Secure the WLAN antenna jack to the chassis with the toothed washer and nut ...

Страница 38: ...OS AMOS AMOS AMOS 5002 5002 5002 5002 User Manual User Manual User Manual User Manual 27 3 4 How to install CFast Card Step 1 Step 1 Step 1 Step 1 Remove the CFast card cover from the front chassis plate ...

Страница 39: ...AMOS AMOS 5002 5002 5002 5002 User Manual User Manual User Manual User Manual 28 Step 2 Step 2 Step 2 Step 2 Insert the CFast card into the CFast socket Ensure the orientation is correct before inserting the card ...

Страница 40: ...AMOS AMOS AMOS AMOS 5002 5002 5002 5002 User Manual User Manual User Manual User Manual 29 Step 3 Step 3 Step 3 Step 3 Install back the CFast socket cover and secure it with screw ...

Страница 41: ...l User Manual User Manual 30 3 5 How to install the Mounting Brackets Step 1 Step 1 Step 1 Step 1 Prepare the left and right brackets and the four screws Step 2 Step 2 Step 2 Step 2 Fasten the mounting brackets to both sides of the AMOS 5002 chassis as shown below ...

Страница 42: ...AMOS AMOS AMOS AMOS 5002 5002 5002 5002 User Manual User Manual User Manual User Manual 31 Step 3 Step 3 Step 3 Step 3 Secure both mounting brackets to the wall table with four screws ...

Страница 43: ......

Страница 44: ...tected by a plastic cover that slides over the pins to connect them In order to close a jumper you should connect the pins with the clip And remove the clip in order to open the jumper Sometimes a jumper will have three pins which labeled 1 2 and 3 In this case you would connect either pins 1 and 2 or pins 2 and 3 Figure Figure Figure Figure 15 15 15 15 Basic j Basic j Basic j Basic jumper configu...

Страница 45: ...tting is on pins 1 and 2 Figure Figure Figure Figure 16 16 16 16 CLEAR CMOS jumper CLEAR CMOS jumper CLEAR CMOS jumper CLEAR CMOS jumper Setting Setting Setting Setting 1 1 1 1 2 2 2 2 3 3 3 3 Normal Operation default ON ON OFF Clear CMOS setting OFF ON ON Table Table Table Table 9 9 9 9 CLEAR CMOS jumper settings CLEAR CMOS jumper settings CLEAR CMOS jumper settings CLEAR CMOS jumper settings N N...

Страница 46: ...ect jumpers JCOMV1 and JCOMV2 voltage select jumpers JCOMV1 and JCOMV2 voltage select jumpers JCOMV1 Setting JCOMV1 Setting JCOMV1 Setting JCOMV1 Setting Pin 1 Pin 1 Pin 1 Pin 1 Pin 2 Pin 2 Pin 2 Pin 2 Pin 3 Pin 3 Pin 3 Pin 3 JCOMV2 Setting JCOMV2 Setting JCOMV2 Setting JCOMV2 Setting Pin 1 Pin 1 Pin 1 Pin 1 Pin 2 Pin 2 Pin 2 Pin 2 Pin 3 Pin 3 Pin 3 Pin 3 RI default Off Off Off RI default Off Off ...

Страница 47: ......

Страница 48: ...ol Keys Up Up Up Up Move up one row Down Down Down Down Move down one row Left Left Left Left Move to the left in the navigation bar Right Right Right Right Move to the right in the navigation bar Enter Enter Enter Enter Access the highlighted item Esc Esc Esc Esc Jumps to the Exit screen or returns to the previous screen 1 Increase the numeric value 1 Decrease the numeric value F1 F1 F1 F1 Genera...

Страница 49: ...User Manual 38 5 3 Getting Help The BIOS Setup Utility provides a General Help screen This screen can be accessed at any time by pressing F1 F1 F1 F1 The help screen displays the keys for using and navigating the BIOS Setup Utility Press Esc Esc Esc Esc to exit the help screen ...

Страница 50: ... Size 3840MB System Memory BIOS SETUP UTILITY V02 69 C Copyright 1985 2010 American Megatrends Inc Tab F1 F10 ESC Select Screen Select Item Change Field Select Field General Help Save and Exit Exit Main Advanced Boot Security Chipset Exit Figure Figure Figure Figure 18 18 18 18 Illustration of the Main menu screen Illustration of the Main menu screen Illustration of the Main menu screen Illustrati...

Страница 51: ...d segments The and keys on the number pad can be used to change the values The time format is Hour Minute Second 5 4 5 System Date This section shows the current system date Press Tab Tab Tab Tab to traverse right and Shift Tab Shift Tab Shift Tab Shift Tab to traverse left through the month day and year segments The and keys on the number pad can be used to change the values The weekday name is a...

Страница 52: ...B Configuration SATA Configuration FreeDos Configuration BIOS SETUP UTILITY V02 69 C Copyright 1985 2010 American Megatrends Inc Enter F1 F10 ESC Select Screen Select Item Go to Sub Screen General Help Save and Exit Exit Main Advanced Boot Security Chipset Exit Figure Figure Figure Figure 19 19 19 19 Illustration of the Advanced Settings screen Illustration of the Advanced Settings screen Illustra...

Страница 53: ...e and Exit Exit Figure Figure Figure Figure 20 20 20 20 Illustration of the CPU Configuration screen Illustration of the CPU Configuration screen Illustration of the CPU Configuration screen Illustration of the CPU Configuration screen 5 5 1 1 5 5 1 1 5 5 1 1 5 5 1 1 PMON PMON PMON PMON The PMON function has two settings Auto and Disabled When set to Auto the PMON function will be enabled and cont...

Страница 54: ...reen Illustration of SATA Configuration screen Illustration of SATA Configuration screen 5 5 2 1 5 5 2 1 5 5 2 1 5 5 2 1 Hard Disk Information Hard Disk Information Hard Disk Information Hard Disk Information When a hard drive is detected the hard drive s detailed information can be displayed on the Primary IDE Master Slave sub screen Primary IDE Master Select the type of device connected to the s...

Страница 55: ...figuration screen Configuration screen Configuration screen Configuration screen 5 5 3 1 5 5 3 1 5 5 3 1 5 5 3 1 Serial Ports 1 to 4 Serial Ports 1 to 4 Serial Ports 1 to 4 Serial Ports 1 to 4 Port Port Port Port Address Address Address Address IRQ IRQ IRQ IRQ Type Type Type Type 1 Disabled 3F8 4 RS232 RS422 RS485 2 Disabled 2F8 4 RS232 RS422 RS485 3 Disabled 3E8 4 4 Disabled 2E8 4 Table Table Tab...

Страница 56: ...68 V 5V 4 918 V 1 5VDIMM 1 502 V Advanced CPU Temperature 33 C 91 F 3 3V 3 352 V System Fan Speed N A VBAT 3 328V VSB 3 328V 12V 12 232 V BIOS SETUP UTILITY V02 69 C Copyright 1985 2010 American Megatrends Inc F1 F10 ESC Select Screen Select Item Change Option General Help Save and Exit Exit Figure Figure Figure Figure 24 24 24 24 Illust Illust Illust Illustration of Hardware Health Configuration ...

Страница 57: ...ion of ACPI Configuration screen Illustration of ACPI Configuration screen Illustration of ACPI Configuration screen Illustration of ACPI Configuration screen 5 5 5 1 5 5 5 1 5 5 5 1 5 5 5 1 Suspend Mode Suspend Mode Suspend Mode Suspend Mode The Suspend Mode field has three selectable options S1 POS S1 POS S1 POS S1 POS S1 Power On Suspend POS is a low power state In this state no system context ...

Страница 58: ...3 5 5 5 3 ACPI APIC Support ACPI APIC Support ACPI APIC Support ACPI APIC Support The ACPI APIC Supports enables the ACPI support in APIC The ACPI APIC Supports has two options Enabled and Disabled When select Enabled the ACPI APIC table pointer includes in the Root System Description Table RSDT pointer lists When select the Disabled support for this feature will be unavailable 5 5 5 4 5 5 5 4 5 5...

Страница 59: ...l Help Save and Exit Exit Figure Figure Figure Figure 26 26 26 26 Illustration of APM Configuration screen Illustration of APM Configuration screen Illustration of APM Configuration screen Illustration of APM Configuration screen 5 5 6 1 5 5 6 1 5 5 6 1 5 5 6 1 Power Button Mode Power Button Mode Power Button Mode Power Button Mode The Power Button Mode has three options On Off On Off On Off On Of...

Страница 60: ...is enabled the system can be restored to an active state when a PCIE wake up signal is detected on the LAN 5 5 6 4 5 5 6 4 5 5 6 4 5 5 6 4 Resume on RTC Alarm Resume on RTC Alarm Resume on RTC Alarm Resume on RTC Alarm Resume on RTC Alarm can only be used if Resume on Software RTC Alarm Resume on Software RTC Alarm Resume on Software RTC Alarm Resume on Software RTC Alarm is not enabled This featu...

Страница 61: ...ric date is selected the RTC Alarm will be triggered on that day of the month 5 5 6 6 5 5 6 6 5 5 6 6 5 5 6 6 System Time System Time System Time System Time The System Time option enables the user to specify the time the system should power on for the date that is set in RTC Alarm Date RTC Alarm Date RTC Alarm Date RTC Alarm Date ...

Страница 62: ...xit Figure Figure Figure Figure 27 27 27 27 Illustration of Spread Spectrum Configuration screen Illustration of Spread Spectrum Configuration screen Illustration of Spread Spectrum Configuration screen Illustration of Spread Spectrum Configuration screen 5 5 7 1 5 5 7 1 5 5 7 1 5 5 7 1 Spread Spectrum Setting Spread Spectrum Setting Spread Spectrum Setting Spread Spectrum Setting The Spread Spect...

Страница 63: ...28 28 28 28 Illustration of USB Configuration screen Illustration of USB Configuration screen Illustration of USB Configuration screen Illustration of USB Configuration screen 5 5 8 1 5 5 8 1 5 5 8 1 5 5 8 1 Legacy USB Legacy USB Legacy USB Legacy USB Support Support Support Support The Legacy USB Support feature has two options Enabled and Auto When set to Enabled the system enables support for l...

Страница 64: ...2010 American Megatrends Inc F1 F10 ESC Select Screen Select Item Change Option General Help Save and Exit Exit Figure Figure Figure Figure 29 29 29 29 Illustration of FreeDos Configuration screen Illustration of FreeDos Configuration screen Illustration of FreeDos Configuration screen Illustration of FreeDos Configuration screen 5 5 9 1 5 5 9 1 5 5 9 1 5 5 9 1 FreeDos FreeDos FreeDos FreeDos The ...

Страница 65: ...tion of CRB Configuration screen Illustration of CRB Configuration screen Illustration of CRB Configuration screen 5 5 10 1 5 5 10 1 5 5 10 1 5 5 10 1 VT6130 LAN Control VT6130 LAN Control VT6130 LAN Control VT6130 LAN Control The VT6130 LAN Control feature determines whether the onboard LAN controller will be used or not 5 5 10 2 5 5 10 2 5 5 10 2 5 5 10 2 LAN Option ROM LAN Option ROM LAN Option...

Страница 66: ... of Boot Settings screen Illustration of Boot Settings screen Illustration of Boot Settings screen Illustration of Boot Settings screen 5 6 1 Boot Settings Configuration The Boot Settings Configuration screen has several features that can be run during the system boot sequence Boot Boot Settings Configuration Allows BIOS to skip certain tests while booting This will decrease the time needed to boo...

Страница 67: ...ill behave When the feature is enabled the 10 key pad will behave as a number pad When the feature is disabled the 10 key pad will behave as cursor navigation keys 5 6 1 4 5 6 1 4 5 6 1 4 5 6 1 4 Wait for F1 if Error Wait for F1 if Error Wait for F1 if Error Wait for F1 if Error This feature determines how the system will respond if an error is detected during the boot sequence If this feature is ...

Страница 68: ...1985 2010 American Megatrends Inc F1 F10 ESC Select Screen Select Item Change Option General Help Save and Exit Exit Figure Figure Figure Figure 33 33 33 33 Illustration of the Boot Device Priority screen Illustration of the Boot Device Priority screen Illustration of the Boot Device Priority screen Illustration of the Boot Device Priority screen 5 6 2 1 5 6 2 1 5 6 2 1 5 6 2 1 1 1 1 1st st st st ...

Страница 69: ...gs screen rity Settings screen rity Settings screen rity Settings screen 5 7 1 Change Supervisor Password This option is for setting a password for accessing the BIOS setup utility When a password has been set a password prompt will be displayed whenever the BIOS setup utility is launched This prevents an unauthorized person from changing any part of the system configuration When a supervisor pass...

Страница 70: ...is option is for setting a password for non supervisors When a user password is set the Clear User Password Clear User Password Clear User Password Clear User Password and Password Check Password Check Password Check Password Check options will be unlocked 5 7 4 Clear User Password This option is only available when the user accesses the BIOS Setup Utility when the user password has been specified...

Страница 71: ... i e Ctrl Alt Del will not work because the keyboard will be locked This feature has two options Se Se Se Setup tup tup tup The Setup option forces users to enter a password in order to access the BIOS Setup Utility Always Always Always Always The Always option forces users to enter a password in order to boot up the system ...

Страница 72: ... Figure Figure Figure 35 35 35 35 Illustration of Advanced Chipset Settings scr Illustration of Advanced Chipset Settings scr Illustration of Advanced Chipset Settings scr Illustration of Advanced Chipset Settings screen een een een 5 8 1 North Bridge VIA VX900 Configuration The North Bridge VIA VX900 Configuration screen contains two links to sub screens and one feature North Bridge VIA VX900 Con...

Страница 73: ...gure Figure 37 37 37 37 Illustration of DRAM Frequency Timing Configurati Illustration of DRAM Frequency Timing Configurati Illustration of DRAM Frequency Timing Configurati Illustration of DRAM Frequency Timing Configuration screen on screen on screen on screen 5 8 1 1 1 5 8 1 1 1 5 8 1 1 1 5 8 1 1 1 DRAM Clock DRAM Clock DRAM Clock DRAM Clock The DRAM Clock option enables the user to determine h...

Страница 74: ...ct Display Device 1 and 2 Select Display Device 1 and 2 Select Display Device 1 and 2 Select Display Device 1 and 2 The Select Display Device feature enables the user to choose a specific display interface This feature has four options CRT LCD HDMI and DP If both Select Display Device 1 and Select Display Device 2 are set to the same interface then any display device connected to the other interfa...

Страница 75: ...x 576 5 8 1 2 5 5 8 1 2 5 5 8 1 2 5 5 8 1 2 5 Backlight Control by VX900 Backlight Control by VX900 Backlight Control by VX900 Backlight Control by VX900 The Backlight Control feature control by VX900 enables the user to control the brightness of the LCD backlight This feature has five options Level 1 Level 1 Level 1 Level 1 0 PW Duty Level 1 Level 1 Level 1 Level 1 25 PW Duty Level 2 Level 2 Leve...

Страница 76: ...onfiguration screen 5 8 2 1 5 8 2 1 5 8 2 1 5 8 2 1 OnChip HDAC Device OnChip HDAC Device OnChip HDAC Device OnChip HDAC Device The OnChip HDAC Device feature enables the BIOS to control the high definition audio codec in the chipset This feature has two options enable and disable 5 8 2 2 5 8 2 2 5 8 2 2 5 8 2 2 WATCHDOG Timer Enable WATCHDOG Timer Enable WATCHDOG Timer Enable WATCHDOG Timer Enabl...

Страница 77: ... Illustration of Exit Options screen Illustration of Exit Options screen 5 9 1 Save Changes and Exit Save all changes to the BIOS and exit the BIOS Setup Utility The F10 hotkey can also be used to trigger this command 5 9 2 Discard Changes and Exit Exit the BIOS Setup Utility without saving any changes The Esc hotkey can also be used to trigger this command 5 9 3 Discard Changes This command rever...

Страница 78: ...www viaembedded com 6 2 Linux Driver Support The AMOS 5002 is compatible with many Linux distributions Support and drivers are provided through various methods including Drivers provided by VIA Using a driver built into a distribution package Visiting www viaembedded com for the latest updated drivers Installing a third party driver such as the ALSA driver from the Advanced Linux Sound Architectur...

Страница 79: ...AMOS AMOS AMOS AMOS 5002 5002 5002 5002 User Manual User Manual User Manual User Manual 68 ...

Страница 80: ...le 2 pole Phoenix Figure Figure Figure Figure 41 41 41 41 2 2 2 2 pole Phoenix power cable pole Phoenix power cable pole Phoenix power cable pole Phoenix power cable A 2 Mounting Brackets Figure Figure Figure Figure 42 42 42 42 Mounting brackets Mounting brackets Mounting brackets Mounting brackets A 3 EMIO 1533 WLAN Kit Figure Figure Figure Figure 43 43 43 43 WLAN Kit WLAN Kit WLAN Kit WLAN Kit ...

Страница 81: ...565 19 Email embedded via tech de Taiwan Headquarters USA Europe Tsinghua Science Park Bldg 7 No 1 Zongguancun East Road Haiden District Beijing 100084 China TEL 86 10 59852288 FAX 86 10 59852299 Email embedded viatech com cn 3 15 7 Ebisu MT Bldg 6F Higashi Shibuya ku Tokyo 150 0011 Japan TEL 81 3 5466 1637 FAX 81 3 5466 1638 Email embedded viatech co jp 2F Sangjin Bldg 417 Dogok Dong Gangnam Gu S...

Отзывы: