background image

English

   - 28 -

Safety Precautions

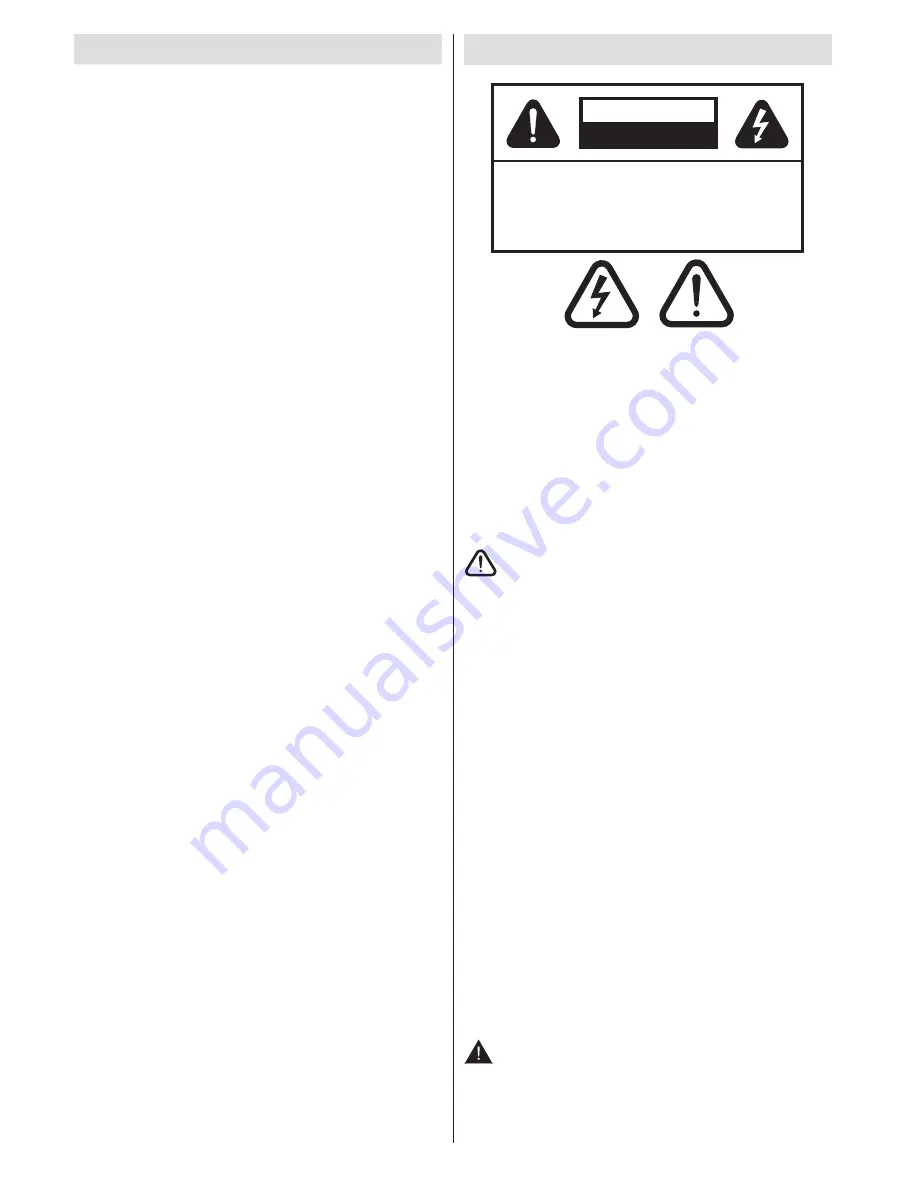
RISK OF ELECTRIC SHOCK

DO NOT OPEN

CAUTION

CAUTION:

TO REDUCE THE RISK OF ELECTRIC
SHOCK, DO NOT REMOVE COVER
(OR BACK). NO USER-SERVICEABLE
PARTS INSIDE. REFER SERVICING TO
QUALIFIED SERVICE PERSONNEL. 


RISK OF ELECTRIC SHOCK

DO NOT OPEN

CAUTION

CAUTION:

TO REDUCE THE RISK OF ELECTRIC SHOCK, 
DO NOT REMOVE COVER (OR BACK).
NO USER-SERVICEABLE PARTS INSIDE.
REFER SERVICING TO QUALIFIED SERVICE
PERSONNEL. 


RISK OF ELECTRIC SHOCK

DO NOT OPEN

CAUTION

CAUTION:

TO REDUCE THE RISK OF ELECTRIC
SHOCK, DO NOT REMOVE COVER
(OR BACK). NO USER-SERVICEABLE
PARTS INSIDE. REFER SERVICING TO
QUALIFIED SERVICE PERSONNEL. 


RISK OF ELECTRIC SHOCK

DO NOT OPEN

CAUTION

CAUTION:

TO REDUCE THE RISK OF ELECTRIC SHOCK, 
DO NOT REMOVE COVER (OR BACK).
NO USER-SERVICEABLE PARTS INSIDE.
REFER SERVICING TO QUALIFIED SERVICE
PERSONNEL. 


The  lightning  flash  with  arrowhead  symbol,  within 

an equilateral triangle, is intended to alert the user 

to the presence of uninsulated “dangerous voltage” 

within the product’s enclosure that may be of sufficient 

magnitude  to  constitute  a  risk  of  electric  shock  of 

persons.
The exclamation point within an equilateral triangle is 

intended to alert the user to the presence of important 

operating and maintenance (servicing) instructions in 

the literature accompanying the appliance.

Please read these instructions fully 

before installing or operating.

Preparation

Place  the  device  on  a  solid  even  surface.  For 

ventilation,  leave  a  free  space  of  at  least  10  cm 

all around the set. To prevent any fault and unsafe 

situations,  do  not  place  any  objects  on  top  of 

the  set.  Use  this  device  in  moderate  climates.

Operation  temperature  and  operation  humidity: 


5ºC up to 45ºC, 85% rel. humidity max. (not blocking 

ventilation openings).

Intended Use

This  device  is  used  to  receive  and  display  TV 

programmmes.The  different  connection  options 

make an additional expansion of the reception and 

display sources possible (various external devices). 

This  device  is  only  suitable  for  the  operation  in 

dry  interiors.  This  appliance  is  intended  solely 

for private domestic use and may not be used for 

industrial  and  commercial  purposes.  We  exclude 

liability  in  principle,  if  the  device  is  not  used  as 

intended, or unauthorized modifications have been 

made. To operate your LCD TV in extreme ambient 

conditions may cause the damage of the device.


WARNING: Never let people (including children) 

with physical, sensory or mental abilities or lack of 

experience and / or knowledge unsupervised use 

electrical device!

Contents

Preparation .......................................................

28

Intended Use ....................................................

28

Power source ....................................................

29

Environmental Information ................................... 30

Repair Information ............................................ 30

Accessories included ............................................ 30
TV - Features ....................................................... 30
Viewing the TV  .................................................... 30
TV Control buttons & Operation ........................... 31

Operation with the Remote Control .................. 31

Input Selection .................................................. 31

Changing Channels and Volume ...................... 31

Viewing remote control  ........................................

32

Viewing remote control  ........................................

33

Installing the Batteries to the Remote...................

35

Connect Power & Antenna/Cable/Satellite ...........

35

Switching On/Off ...................................................

35

First Time Installation............................................

35

Aerial Installation ..............................................

36

Cable Installation ..............................................

36

Satellite Installation ...........................................

37

Media Playback via USB Input .............................

37

Media Browser Menu ........................................

37

Changing Image Size: Picture Formats ................

38

Using the Channel List .........................................

38

Sorting Channel List .........................................

38

Menu Features and Functions ..............................

39

Menu Features and Functions .............................. 40
Menu Features and Functions .............................. 41
DVD MODE .......................................................... 43

Handling Discs .................................................. 43

Cleaning Discs .................................................. 43

DVD  - Features ................................................ 43

How to watch a DVD ............................................ 43

Notes on DVD Playback ................................... 43

DVD Mode Configuration...................................... 44
Electronic Programme Guide (EPG) .................... 46

Programme Options.......................................... 46

Recording a Programme ...................................... 46
Timeshift Recording  ............................................. 47
Instant Recording ................................................. 47
Watching Recorded Programmes  ....................... 47

Recordings Library............................................ 47

Recording Configuration ....................................... 47

Teletext

 ................................................................. 48

Digital Teletext (If available) .............................. 48

Software Upgrade................................................. 48
Troubleshooting & Tips ......................................... 48
PC Typical Display Modes  ................................... 50

Содержание 22PF5021B

Страница 1: ...2 KULLANIM KILAVUZU OPERATING INSTRUCTIONS COLOR 22PF5021B 22 LED TV...

Страница 2: ...cari ama larla kullan lamaz E er cihaz kullan m amac n n d nda kullan l rsa veya zerinde izinsiz de i iklikler yap l rsa prensip olarak cihazdaki sorumlulu umuz kalkar LCD TV nizi a r ortam ko ullar n...

Страница 3: ...llanmay n z banyoda mutfak lavabosu ve bula k makinesi y a k n l a r n d a k u l l a n m a k t a n ka n n z TV yi ya mura veya suya maruz b rakmak tehlikeli olabilir Tehlike yaratabilece inden bu alet...

Страница 4: ...erji t ketimini azaltacakt r Uzun s re uzakta kalacaksan z prizden kar n z Y ll k g t ketiminizi azaltmak i in G Tasarruf Modu ayarlar n etkinle tirmeniz iddetle nerilir Ayr ca kullanmad n zda daha fa...

Страница 5: ...e mek i in Sol veya Sa tu lar n kullan n ve girmek i in OK tu una bas n z Bir eyi se mek veya kaydetmek i in Sol Sa Yukar A a tu lar n kullan n z Bir men ekran ndan kmak i in BACK veya MENU tu lar n k...

Страница 6: ...tronik Program Rehberi 14 Kay t K t phanesi 15 lev yok 16 Durdur Ortam Taray c video modunda 17 Program Kayd 18 H zl geri sarma Ortam Taray c video modunda 19 H zl ileri sarma Ortam Taray c video modu...

Страница 7: ...H zl Geri sar 10 H zl ileri sar 11 Bilgi 12 Yak nla t rma 13 Tekrar 14 Kaynak 15 Men 16 Ba l k 17 OK Se me 18 Y n Tu lar 19 Altyaz 20 A Angle 21 Arama modu 22 Oynat 23 Duraklat 24 Sonrakine atlama 25...

Страница 8: ...ar daki izimlere bak n z PC sesini devreye sokmak i in YAN AV BA LANTISI kablosunun BEYAZ ve KIRMIZI giri lerini kullanmal s n z SCART soketi yoluyla harici bir cihaz ba lanm sa Tv otomatik olarak AV...

Страница 9: ...akt r TV yi Kapatma Televizyonun bekleme moduna ge mesi i in kumanda zerindeki tu una veya bekleme tu una bas n Televizyonu tamamen kapatmak i in elektrik fi ini prizden ekiniz Not TV bekleme moduna g...

Страница 10: ...onra OK tu una bas n z Kanal listesinden kmak ve TV yi seyretmek i in OK tu una bas n z LCN mevcut yay nlar tan nabilir bir kanal s ras na g re d zenleyen Mant kl Kanal Say sistemidir Kablo Kurulumu D...

Страница 11: ...ar oynatman z sa lar 2 5 ve 3 5 in haricig kayna olan hdd harici disk s r c leri desteklenir NEML Herhangi bir olas veri kayb n nlemek amac yla TV setine bir ba lant yapmadan nce dosyalar n z yedekley...

Страница 12: ...i in MENU tu una bas n z Sol veya Sa tu una basarak Kanal Listesi esini se iniz Men i eri ini g rmek i in OK tu una bas n z T m kay tl kanallar y netmek i in Kanal Listesini D zenle se ene ini se iniz...

Страница 13: ...aati ayarlamalar hesap izelgesigibiyo unnoktai erensunumlar veya k k karakterlerin kullan ld paragraflar ya da metinlerde dikey erit olarak g r nen paraziti d zeltir Faz PC modunda TV setine girdi ini...

Страница 14: ...k Orta Y ksek veya Kapal Renk S cakl stenen renk tonunu ayarlar G r nt Yak nla t rma G r nt boyutunu Otomatik 16 9 Altyaz 14 9 14 9 Yak nla t rma 4 3 veya Sinema olarak ayarlar HDMI True Black opsiyon...

Страница 15: ...l k ses t r n ayarlar Kurulum ve Geri D n Men s eri i O t o m a t i k K a n a l Arama Otomatik kanal arama se eneklerini g r nt ler Dijital Anten Havadan yay nlanan DVB kanallar n arar ve haf zaya al...

Страница 16: ...in ayar A k konuma getiriniz Sesli A klama Sesli a klama televizyon ve filmleri de i eren g rsel medyada k r ve g rme engelli izleyiciler i in ek bir anlat m ifade eder Bu zelli i yaln zca yay nc n n...

Страница 17: ...manda tu una bas lmazsa DVD moduna ge ilemez 1 TV yi a n 2 Uzaktan kumanda zerindeki SOURCE tu una basarak DVD kayna n se in 3 Yuvaya bir disk yerle tiriniz TV ekran na bakarken disk size do ru d n k...

Страница 18: ...lat lmaktad r FABR KA AYARI FABR KAAYARI se ene ini se erseniz ve SELECT tu una basarsan z fabrika ayarlar y klenir Ebeveyn seviyesi ve parolas de i mez DOWNMIX Televizyonun dijital ses k kullan ld nd...

Страница 19: ...mak i in st ste bas n DiL Otomatik dil X X MEN TV men s n g r nt ler OK SE ME Giri G r nt leme Oynatma TEKRAR Tekrarlama se eneklerini g sterir RETURN GER Bir nceki men ye d ner mevcutsa Kaynak Kaynak...

Страница 20: ...ak m mk n de ildir Program Kaydetme NEML Yeni bir USB hard disk s r c s kullan rken ncelikle TV nizin Disk Format se ene ini kullanarak yapman z tavsiye edilir Bir program kaydetmek i in TV nize kapal...

Страница 21: ...phanesi ni se iniz ve OK d mesine bas n z Kay t K t phanesi mevcut kay tlarla birlikte g r nt lenecektir B t n kay tlar kay t k t phanesindeki listede tutulur Devam Kay tlar yeniden ba lat r KIRMIZI t...

Страница 22: ...r Bir ilerleme ubu unda kalan indirme durumu g sterilir Y kleme ba ar ile tamamland nda yeni yaz l m aktive etmek i in yeniden ba latma mesaj g r n r Yeniden ba latma operasyonunun devam i in OK tu u...

Страница 23: ...ni iptal etmek i in tu una bas n veya sesi y kseltin 2 Ses hoparl rlerin sadece birinden geliyor Denge ayar u lardan birisine mi ayarlanm Ses Men s k sm na bak n z Uzaktan kumanda aleti al m yor TV uz...

Страница 24: ...L 16 9 ekran 22 Ekran Boyutu BOYUTLAR mm BxUxY Ayaks z 53 x 532 x 347 A rl k Kg 4 80 AEEE Y netmeli ine uygundur PC Tipik Ekran Modlar A a daki tablo baz tipik video ekran konumlar n n bir rne idir TV...

Страница 25: ...2 mkv H 264 MPEG1 2 4 EAC3 AC3 mp4 MPEG4 Xvid 1 00 Xvid 1 01 Xvid 1 02 Xvid 1 03 Xvid 1 10 beta1 2 H 264 PCM MP3 avi MPEG2 MPEG4 Xvid 1 00 Xvid 1 01 Xvid 1 02 Xvid 1 03 Xvid 1 10 beta1 2 H 264 PCM M z...

Страница 26: ...Disk T rleri Logolar Kay t T rleri Disk Boyutu En Fazla alma S resi zellikler Ses G r nt 12cm Tek tarafl 240 dk ift tarafl 480 dk Dolby Dijital ve MPEG 2 sistemi sayesinde DVD m kemmel ses ve g r nt...

Страница 27: ...s recinde de kar la labilinir Alt piksel hatalar 2 ana e ittir Tip 1 S rekli yanan alt piksel k rm z ye il veya mavi olabilir Tip 2 S rekli s n k alt piksel siyah bir ekilde g r n r ISO 13406 2 standa...

Страница 28: ...an uydu al c s DVD player ya da kablolu kanal yay nlar nda beklenen performans al namayabilir ve bu yay nlarda resimde mozaiklenme veya resim netlik ve keskinli i az g r nt de ekranda baz efektler olu...

Страница 29: ...ces possible various external devices This device is only suitable for the operation in dry interiors This appliance is intended solely for private domestic use and may not be used for industrial and...

Страница 30: ...ure and Water Do not use this TV in a humid or damp place avoid bathrooms the sink in the kitchen and near the washing machine Do not expose this TV to rain or water as this may be dangerous Do not pl...

Страница 31: ...me It is highly recommended to activate Power Save Mode setting to reduce your annual power consumption Also it is recommended to disconnect the TV from the mains plug to save energy more when you do...

Страница 32: ...Left or Right button to select a menu tab and press OK to enter Use Left Right Up Down to select or set an item Press BACK or MENU button to quit a menu screen Input Selection Once you have connected...

Страница 33: ...amme Guide 14 Recordings Library 15 No function 16 Stop in Media Browser mode 17 Programme recording 18 Rapid reverse in Media Browser mode 19 Rapid advance in Media Browser mode 20 Info Reveal in TXT...

Страница 34: ...y 2 Numeric buttons 3 Return back 4 Language selection 5 Display Time DVD menu 6 Clear 7 Stop 8 No function 9 Rapid reverse 10 Rapid advance 11 Info 12 Zoom 13 Repeat 14 Root 15 Menu 16 Title 17 OK Se...

Страница 35: ...ction See the illustrations above To enable PC audio you will need to use the supplied SIDE AV CONNECTION cable s WHITE RED inputs If an external device is connected via the SCART socket the TV will a...

Страница 36: ...f the button on the TV By either method the TV will switch on Switching the TV Off Press the button on the remote control or press the standby button so the TV will switch to standby mode To turn off...

Страница 37: ...ect AERIAL option from the Search Type screen the television will search for digital terrestrial TV broadcasts NOTE You can press MENU button to cancel After all the available stations are stored Chan...

Страница 38: ...3 5 inch hdd with external power supply external hard disk drives are supported IMPORTANT You should back up your files before making any connections to the TV set in order to avoid any possible data...

Страница 39: ...own and OK buttons to select Edit Channel List Press Up or Down button to select the channel that will be processed Press Left or Right button to select a function on Channel List menu Use P P buttons...

Страница 40: ...hese options Low Medium High or Off Colour Temp Sets the desired colour tone Picture Zoom Sets the picture size to Auto 16 9 Subtitle 14 9 14 9 Zoom 4 3 or Cinema HDMI True Black optional While watchi...

Страница 41: ...orrect the interference that appear as vertical banding in dot intensive presentations like spreadsheets or paragraphs or text in smaller fonts Phase in PC mode Depending on the resolution and scan fr...

Страница 42: ...igital out audio type Install and Retune Menu Contents Automatic Channel Scan Retune Displays automatic tuning options Digital Aerial Searches and stores aerial DVB stations Digital Cable Searches and...

Страница 43: ...receive such signals Audio Description Audio description refers to an additional narration track for blind and visually impaired viewers of visual media including television and movies You can use th...

Страница 44: ...e remote control 3 Insert a disc into the loader The disc MUST be facing you when looking at the TV screen Most discs will be automatically loaded and play will start automatically if the disc does no...

Страница 45: ...preferences Menu contents are detailed below DEFAULT If you choose RESET and press SELECT the factory presets are loaded Parental level and parental password does not change DOWNMIX This mode can be...

Страница 46: ...us menu if available ROOT Goes back to the root folder if available SEARCH MODE Direct selection of scenes or time Selects the desired file Selects the desired file SUBTITLE Subtitle on off Press repe...

Страница 47: ...hen using a new USB hard disk drive it is recommended that you first format the disk using your TV s Format Disk option To record a programme you should first connect a USB disk to your TV while the T...

Страница 48: ...back and return to return to Recordings Library Slow Forward If you press PAUSE button while watching recorded programmes slow forward feature will be available You can use button to slow forward Pres...

Страница 49: ...button If a new upgrade is found it starts to download the upgrade A progress bar indicates the remaining download progress When download completes with success a message is displayed for reboot to a...

Страница 50: ...Wait for 1 to 2 hours in Stand by mode to dry the equipment The Disc does not play 1 No disc in the machine Place a disc into the loader 2 Disc is incorrectly loaded Ensure that the DVD disc is in th...

Страница 51: ...icates that this battery contains lead Products Battery PC Typical Display Modes The following table is an illustration of some of the typical video display modes Your TV may not support all resolutio...

Страница 52: ...JPEG max WxH 15360x8640 4147200bytes Progressive JPEG max WxH 9600x6400 3840000bytes bmp max WxH 9600x6400 3840000bytes Subtitle sub srt Specifications TV BROADCASTING PAL SECAM B G D K K I I L L DIG...

Страница 53: ...formats Compatible disc types Disc Types Logos Recording Types Disc Size Max Playing Time Characteristics Audio Video 12cm Single sided 240 min Double sided 480 min DVD contains excellent sound and v...

Страница 54: ...els may cause sub pixel errors by way of lighting continuously or remaining dim continuously Please consider the following explanation about a possible sub pixel error This problem can be encountered...

Страница 55: ...pported by other sources in terms of high definition DVD players or cable television and in these broadcasts mosaic images may occur sharpness and resolution of the image may be low some effects may a...

Страница 56: ...ra Tarihi Fatura No Ka e ve mza ALICININ Ad Soyad Adresi Tel GARANT BELGES MALIN Cinsi TELEV ZYON Markas VESTEL Modeli Seri No bu Garanti Belgesi T C G mr k ve Ticaret Bakanl T keticinin ve Rekabetin...

Страница 57: ...r garanti kapsam d ndad r 7 Garanti belgesi ile ilgili olarak kabilecek sorunlar i in T C G mr k ve Ticaret Bakanl T keticinin Korunmas ve Piyasa G zetimi Genel M d rl ne ba vurulabilir 8 Bu belgenin...

Страница 58: ...retici firma Vestel Elektronik Sanayi ve Ticaret A Adres Organize Sanayi B lgesi 45030 Manisa Tel 0236 233 01 31 Fax 0236 233 25 85...

Страница 59: ...plerinizi Vestel dan ma hatt na iletebilir ikayet dilek nerileriniz ve Vestel irketler Grubu ile ilgili sorular n z ilgili birimlere aktarabilirsiniz e mail ba vurular n z i in tuketicihizmetleri vest...

Отзывы: