background image

VX-1210 O

PERATING

 M

ANUAL

5

Battery Compartment

This compartment houses allows installation of the 

FNB-66LI

 Lithium-Ion Battery

Pack.

CHG

 Jack

This 4-pin jack allows connection to the optional 

CD-17

 Charger.

AUX

 Jack (Option)

This optional 9-pin DB-9 jack provides AFSK input/output and CW keying to allow
easy interfacing to data communications modem devices.

Note

: The protective cover over the 

CHG

 jack and 

AUX

 jacks must be removed to access

the jacks. Replace it back over the jacks when they are not in use, to protect the inside of
the transceiver from dust and water.

Rear Panel Connectors

Содержание VX-1210

Страница 1: ...10900 Walker Street Cypress CA 90630 U S A YAESU UK LTD Unit 12 Sun Valley Business Park Winnall Close Winchester Hampshire SO23 0LB U K VERTEX STANDARD HK LTD Unit 5 20 F Seaview Centre 139 141 Hoi Bun Road Kwun Tong Kowloon Hong Kong VERTEX STANDARD AUSTRALIA PTY LTD Normanby Business Park Unit 14 45 Normanby Road Notting Hill 3168 Victoria Australia ...

Страница 2: ...VX 1210 OPERATING MANUAL 1 English ...

Страница 3: ...ifier Knob This control allows you to offset the receiving frequency by up to 200 Hz in 10 Hz steps SSB CW and DATA modes or up to 400 Hz in 20 Hz steps AM mode This control is helpful in case the incoming signal is drifting GND Terminal If an earth ground connection is available at the operating site this terminal may be connected to it to provide improved performance and safety ANT Jack This jac...

Страница 4: ...ing channel is displayed here LED Indicator This LED indicates the current status of the transceiver Glowing Green Busy Receive Channel or Squelch off Glowing Yellow Transmission in progress Blinking Yellow Antenna mismatching problem High SWR condition Blinking Red Battery voltage is nearing depletion Prepare to replace the battery Glowing Red Battery voltage is critically low Replace the battery...

Страница 5: ...ack the MH 50B7A s internal loudspeaker will be disabled Note The protective rubber cover over the jack must be pulled up to access the jack Press it back over the jack when does not in use to protect the inside of the microphone from dust and water Speaker The loudspeaker for the MH 50B7A is located here Microphone Speak across this opening in a normal voice level while pressing the PTT switch Sp...

Страница 6: ... 17 Charger AUX Jack Option This optional 9 pin DB 9 jack provides AFSK input output and CW keying to allow easy interfacing to data communications modem devices Note The protective cover over the CHG jack and AUX jacks must be removed to access the jacks Replace it back over the jacks when they are not in use to protect the inside of the transceiver from dust and water Rear Panel Connectors ...

Страница 7: ...n the Battery Pack To remove the Battery Pack turn the radio off and remove any protective cases then unlatch the clip from the Battery Pack Place your thumbs on the edge of the Battery pack then slide out the Battery Pack from the radio while applying light pressure onto it Do not attempt to open the Re chargeable Battery Pack as per sonal injury or damage to the pack could occur if a cell or cel...

Страница 8: ...rger will glow red Charging while the battery is being charged When charging is completed the red LED indicator will change to green Fully Charged A fully discharged pack will be charged completely in about five hours 5 Unplug the cable from the CHG terminal then disconnect the PA 26 AC Adapter from the AC line outlet Do not connect an improper Charger into the CHG terminal Do not forget to replac...

Страница 9: ... antenna first then connect the coaxial plug from the YA 30 to the ANT jack of the transceiver Ú When using the YA 30 dipole antenna the built in antenna tuner is not used 4 If you use this transceiver with the optional whip antenna YHA 61 or FHA 27w GN 1210 connect the whip antenna onto the ANT jack of the transceiver then con nect a good earth ground onto the GND terminal of the transceiver usin...

Страница 10: ...ave the new settings You may set up the whip antenna using the TOGGLE switch if your transceiver s TOGGLE switch has been assigned to the Antenna Tuning feature See page 11 for de tails regarding Antenna Tuning Ú Requires Optional ATU 1210 Built in Antenna Tuner and YHA 61 Whip Antenna or FHA 27 Folding Whip Antenna w GN 1210 Goose Neck Important Note If you use the VX 1210 with the optional whip ...

Страница 11: ... set a comfortable vol ume level 4 To transmit press and hold in the microphone s PTT switch and speak into the microphone in a normal voice level To return to the receive mode release the PTT switch 5 If the frequency of the station you are receiving should start to drift rotate the CLAR knob to fol low the drifting signal this does not cause your radio s transmitting frequency to move Operation ...

Страница 12: ... the next page For further details contact your Vertex Standard dealer For future reference check the box next to each function that has been assigned to the toggle switch on your particular radio and keep it handy Functions SELCALL Function High Low Power Select Noise Blanker on off Antenna Tuner on off Antenna Tuning Encryption on off LAMP on off Display Select Tag Frequency HAIL on off VFO Memo...

Страница 13: ...the Automatic Antenna Tuner Antenna Tuning Press and hold the assigned TOGGLE switch into the ON position for 1 2 second to initiate antenna tuning The WAIT WAIT WAIT WAIT WAIT indicator will appear on the display during tuning and will disappear when a match has been achieved If the tuning is successful the TUNE OK TUNE OK TUNE OK TUNE OK TUNE OK indication will appear on the display and the radi...

Страница 14: ...ch emits a loud Alarm sound Use this feature if you want a quick way of alerting other group members as to a dangerous situation VFO MR Select Selects the frequency control technique between I the VFO or II the Memory System Press the assigned TOGGLE switch momentarily to toggle frequency control be tween the VFO and Memory Systems Press and hold the assigned TOGGLE switch in the ON position for 1...

Страница 15: ...ust the Squelch threshold level 1 Rotate the SEL knob to select a clear channel where no signals are present 2 Turn the TOGGLE switch assigned to the Squelch on off feature to the up per position 3 Press and hold in the SEL knob for 5 seconds to enable modification of the squelch threshold level 4 Rotate the SEL knob to the point where the background noise just disappears this is point of maximum ...

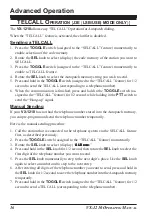
Страница 16: ...y to enable selection of the code memory 2 Rotate the SEL knob to select display the code memory of the station you want to SELCALL 3 Press and hold in the TOGGLE switch assigned to the SELCALL feature for 1 2 second to send the SELCALL Manual Sending If your VX 1210 has not been programmed with the 4 digit codes for the SELCALL feature into the code memory you can pre program and send the 4 digit...

Страница 17: ...ng up signal Manual Sending If your VX 1210 has not had the telephone number stored into the Autopatch memory you can pre program and send the telephone number temporarily Here is the manual sending procedure 1 Call the station that is connected to the telephone system via the SELCALL feature first as described previously 2 Press the TOGGLE switch assigned to the TELCALL feature momentarily 3 Rota...

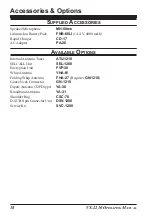
Страница 18: ...ack Transmitter Power Output 20 W 5 W J3E A1A F1B 10 W 2 5 W H3E Selectable Modulation Type Balanced Modulator SSB J3E Early Stage Low Level AM H3E Spurious Radiation 56 dB down Harmonics Carrier Suppression 55 dB Undesired Sideband Suppression 55 dB 1 5 kHz tone Audio Response A3J 350 to 2650 Hz 6 dB 3rd order IMD 31 dB Microphone Impedance 2 kΩ condenser Receiver Circuit Type Double Conversion S...

Страница 19: ...d Charger CD 17 AC Adapter PA 26 AVAILABLE OPTIONS Internal Antenna Tuner ATU 1210 SELCALLUnit SEL 1200 Encryption Unit FVP 38 Whip Antenna YHA 61 Folding Whip Antenna FHA 27 Requires GN 1210 Goose Neck Connector GN 1210 Dipole Antenna T2FD type YA 30 Broadband Antenna YA 31 Shoulder Bag CSC 78 D SUB 9 pin Connector Unit DSV 1200 Service Kit SVC 1200 ...

Страница 20: ...MANUAL DE INSTRUCCIONES DEL VX 1210 1 Español ...

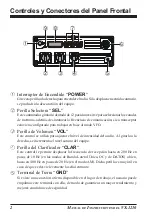
Страница 21: ...illa de Volumen VOL Este control se utiliza para ajustar el nivel de intensidad del audio Al girarlo a la derecha se incrementa el nivel sonoro del equipo Perilla del Clarificador CLAR Este control le permite desplazar la frecuencia de recepción hasta en 200 Hz en pasos de 10 Hz en los modos de Banda Lateral Única OC y de DATOS o bien hasta en 400 Hz en pasos de 20 Hz en el modo AM Dicha perilla e...

Страница 22: ...mación que realiza el Distribuidor Vertex Standard de su localidad Las funciones que puede utilizar con los referidos conmutadores se describen en la página 11 del manual Visualizador de Cristal Líquido LCD Aquí se exhibe el canal de comunicación vigente Indicador Luminoso LED Este indicador luminoso LED da a conocer el estado actual del transceptor Luz Verde Fija Canal de Recepción Ocupado o el C...

Страница 23: ...clavija en este enchufe se inhabilita automáticamente el parlante interno del MH 50B7A Nota Se debe retirar la tapa de caucho que protege el referido conector para tener acceso a él Cuando no lo necesite vuelva a presionar la tapa sobre el conjuntor con el objeto de proteger el interior del micrófono del polvo y la humedad Parlante En este punto se encuentra ubicado el parlante para el MH 50B7A Mi...

Страница 24: ...vo El conjuntor optativo de 9 alfileres de contacto DB 9 suministra la entrada y salida AFSK además de la manipulación telegráfica de OC con el objeto de facilitar la interconexión de dispositivos módem utilizados en la transmisión de datos Nota Se deben retirar las tapas de caucho que protegen los conjuntores CHG y AUX para tener acceso a ellos Cuando no los necesite vuelva a presionar las tapas ...

Страница 25: ...roche de Retén que trae el referido Bloque Para remover el Bloque de Pilas apague el radio y quite cualquier funda protectora que pueda tener el aparato y a continuación libere el broche que sujeta dicho bloque Coloque ambos pulgares en el borde del Bloque de Pilas y deslícelo para retirarlo de ra dio al mismo tiempo que ejerce un poco de presión sobre él Jamás intente abrir el Bloque de Pilas Rec...

Страница 26: ... se ilumina de color rojo Cargando cuando se le está aplicando energía a la batería Una vez que se termina de cargar el indicador LED se cambia a verde para indicar que la unidad está completamente cargada Un bloque totalmente agotado demora alrededor de cinco horas en volver a recuperar su carga por completo 5 Para terminar retire el cable del terminal CHG y desconecte posteriormente el Adaptador...

Страница 27: ...niente de dicha antena en el conjuntor ANT ubicado en el transceptor Ú Cuando se instala la dipolo YA 30 el sintonizador de antena integrado no se utiliza 4 Si emplea este transceptor con la antena de látigo optativa ya sea la YHA 61 o FHA 27 con cuello de cisne GN 1210 conecte la referida antena en el conjuntor ANT del transceptor y posteriormente acople una buena toma de tierra en el terminal GN...

Страница 28: ...Finalmente apague el transceptor con el objeto de almacenar los nuevos valores de programación El usuario puede poner en funcionamiento la antena con el conmutador de palanca TOGGLE de haber sido asignado para la función de Sintonización de Antena Refiérase a la página 11 del manual para ver los detalles relacionados con esta función Ú Requiere el Sintonizador deAntena Integrado ATU 1210 y laAnten...

Страница 29: ...r el nivel sonoro que le resulte cómodo 4 Para transmitir mantenga deprimido el interruptor del PTT del micrófono y hable a través de él con un tono de voz normal Cuando desee regresar al modo de recepción suelte dicho interruptor 5 En caso de que la frecuencia de la estación que usted está recibiendo comenzara a desviarse gire la perilla del clarificador CLAR a fin de seguir la señal errante tal ...

Страница 30: ...lidad Como referencia en el futuro marque el cuadro frente a cada función que ha sido asignada al conmutador de palanca de su propio radio y mantenga esta lista siempre a mano Función Función de Llamada de Búsqueda y Selectiva SELCALL Selector de Alta o Baja Potencia Activación Desactivación del Supresor de Ruidos Activación Desactivación del Sintonizador de Antena Sintonización de Antena Activaci...

Страница 31: ... Antena Habilita e inhabilita el Sintonizador de Antena Automático en el Transceptor Sintonización de Antena Accione firmemente el conmutador TOGGLE asignado hasta la posición de conexión ON durante 1 2 segundo para iniciar la sintonización de la antena El indicador WAIT WAIT WAIT WAIT WAIT Esperar se ilumina en la pantalla mientras se sintoniza y desaparece una vez que se logra hacer coincidir un...

Страница 32: ...dor de Cristal Líquido Etiqueta Frecuencia Selecciona el formato de exhibición para la frecuencia del canal entre I la frecuencia del canal de tráfico propiamente tal y II la etiqueta Alfanumérica respectiva denominación Función de Alarma HAIL Activa el conmutador TOGGLE asignado para habilitar la función HAIL según la cual el radio emite un sonido de Alarma intenso Utilice esta función si desea c...

Страница 33: ... conmutador de palanca asignado hasta su posición más baja para abrir el circuito de silenciamiento de RF en forma manual y así poder escuchar las señales de menor intensidad Para ajustar el nivel umbral de Silenciamiento 1 Gire la perilla SEL con el objeto de seleccionar un canal desocupado donde no exista ninguna señal presente 2 Desplace posteriormente el conmutador TOGGLE destinado a Activar y...

Страница 34: ...el VX 1210 transmitirá automáticamente la señal de contestación a la estación que emite la llamada antes de activar la campanilla de alerta en el equipo A menos que usted responda el radio emitirá dicho sonido de alerta una vez cada tres segundos en tanto que CALL RECEIVED CALL RECEIVED CALL RECEIVED CALL RECEIVED CALL RECEIVED junto con el Código de Identificación de la estación que llama aparece...

Страница 35: ...perilla SEL por 1 2 segundo y gírela a continuación para seleccionar el primer número correspondiente al código de 4 dígitos que usted desea enviar 4 Presione la perilla SEL en forma momentánea para trasladar el cursor hasta la posición del próximo dígito Utilice la perilla SEL una vez más con el objeto de escoger un nuevo número y desplazarse hasta el lugar del siguiente carácter de la secuencia ...

Страница 36: ...digos correspondiente a la estación a la que desea transmitir una llamada de búsqueda y selectiva SELCALL 3 Oprima ahora el conmutador TOGGLE asignado a la función de Discado a través del Sistema Telefónico a fin de habilitar el modo TELCALL 4 Gire posteriormente la perilla SEL a fin de seleccionar la secuencia en la memoria para Conexión de Líneas Automáticas que usted desea transmitir 5 Presione...

Страница 37: ...xx en la pantalla 4 Oprima firmemente la perilla SEL por 1 2 segundo gire esta misma perilla para seleccionar el primer dígito correspondiente al número de teléfono que usted desea enviar 5 Presione la perilla SEL en forma momentánea para trasladar el cursor hasta la posición del próximo dígito Utilice la perilla SEL una vez más para escoger un nuevo número y desplazarse hasta el lugar del siguien...

Страница 38: ...W 5 W J3E A1A F1B 10 W 2 5 W H3E Seleccionable TipodeModulación Modulador Balanceado SSB J3E Etapa Próxima a la Entrada Bajo Nivel AM H3E Radiación de Espuria 56 dB descendente Armónicas Supresión de Portadora 55 dB Supresión de Banda Lateral no Deseada 55 dB tono de 1 5 kHz Respuesta de Audio A3J de 350 a 2650 Hz 6 dB Distorsión por Intermodulación del 3er Orden 31 dB Impedancia del Micrófono 2 k...

Страница 39: ...onizador de Antena Interno ATU 1210 Unidad de Llamada de Búsqueda y Selectiva SELCALL SEL 1200 Unidad de la encripción FVP 38 Antena de Látigo YHA 61 Antena de Látigo Plegable FHA 27 se requiere el GN 1210 Conector para Cuello de Cisne GN 1210 Antena Dipolo tipo T2FD YA 30 Antena de banda ancha YA 31 Bolso para Colgar CSC 78 Unidad de Conexión de 9Alfileres D SUB SVC 1200 Kit de Reparación SVC 120...

Страница 40: ...Copyright 2009 VERTEX STANDARD CO LTD All rights reserved No portion of this manual may be reproduced without the permission of VERTEX STANDARD CO LTD Printed in Japan E C 0 2 7 H 7 5 2 ...

Отзывы: