background image


286B  

2019-10 

Assembly and adjustments 


EN 


NL


4


Assembly and adjustments   

4.1  Assembly


1. 

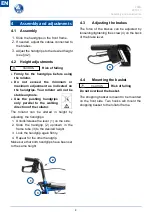
Slide the handgrips in the front frame. 

2. 

If needed, adjust the cables connected to 
the brakes. 

3. 

Adjust the handgrips to the desired height 
(see §4.2). 

4.2  Height adjustments  

Risk of falling 


Firmly  fix  the  handgrips  before  using 
the rollator. 


Do  not  exceed  the  minimum  or 
maximum  adjustment  as  indicated  on 
the handgrips. Your rollator  will  not be 
stable anymore. 


Use  the  pushing  handgrips 
only  parallel  to  the  walking 
direction of the rollator. 

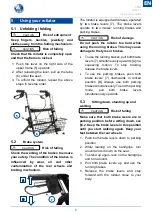
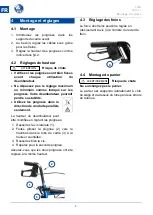
The  rollator  can  be  altered  in  height  by 
adjusting  the handgrips:  

1. 

Unlock/release the lever (1) on the side. 

2. 

Slide  the  handgrip  (2)  up/down  in  the 
frame tube (3) to the desired height.  

3. 

Lock the handgrip again firmly.  

4. 

Repeat for the other handgrip.  

Make sure that both handgrips have been set 
to the same height.  


4.3 

Adjusting the brakes 

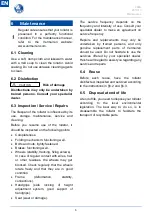
The  force  of  the  brakes  can  be  adjusted  by 
loosening/tightening the screw (4) on the back 
of the brake lever.  


4.4 

Mounting the basket  

Risk of falling  

Do not overload the basket. 

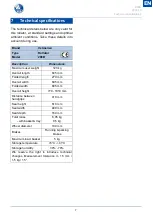
The shopping basket is meant to be mounted 
on  the  front  side.  Two  hooks  will  mount  the 
shopping basket to the rollator frame. 


CAUTION

CAUTION

Содержание 286B

Страница 1: ... U E L D U T I L I S A T I O N G E B R U I K S A A N W I J Z I N G G E B R A U C H S A N W E I S U N G M A N U A L E D I I S T R U Z I O N I M A N U A L D E I N S T R U C C I O N E S I N S T R U K C J A O B S Ł U G I N Á V O D K O B S L U Z E ...

Страница 2: ...mpleando sistemas electrónicos sin el permiso escrito del editor Wszelkie prawa zastrzeżone łącznie z tłumaczeniem Żadna część niniejszej instrukcji nie może być powielana w jakiejkolwiek formie drukowanej fotokopii mikrofilmu ani innej bez pisemnej zgody wydawcy nie może być również przetwarzana kopiowana ani rozprowadzana za pomocą systemów elektronicznych Všechna práva vyhrazena včetně překladu...

Страница 3: ...English Français Nederlands Deutch Italiano Español Polski Czech User manual Manuel d utilisation Gebruiksaanwijzing Bedienungshandbuch Manuale di istruzioni Manual de instrucciones Instrukcja obsługi Návod k obsluze ...

Страница 4: ...This page is intentionally left blank ...

Страница 5: ...help you Important note To ensure your safety and to prolong the lifetime of your product please take good care of it and have it checked and serviced on a regular basis This manual reflects the latest product developments Vermeiren has the right to implement changes to this type of product without any obligation to adapt or replace similar products previously delivered Pictures of the product are...

Страница 6: ...her physical limitations that may cause unsafe use of your rollator like a weak arm balance disorders The rollator is designed and produced solely to be used as walking aid for one person with a maximum weight of 120 kg The rollator will compensate the lack of adequate support by the legs by leaning on or moving with the rollator with usage of the upper limbs or chest The rollator will provide bet...

Страница 7: ... your rollator may get very hot or cold due to ambient temperature solar radiation heating devices etc Be careful when touching Before every use check that the handgrips are firmly secured see 4 2 Do not hold the handgrips with wet hands If you do so you can lose your grip and lose your balance Do not proceed with your rollator into traffic Always stay on the pavement Take note of the instructions...

Страница 8: ...e walking direction of the rollator The rollator can be altered in height by adjusting the handgrips 1 Unlock release the lever 1 on the side 2 Slide the handgrip 2 up down in the frame tube 3 to the desired height 3 Lock the handgrip again firmly 4 Repeat for the other handgrip Make sure that both handgrips have been set to the same height 4 3 Adjusting the brakes The force of the brakes can be a...

Страница 9: ...llator too hard while using the running brakes This may cause damage to the tyres or brakes To use the running brakes pull both brake levers 7 simultaneously upwards A in a squeezing motion To stop braking release the brake levers To use the parking brakes push both brake levers 7 downwards in locked position B Always use both parking brakes simultaneously To end the parking mode pull both brake l...

Страница 10: ... contact with wires hair or other residues the wheels may get blocked Check regularly that the wheels rotate freely and that they are in good condition Frame deformation stability connections Handgrips safe locking of height adjustment system good support of handgrips Seat wear or damage The service frequency depends on the frequency and intensity of use Consult your specialist dealer to make an a...

Страница 11: ...ns Maximum user weight 120 kg Overall length 645 mm Folded length 270 mm Overall width 605 mm Folded width 605 mm Overall height 770 1010 mm Distance between handgrips 410 mm Seat height 610 mm Seat width 400 mm Seat depth 160 mm Total mass with basket tray 8 95 kg 9 5 kg Wheel diameter 190 mm Brakes Running parking brakes Maximum load basket 5 kg Storage temperature 5 C 41 C Storage humidity 30 7...

Страница 12: ......

Страница 13: ...cialisé Il vous aidera volontiers Remarque importante Pour assurer votre sécurité et prolonger la durée de vie de votre produit prenez en grand soin et faites le contrôler ou entretenir régulièrement Ce manuel est le reflet des derniers développements du produit Vermeiren a le droit d apporter des modifications à ce type de produit sans être tenu d adapter ou de remplacer des produits similaires f...

Страница 14: ...ransporteur 3 2 Usage prévu Risque de chute Le déambulateur est conçu pour soutenir la fonction de la jambe pendant la marche N utilisez pas votre déambulateur si vous souffrez d autres défaillances physiques pouvant rendre l utilisation du déambulateur dangereuse comme une faiblesse du bras des troubles de l équilibre etc Le déambulateur est exclusivement conçu et produit pour servir d aide à la ...

Страница 15: ...confortable vous pouvez relâcher les freins de stationnement Maintenez les deux mains sur les poignées lorsque vous avancez N oubliez pas que certaines parties de votre déambulateur peuvent devenir très chaudes ou très froides en fonction de la température ambiante des rayons du soleil des dispositifs de chauffage etc Faites donc attention lorsque vous les touchez Avant chaque utilisation vérifiez...

Страница 16: ...lisez les poignées dans la direction de conduite parallèle seulement La hauteur du déambulateur peut être modifiée en réglant les poignées 1 Desserrez la vis latérale 1 2 Faites glisser la poignée 2 vers le haut bas dans le tube de cadre 3 à la hauteur souhaitée 3 Resserrez bien la vis 4 Répétez pour la seconde poignée Assurez vous que les deux poignées ont été réglées à la même hauteur 4 3 Réglag...

Страница 17: ...nement Risque de dommages N appuyez pas trop fort sur le déambulateur lorsque vous utilisez les freins standard Cela pourrait endommager les pneus ou les freins Pour utiliser le frein standard poussez les deux leviers de frein 7 en même temps vers le haut A en appliquant une pression Pour interrompre le freinage relâchez les leviers de frein Pour utiliser le frein de stationnement poussez les deux...

Страница 18: ...dommages La désinfection ne peut être réalisée que par des personnes formées Renseignez vous auprès de votre commerçant spécialisé à cet égard 6 3 Inspection Entretien Réparation La durée de vie de votre déambulateur est influencée par son utilisation son entreposage son entretien son service et son nettoyage Avant que vous ne commenciez à utiliser votre déambulateur vous devez contrôler les point...

Страница 19: ... la fin de sa durée de vie votre déambulateur doit être évacué conformément à la législation environnementale locale Il est recommandé de démonter le déambulateur afin de faciliter le transport des matériaux recyclables 7 Détails techniques Les détails techniques ci dessous concernent uniquement ce déambulateur avec des réglages standard et dans des conditions ambiantes optimales Veuillez tenir co...

Страница 20: ......

Страница 21: ...id te garanderen en om de levensduur van uw product te verlengen raden we u aan om er goed zorg voor te dragen en om regelmatig nazicht en onderhoud te laten uitvoeren Deze handleiding houdt rekening met de recentste productontwikkelingen De Firma Vermeiren behoudt zich het recht voor om wijzigingen aan dit type product door te voeren zonder verplicht te zijn om voordien geleverde producten aan te...

Страница 22: ...d ter ondersteuning van de beenfunctie tijdens het lopen Gebruik uw rollator niet indien u andere fysieke beperkingen heeft waardoor het gebruik van de rollator onveilig wordt zoals een zwakke arm evenwichts stoornis De rollator is uitsluitend ontworpen en geproduceerd om als loophulp te dienen voor één persoon met een maximaal gewicht van 120 kg Door met de bovenste ledematen of de romp op de rol...

Страница 23: ...vrijzetten Hou beide handen op de handgrepen tijdens het vooruit stappen Hou er rekening mee dat bepaalde delen van uw rollator erg warm of koud kunnen worden ten gevolge van de omgevingstemperatuur zonnestralen verwarmingstoestellen enz Wees dus voorzichtig bij het aanraken Verifieer voor elk gebruik of de hoogte verstellingen goed vast staan zie 4 2 Hou de handgrepen niet met natte handen vast A...

Страница 24: ...lator De rollator is in hoogte aanpasbaar door de handgrepen te verstellen 1 Maak de hendel 1 aan de zijkant los 2 Schuif de handgreep 2 omhoog omlaag in de framebuis 3 tot de gewenste hoogte 3 Zet de handgreep weer stevig vast 4 Herhaal voor de tweede handgreep Zorg ervoor dat beide handgrepen op dezelfde hoogte zijn ingesteld 4 3 De remmen aanpassen De remkracht kan aangepast worden door de schr...

Страница 25: ...em of als parkeerrem Kans op schade Duw de rollator niet te hard wanneer u de standaard rem gebruikt Dit kan de remmen en wielen beschadingen Om de standaard rem te gebruiken trekt u beide remhendels 7 tegelijkertijd omhoog A in een knijpbeweging Om het remmen te stoppen laat u de remhendels los Om de parkeerrem te gebruiken drukt u beide remhendels 7 naar beneden tot in vergrendelstand B Gebruik ...

Страница 26: ...draden haren of andere vezels kunnen deze geblokkeerd raken Kijk daarom regelmatig uw wielen na of ze vrij kunnen roteren en of ze in een goede staat verkeren Frame vervormingen stabiliteit verbindingen Handgrepen veilige blokkering van de hoogteverstelling goede steun van de handgrepen Zit slijtage of beschadigingen De onderhoudsfrequentie hangt af van de frequentie en intensiteit van gebruik Raa...

Страница 27: ...uiker 120 kg Totale lengte 645 mm Gevouwen lengte 270 mm Totale breedte 605 mm Gevouwen breedte 605 mm Totale hoogte 770 1010 mm Afstand tussen de handgrepen 410 mm Zithoogte 610 mm Zitbreedte 400 mm Zitdiepte 160 mm Totale massa met mandje en tablet 8 95 kg 9 5 kg Wieldiameter 190 mm Remmen Standaard remmen parkeerremmen Maximaal vulgewicht van winkelmandje 5 kg Opslagtemperatuur 5 C 41 C Opslag ...

Страница 28: ......

Страница 29: ...ewährleisten und die Nutzungsdauer Ihres Produkts zu verlängern sollten Sie es gut behandeln und regelmäßig überprüfen und oder warten lassen Dieses Handbuch enthält die neuesten Produktentwicklungen Vermeiren behält sich das Recht vor Veränderungen an dieser Art von Produkt vorzunehmen ohne eine Verpflichtung einzugehen ähnliche bereits ausgelieferte Produkte anzupassen oder auszutauschen Abbildu...

Страница 30: ...ungsgemäße Verwendung Sturzrisiko Der Rollator dient zur Unterstützung der Beinfunktion beim Gehen Benutzen Sie Ihren Rollator nicht wenn Sie andere körperliche Einschrän kungen haben durch die die Nutzung des Rollators unsicher wird zum Beispiel bei geschwächter eingeschränkter Armfunktion Gleichgewichtsstörungen usw Der Rollator ist ausschließlich als Gehhilfe für eine Person mit einem maximalen...

Страница 31: ...or als Hilfsmittel zum Aufstehen benutzen Lösen Sie die Feststellbremsen erst wenn Sie sicher stehen Halten Sie beide Hände an den Handgriffen wenn Sie vorwärts gehen Beachten Sie dass bestimmte Teile Ihres Rollators infolge der Umgebungstemperatur Sonneneinstrahlung Heizkörpern usw sehr warm oder sehr kalt werden können Seien Sie also vorsichtig beim Berühren Überprüfen Sie vor jeder Nutzung ob d...

Страница 32: ...parallel zum Seitenrahmen in Schieberichtung Die Höhe des Rollators kann durch Einstellen der Handgriffe 1 Lösen Sie die seitlichen Feststellschraube 1 2 Schieben Sie den Handgriff 2 im Rahmenrohr 3 auf die gewünschte Höhe 3 Drehen Sie die Feststellschraube wieder handfest an 4 Wiederholen sie das für den anderen Handgriff Stellen Sie sicher dass beide Handgriffe auf die gleiche Höhe eingestellt s...

Страница 33: ...igt werden siehe nächste Abbildung Die Bremshebel können auf zwei Arten genutzt werden als normale Bremse Betriebsbremse und als Feststellbremse Parkbremse Beschädigungsgefahr Schieben Sie den Rollator nicht zu stark wenn Sie die Betriebsbremse betätigen Hierdurch könnten die Reifen oder Bremsen beschädigt werden Um die normale Bremse zu benutzen ziehen Sie beide Bremshebel 7 gleichzeitig in einer...

Страница 34: ...s Wasser mit einer milden Seifenlösung Vermeiden Sie eine Durchnässung der Teile Verwenden Sie keine scheuernden Reinigungsmittel 6 2 Desinfektion Beschädigungsgefahr Eine Desinfektion darf nur von dafür geschultem Personal durchgeführt werden Wenden Sie sich hierfür an Ihren Fachhändler 6 3 Inspektion Wartung Reparatur Die Lebensdauer Ihres Rollators hängt von der Art der Nutzung der Einlagerung ...

Страница 35: ... warten 6 5 Entsorgung Am Ende seiner Lebensdauer muss der Rollator in Übereinstimmung mit den örtlichen Umweltgesetzen entsorgt werden Am besten demontieren Sie den Rollator um den Transport von wiederverwertbaren Materialien zu erleichtern 7 Technische Daten Die nachstehenden technischen Daten gelten für diesen Rollator nur bei Standardeinstellungen und optimalen Umgebungsbedingungen Berücksicht...

Страница 36: ......

Страница 37: ...sicurezza e prolungare la durata del prodotto trattarlo con cura e farlo controllare e o sottoporlo a manutenzione con regolarità Questo manuale rispecchia gli sviluppi più recenti del prodotto Vermeiren si riserva il diritto di apportare modifiche al prodotto senza alcun obbligo di adattare o sostituire i prodotti analoghi consegnati in precedenza Le immagini del prodotto vengono utilizzate per c...

Страница 38: ...tare il funzionamento delle gambe durante la deambulazione Non utilizzarlo se si soffre di altre limitazioni fisiche come debolezza delle braccia disturbi dell equilibrio e così via in grado di causare un uso non sicuro del deambulatore Il deambulatore è progettato e realizzato esclusivamente per l uso come ausilio per la deambulazione di una sola persona di peso non superiore a 120 kg Il deambula...

Страница 39: ... tenere entrambe le mani sulle impugnature Non dimenticare che alcune parti del deambulatore possono diventare molto calde o fredde a causa della temperatura ambiente della radiazione solare di dispositivi di riscaldamento e così via Prestare attenzione quando si tocca il deambulatore Prima di ogni impiego verificare che le regolazioni dell altezza siano saldamente bloccate vedere i 4 2 Non afferr...

Страница 40: ...ossibile variare l altezza del deambulatore regolando le impugnature 1 Aprire rilasciare la vite sul lato 1 2 Sfilare l impugnatura 2 alzare abbassare il tubo del telaio 3 fino all altezza desiderata 3 Bloccare saldamente le maniglie 4 Ripetere per l altra impugnatura Accertarsi che le impugnature siano state regolate sulla stessa altezza 4 3 Regolazione dei freni È possibile regolare la forza dei...

Страница 41: ...pingere il deambulatore con una forza eccessiva mentre si utilizzano i freni nella modalità di esercizio Ciò può danneggiare gli pneumatici o i freni Per utilizzare i freni nella modalità di esercizio tirare simultaneamente entrambe le leve dei freni 7 verso l alto A con un movimento di compressione Per interrompere la frenatura rilasciare le leve dei freni Per utilizzare i freni di parcheggio spi...

Страница 42: ...n utilizzare detergenti abrasivi per la pulizia 6 2 Disinfezione Rischio di danni La disinfezione deve essere eseguita esclusivamente da personale con un opportuna formazione Consultare il proprio rivenditore autorizzato 6 3 Ispezione assistenza riparazioni La durata del deambulatore è influenzata dalle modalità di uso stoccaggio manutenzione assistenza e pulizia Prima di riprendere a utilizzare i...

Страница 43: ...slazione ambientale locale Il modo migliore per farlo consiste nello smontare il deambulatore per agevolare il trasporto dei componenti riciclabili 7 Specifiche tecniche I dettagli tecnici riportati di seguito sono validi soltanto per il deambulatore oggetto del manuale con le impostazioni standard e in condizioni ambiente ottimali Durante l uso tenere conto di questi dati di dettaglio Marca Verme...

Страница 44: ......

Страница 45: ...ida útil de su producto cuídelo bien y asegúrese de realizar revisiones y mantenimientos de manera regular Este manual refleja los desarrollos más recientes del producto Vermeiren se reserva el derecho a implementar cambios en este tipo de producto sin que ello suponga obligación alguna de adaptar o cambiar productos similares previamente entregados Las imágenes del producto están presentes para c...

Страница 46: ...Uso previsto Riesgo de caída El andador está pensado como apoyo para la función de las piernas al andar No utilice el andador si tiene otras discapacidades físicas por las que su uso podría suponer un riesgo como brazos débiles trastornos del equilibrio etc El andador está diseñado exclusivamente como un instrumento de ayuda para andar para una persona con un peso máximo de 120 kg Al apoyar o move...

Страница 47: ...amiento Mantener siempre ambas manos en las empuñaduras al andar con el andador Téngase en cuenta que ciertas partes del andador pueden llegar a calentarse o enfriarse demasiado a causa de la temperatura ambiente la luz del sol equipos de calefacción etc así que tener siempre cuidado al tocar Comprobar que el ajuste de altura esté bien sujeto antes de cada uso véase 4 2 No sujete las empuñaduras c...

Страница 48: ...ción con que esté andando con del andador Se puede cambiar la altura del andador ajustando las empuñaduras 1 Aflojar la palometa 1 del lado requerido 2 Deslice la empuñadura 2 arriba abajo en el tubo del marco 3 hasta la altura deseada 3 Cierre firmemente las empuñaduras otra vez 4 Repita con la otra empuñadura Asegurarse de que ambas empuñaduras estén ajustadas a la misma altura 4 3 Ajuste de los...

Страница 49: ...tacionamiento Riesgo de daños No empujar el andador demasiado fuerte mientras se usan los frenos normales Esto puede ocasionar daños a las ruedas o los frenos Para usar el freno normal tirar hacia arriba de ambas palancas de freno 7 a la vez A apretándolas Para dejar de frenar soltar las palancas de freno Para usar el freno de estacionamiento tirar hacia abajo de ambas palancas de freno 7 hasta qu...

Страница 50: ...a abrasivos 6 2 Desinfección Riesgo de dañar el andador La desinfección sólo puede llevarla a cabo personal debidamente cualificado Consulte con su distribuidor especializado al respecto 6 3 Inspección Mantenimiento Reparación La vida útil del andador se ve afectada por su uso almacenamiento mantenimiento y limpieza Antes de utilizar el andador deben comprobarse los siguientes puntos Integridad Me...

Страница 51: ...andador siguiendo las leyes medioambientales de su localidad Para transportar materiales reciclables del andador de manera más cómoda se recomienda que se desmonte primero 7 Datos técnicos Los datos técnicos expuestos a continuación son sólo válidos para este andador con configuración estándar y en condiciones ambientales óptimas Tener en cuenta estos datos durante la utilización del andador Marca...

Страница 52: ......

Страница 53: ...stwo i wydłużyć okres użytkowania produktu prosimy o dbanie o niego oraz regularne dokonywanie przeglądów i serwisowanie Instrukcja obejmuje najnowsze rozwiązania zastosowane w produkcie Firma Vermeiren ma prawo do wprowadzania zmian w produktach tego typu bez obowiązku adaptowania lub wymiany podobnych poprzednio dostarczonych produktów Ilustracje produktu stanowią dodatkowe objaśnienia do instru...

Страница 54: ...nie Ryzyko upadku Balkonik jest przeznaczony do wspomagania nóg podczas chodzenia Nie używaj balkonika jeśli masz inne ograniczenia fizyczne które mogą sprawiać że używanie balkonika nie będzie bezpieczne np słabe ramię zaburzenia równowagi Balkonik został zaprojektowany i jest produkowany wyłącznie w celu używania jako pomoc przy chodzeniu dla jednej osoby o maksymalnej wadze 120 kg Balkonik komp...

Страница 55: ...awdź czy obie dźwignie hamulców są w położeniu postojowym Kiedy staniesz wygodnie i stabilnie możesz odblokować hamulce postojowe Podczas chodzenia trzymaj obiema dłońmi za rączki Pamiętaj że pewne części balkonika mogą stać się bardzo gorące lub zimne ze względu na temperaturę otoczenia promieniowanie słoneczne urządzenia grzewcze itp Zachowaj ostrożność kiedy ich dotykasz Przed każdym użyciem sp...

Страница 56: ...traci stabilność Należy pchać balkonik dwoma dłońmi jednocześnie w kierunku jazdy Można zmienić wysokość balkonika odpowiednio ustawiając rączki 1 Odblokuj zwolnij dźwignię 1 z boku wózka 2 Wsuń wysuń z ramy 2 rączkę prowadzącą 3 by uzyskać pożądaną wysokość 3 Ponownie zablokuj na sztywno rączkę 4 Powtórz dla drugiej rączki Upewnij się że obie rączki są ustawione na tę samą wysokość 4 3 Regulacja ...

Страница 57: ...lkonika zbyt mocno gdy są wciśnięte hamulce jezdne To może powodować uszkodzenie opon lub hamulców Aby użyć hamulców jezdnych pociągnij obie dźwignie hamulców 7 jednocześnie do góry A ruchem ściskającym Aby przerwać hamowanie zwolnij dźwignie hamulców Aby użyć hamulców postojowych naciśnij obie dźwignie hamulców 7 w dół do położenia zablokowanego B Zawsze używaj obu hamulców postojowych na raz Aby...

Страница 58: ... kontaktu z drutami włosami lub innymi pozostałościami koła mogą zostać zablokowane Należy regularnie sprawdzać czy koła obracają się swobodnie i czy są w dobrym stanie Rama odkształcenia stabilność połączenia Uchwyty bezpieczne blokowanie systemu regulacji wysokości solidne wsparcie uchwytów Siedzisko sprawdzić pod kątem zużycia lub uszkodzenia Częstotliwość serwisu zależy od częstotliwości i int...

Страница 59: ... kg Łączna długość 645 mm Długość po złożeniu 270 mm Łączna szerokość 605 mm Szerokość po złożeniu 605 mm Łączna wysokość 770 1010 mm Odległość między rączkami 410 mm Wysokość siedziska 610 mm Szerokość siedziska 400 mm Głębokość siedziska 160 mm Masa łączna z koszykiem i tacka 8 95 kg 9 5 kg Średnica koła 190 mm Hamulce Hamulce jezdne i postojowe Maksymalne obciążenie koszyka 5 kg Temperatura prz...

Страница 60: ......

Страница 61: ...ležitá poznámka Aby byla zajištěna vaše bezpečnost a prodloužena životnost tohoto výrobku věnujte mu řádnou péči a nechávejte jej pravidelně kontrolovat a opravovat Tento návod obsahuje nejnovější verzi produktu Společnost Vermeiren má právo provádět změny tohoto typu výrobku aniž by byla povinna upravit nebo nahradit podobné výrobky které již byly dodány Obrázky výrobku slouží pouze k upřesnění p...

Страница 62: ...Nepoužívejte chodítko máte li jiná fyzická omezení jež mohou způsobit jeho nebezpečné použití jako jsou slabé ruce poruchy rovnováhy apod Chodítko je navrženo a vyrobeno výhradně k použití jako pomůcka při chůzi pro jednu osobu o maximální váze 120 kg Chodítko kompenzuje absenci přiměřené podpory nohou tím že se osoba opírá o chodítko či pohybuje s ním pomocí horních končetin nebo hrudníku Chodítk...

Страница 63: ...chodítka mohou být velmi teplé či studené vlivem okolní teploty slunečního záření topných těles atd Při dotýkání buďte opatrní Před každým použitím ověřte zda jsou nastavení výšek řádně zajištěna viz odst 4 2 Nedržte se rukojetí mokrýma rukama Jinak může dojít k uklouznutí úchopu a ztrátě vaší rovnováhy Nechoďte s chodítkem v silničním provozu Vždy choďte jen po chodníku Dodržujte pokyny pro servi...

Страница 64: ...madla používejte pouze v paralelní poloze vůči směru chůze chodítka U chodítka můžete nastavovat výšku seřízením rukojetí 1 Odemkněte uvolněte postranní páčku 1 2 Pohybujte rukojetí 2 nahoru dolů v trubce rámu 3 do požadované výšky 3 Madla opět pevně uzamkněte 4 Opakujte s druhou rukojetí Zkontrolujte že jsou obě rukojeti nastaveny na stejnou výšku 4 3 Seřízení brzd Sílu brzd lze seřizovat povolov...

Страница 65: ... chodítko příliš netlačte Jinak dojde k poškození pneumatik či brzd Chcete li použít jízdní brzdy vytáhněte obě brzdové páčky 7 zároveň nahoru A mačkavým pohybem Pro ukončení brždění uvolněte brzdové páčky Chcete li použít parkovací brzdy stiskněte obě brzdové páčky 7 dolů do zamknuté polohy B Vždy použijte obě parkovací brzdy současně Pro ukončení režimu parkování vytáhněte obě brzdové páčky záro...

Страница 66: ...avidelného kontaktu s drátky vlasy či jinými nečistotami se mohou kola zablokovat Pravidelně kontrolujte zda se kola volně otáčejí a zda jsou v dobrém stavu Rám deformace stabilita připojení Rukojeť bezpečné zamknutí systému nastavení výšky dobrá podpěra rukojetí Sedadlo opotřebení či poškození Servisní intervaly závisejí na intenzitě a frekvenci používání Poraďte se s odborným prodejcem a dohodně...

Страница 67: ...živatele 120 kg Celková délka 645 mm Délka ve složeném stavu 270 mm Celková šířka 605 mm Šířka ve složeném stavu 605 mm Celková výška 770 1010 mm Vzdálenost mezi rukojeťmi 410 mm Výška sedadla 610 mm Šířka sedadla 400 mm Hloubka sedadla 160 mm Celková hmotnost s košíkem a tácem 8 95 kg 9 5 kg Kola 190 mm Brzdy Jízdní a parkovací brzdy Nosnost košíku 5 kg Skladovací teplota 5 C 41 C Vlhkost při skl...

Страница 68: ......

Страница 69: ... Date By stamp Kind of work I S R D Date By stamp Kind of work I S R D Date By stamp Kind of work I S R D Date By stamp Kind of work I S R D Date By stamp Kind of work I S R D Date By stamp Kind of work I S R D Date By stamp Kind of work I S R D Date By stamp Kind of work I S R D Date By stamp Kind of work I S R D Date By stamp Kind of work I S R D Date By stamp Kind of work I S R D Date By stamp ...

Страница 70: ......

Страница 71: ......

Страница 72: ...eiren Group 2019 Vermeiren GROUP NV Vermeirenplein 1 15 2920 Kalmthout BE website www vermeiren com R E Vermeiren GROUP Vermeirenplein 1 15 2920 Kalmthout Belgium User manual 286B_MULTI_W200856_A5_2019 10_C ...

Отзывы: