background image

- Screw M3x20mm 2pcs


- Dowle 2pcs


- Power adapter


5.Installation


Note: For trouble-free videophone operation,please observe 

the followinginstallationinstructions. 

Do not install the monitor: 

• in adusty

environment to prevent dust from

intrusion, 


including other solid 

the ingredients and substances tobeused, 

• nearheat


 sources or in a place

exposed

to 

Thesunisover, 

• inthe open airwith high humidity and condensation of steam 

• in the vicinityof strong sources


 of electromagnetic 

• on unstable and uneven surfaces. 

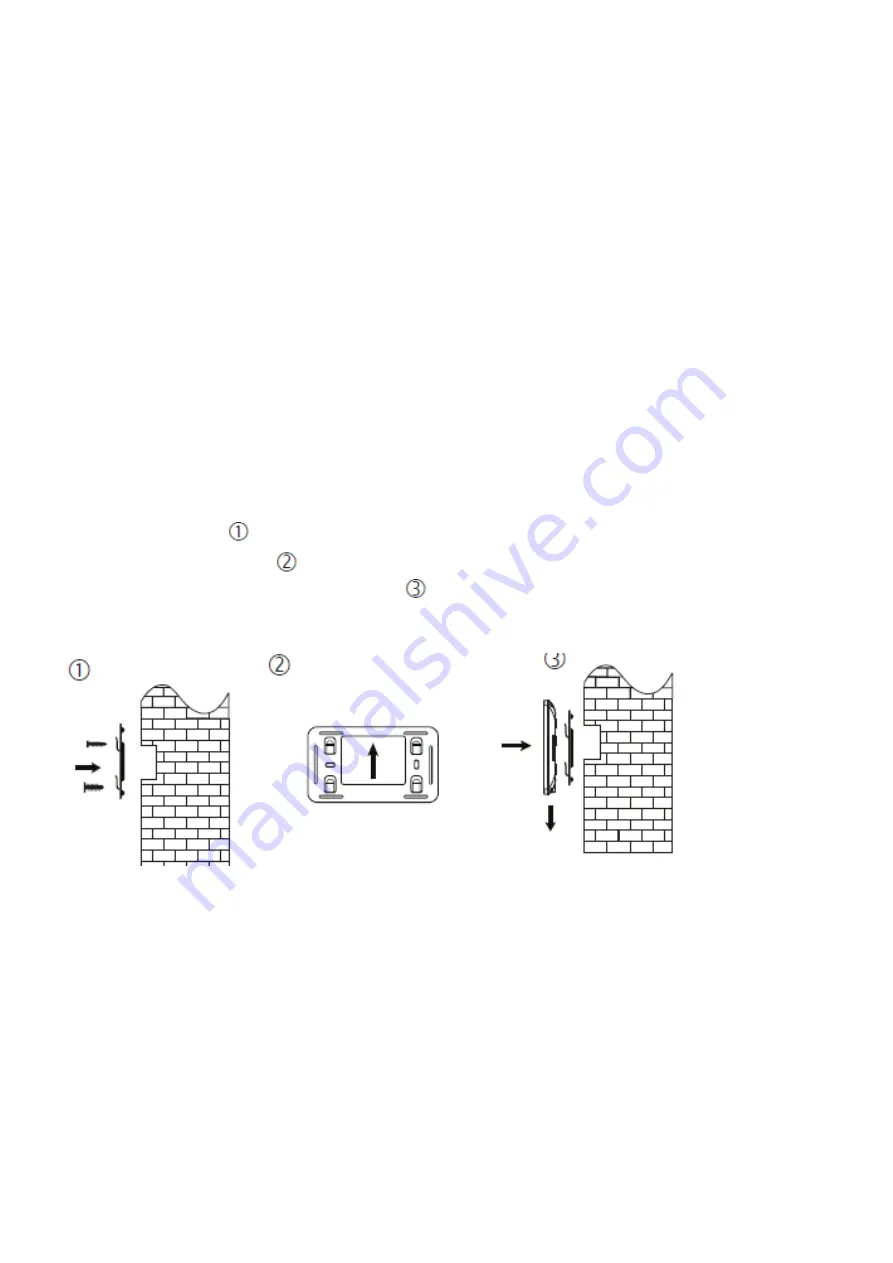
To install: 

Preparea suitablecable according to the manufacturer's


 instructionsfor

 connecting

 individual 

depending on


 their distance between them

and the end

ofthe 

corresponding connectors. Selectthe

height

of the

monitor

after theinstalled installation 

and fix the metal bracketwith

 the


Horizontally. Make sure

theconsole is properly positioned 

shown in the following figure. 

Connect theconnectors to the monitor 

andput it

on the console by moving it

downwards .


For installationuse thecorresponding cables with two copper cablesNoi, at

least

0.5mm²


 .


The cable does 

not need to betingled, usea

protective pipe

during installation.


For example,cables: 
CYH 2x0.5 mm², H03VVH2-F 2x0.5mm², JYTY-O 2x1mm². 

Installation canonly be carried

out by a person 

who

is  and usedforthe installation of VERIA videophone systems. 


Содержание 8277B-W

Страница 1: ...VERIA User s guide Videophone Model Veria 8277B W Please read this manual carefully before use and keep it in case of further need...

Страница 2: ...tone 13 18 System settings 13 19 Setting the password 13 20 Password protection list input stations 13 21 Setting the address of the room 14 22 Set the monitor name 14 23 Setting the name of the entry...

Страница 3: ...conditions may result in damage fromthe device injury to the property orfire Do not bend or unplug the power cord from the mains by force If it is damaged there is a risk of fire or electric shock Do...

Страница 4: ...can be stored on integrated memory H 264 coding and decoding technology provides high quality video DVR with face detection of motion detection and recording with dynamic frame rate EPTZ Possibility t...

Страница 5: ...to the manufacturer s instructionsfor connecting individual depending on their distance between themand the endofthe corresponding connectors Selecttheheightof themonitorafter theinstalled installatio...

Страница 6: ...tton Touch 10 Internal calls Supported 11 Extending monitors Supported 12 Power DC 24V 13 Consumption 4W max 1 5W standby 14 Operating temperature 10 C 40 C 15 Storage temperature 30 C 60 C 16 Dimensi...

Страница 7: ...6 Connectivity options 230V 24V DC adapter 1 1xmonitor 1x access station...

Страница 8: ......

Страница 9: ...2x monitor 1x entry station 4x monitor 2x entry station 5x monitor 1x entry station...

Страница 10: ...Connection of external analog cameras Warning Itisnecessary to useaseparate power supply for the cameras...

Страница 11: ...listedon the screen Function Accept Hang Volume Buy Photograph Buy Video Unlock gate or door View or hide icons on the screen Press to answer the call and talk to the visitor After the call is over pr...

Страница 12: ...ro SDcardis required to format 7 Intercom function If you install more than one monitor in the same family press the call icons in the main menu you can perform the operations below 1 Internal call to...

Страница 13: ...on 9 Do not disturb function If you do not want to be disturbed byringtones youcan enable the do not disturb function Method 1 Press the silent re imicon on the main menu do not disturb is activated a...

Страница 14: ...nal Memory or Internal Memory and press and hold the selected file to display an icon and confirm that you will delete the file Note To delete all photos video recordings audio files press the setting...

Страница 15: ...ear Hours Minutes Seconds after setting press nasset in theupper left corner of the screen to confirm and save 19 Password settings Password for system settings and settings Press the Settings icon in...

Страница 16: ...Set the name of the entry station Press the settings icon in the main menu select device configuration then List of entry stations and select the desired entry station go to the Edit option enter the...

Страница 17: ...going button Set the target of the outbound button control on the door or gateway depending on the actual installation Press the exit button to open the door gate lock 34 Status assigned from the wash...

Страница 18: ...und Ring time Ring volume Off by default If enabled the monitor will not ring when it rings Repeat ringtone If you turn off the monitor when ringing only once Door opening ringtone Set the ringtone fo...

Страница 19: ...ssword to enter both settings and system settings 9 System time Format Day Month Year Hours Minutes Seconds 10 Device configuration The name of the device Room address Call center The address of the C...

Страница 20: ...or unlocking Outgoing button type Select the destination of the outgoing button door or gateway You can enable disable the status of the assigned unlocking device if there is a station with RFIDfuncti...

Страница 21: ...ement of the product Repair of the product or its replacement with a repaired product is at the supplier s decision Full terms and conditions of warranty and information regarding the warranty and pos...

Страница 22: ...Website www veria eu SAFE HOME europe s r o reserves the right to modify and change product specifications without notice All materials are carefully inspected but the company SAFE HOME europe s r o i...

Отзывы: