


E - 8
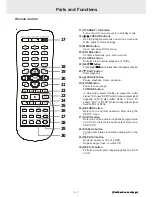
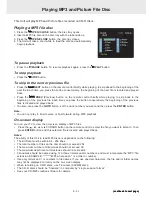
Rear Panel
1)
MIC 1/MIC 2 INPUT JACK
Connect the microphone.
2)
MIC VOL (microphone volume) control
Adjust the microphone volume level.
3)
5 Disc tray
Open or close tray by pushing
button. Place
discs on the disc trays, label side up.
4)
POWER indicator
When the Unit is turned on by pressing the
power button, the light will be on. If you press the
STANDBY/ON button on the remote control, the
Unit will turn off and go into standby mode. The light
will be off.
5)
Power button
Turn the power on or off.
6)
STOP button
Stop playing a disc.
14) S-Video output jack
15) VIDEO OUT jack
16) COMPONENT VIDEO jacks (Y, P
B
/C
B
, P
R
/C
R
)
Front Panel
7)
PAUSE button
Pause playback, frame advance.
8)
PLAY button
Press to start or resume playback.
9)
SKIP
buttons
Press SKIP
button to go back to previous chapters/
tracks.
Press SKIP
button to advance to chapters / tracks.
10) Remote Sensor
Receive the remote control unit signals.
11) DISC 1 - 5 indicators
12)
(disc skip) button
To change next available disc.
13)
(open/close) button
Use to open and close the disc tray.
Parts and Functions
Note:
Screen saver - If no button is pressed within 2 minutes, the screen save function will activate, If you want to return
to the normal screen, press any button.
17) Power cord
18) AUDIO OUT (L/R) jacks
19) DIGITAL AUDIO OUT jack
1
2
3
4 5 6 7 8
10
12 13
9
11
14 15 16
18
19
17


