11
www.vents-us.com
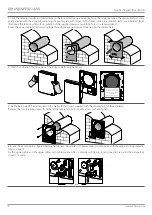
7. Install the cartridge into the air duct as figured below. The pointer must be directed upwards. Then fix the wire with the protruding
clamp and connect the socket connector to the circuit board.
Insert the wires under the
retaining clip and connect the
connector to the circuit board.
The pointer must
be directed upwards.
8. Install the front part of the indoor unit. The thermal actuator rod must be in lower position when installing the front panel, as shown
in the figure in Section 4 on page 11.
TwinFresh Expert RA/M1
TwinFresh Expert Duo RA1
9. Insert the sound absorbing material into the air duct from the
outside.
Roll the layer of the sound absorbing material to match the air
duct diameter. The protecting paper layer must be outside.
Insert the sound absorbing roll into the cartridge against stop.
Make a mark at the end of the air duct, remove the material and
cut the roll as marked.
After that insert the ready roll into the air duct.
9. Install the sectional air flow separators from the outside. Insert a
required number of the air flow separators in the air duct until they
reach the cartridge. Mark the last air flow separator to be flush with
the air duct face, remove it from the air duct and cut the excessive
part of the last air flow separator. Tighter fixation is provided if the
air flow separator protrudes to some distance.
Install the adjusted air flow separators in the air duct.
10. Install the outer ventilation hood. For this, see the user’s manual for the hood.
Содержание TwinFresh Comfo RA1-50
Страница 21: ...21 www vents us com ...
Страница 22: ...22 TwinFresh Expert Duo RA M1 www vents us com ...
Страница 24: ...VUSA139EN 05 ...

