background image

2.4 Battery  Status Indicator

Icon

Description

Green

LED Light Off

Green

LED Light Off

Power off, battery charging

Power off, battery  fully Charged

Power on, battery charging

Power on, battery fully charged

Recording/ Recording and screen off

Blinking Red

2.5 Powering the Camcorder On / Off

2.5.1.1 Power On

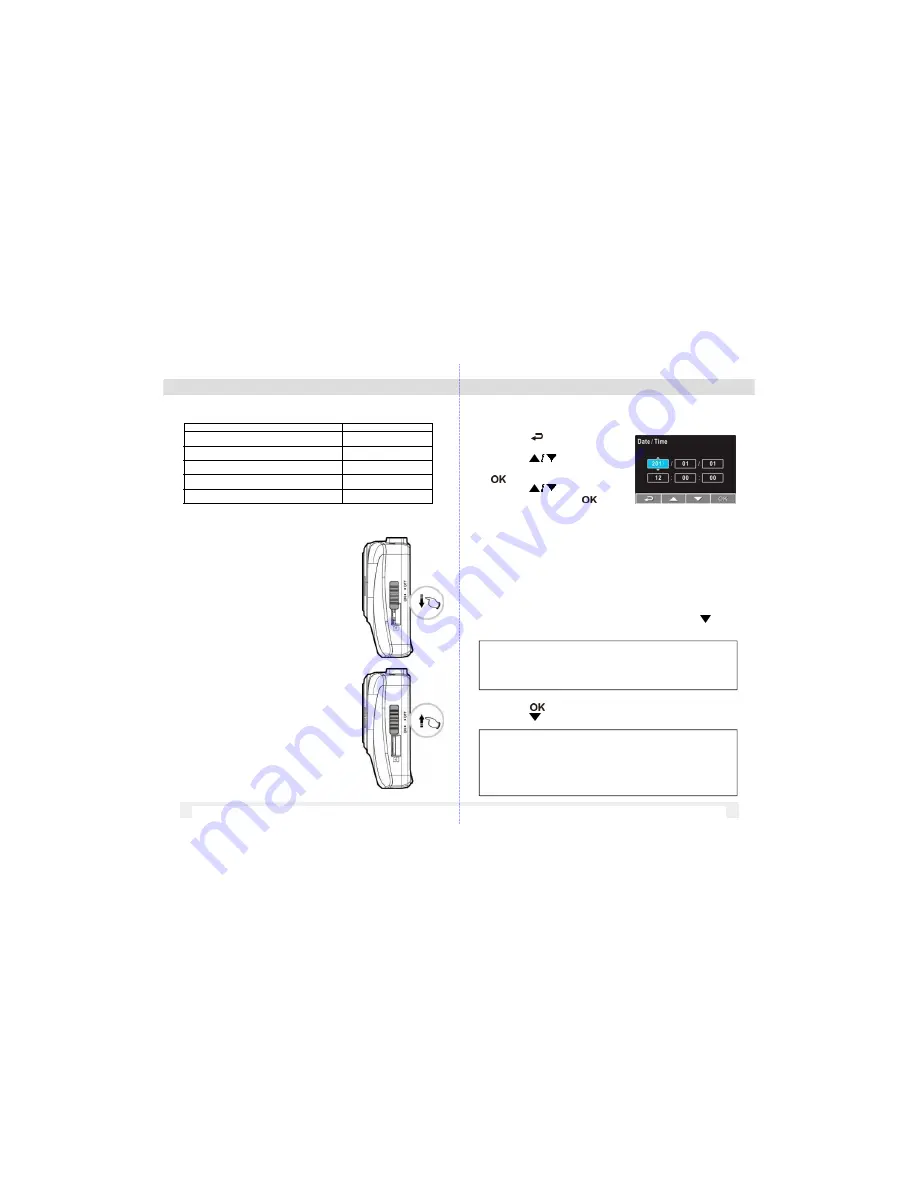
Slide the Power Switch down to the  
ON position. This action will cover  
part of the memory card slot.

2.5.2 Set the Date and Time

To set the date and time, do the following:
1. Press the

button to enter the

on-screen display (OSD) menu.
2. Press the

button to select

Date / Time and press
the

button.

3. Press the

button to adjust

the value and press the

button

to move to another field.
4. Repeat step 3 until the date and time setting is
Complete
.

3 Using the VDR-100

3.1.1 Record videos while driving

When the vehicle engine starts up and the Automatic  
Record function is enabled, the VDR-100 automatically  

part of the memory card slot.

2.5.1.2 Power Off

Slide the Power Switch up to the OFF  
position. Before removing the 
memory  card, please wait until 
power-off  sequence is completed 
and the screen turns off. Do not 
remove memory card during power-
off sequence to prevent  video loss or
file corruption.

2.5.1.3 Reset the camcorder

On rare occasions, the VDR-100 may  
experience an error for unknown  
reasons. In this case, please press  
OK button for at least 8 seconds to  
turn off the camera.

Record function is enabled, the VDR-100 automatically  
turns on and starts recording. Recording will automatically
stop when the engine is switched off. Or press the

button

to stop recording manually.

Note: 

On certain vehicles, the cigarette lighters are 

constantly ON (Hot) so the recording will continue when the  
engine is switched off. If this happens, please manually turn  
off the camera or remove the car adapter from the  cigarette
lighter.

3.1.2 Record all other types of videos

1. Press the

button to start recording.

2. Press the

button to stop recording.

Note:

1.Camera can be configured to save a video file for every
3 or 5  minutes of recording segment.

2. If the memory card capacity is full, the oldest file in
the  memory card will be overwritten.

08

09

Содержание VDR-100

Страница 1: ... solutions in vehicle and mobile video technology Please read and follow all instructions and features before use Save for future reference Manual Ver 09 17 1578 W San Bernardino Rd E Covina CA 91722 USA www ventrainc com info ventrainc com Tel 888 418 3833 ...

Страница 2: ...ged In the event of an impact or accident please check to ensure the equipment is properly secured Inspect the mounting bracket and adhesive for any signs of damage Do not put foreign material into card insertion slot of the terminal it may cause product damage The product is designed to be installed inside the vehicle Any damage caused by placing the device outside the vehicle or damage due to Wh...

Страница 3: ...R S RESPONSBILITY TO MOUNT VENTRA EQUIPMENT IN COMPLIANCE WITH ALL PPLICABLE LAWS AND ORDINCANCE Audio and Video Recording Legal Notice Certain local state and federal laws may prohibit recording of audio and or video in vehicles or public area or without knowledge and or consent please check and comply with ALL local state and federal laws and regulations Built In Shock Sensor The built in shock ...

Страница 4: ...nsor Motion Detection Emergency Recording File Advanced Driver Assistance Systems ADAS 1 2 Package Contents Camera Bracket 1 3 ProductOverview Car Charger MicroSD Card Note To operate the camera press the corresponding buttons 5 8 9 10 according to guide icons shown on the screen Number ITEM Number ITEM 1 Bracket Socket 8 Up Button 2 Power Switch 9 Down Button 3 Memory Card Slot 10 Enter Button 4 ...

Страница 5: ...the memory card 2 It is recommended to use Class 10 U1 or above micro SD card 3 Please format the micro SD card prior to the initial use 4 If the screen shows Low Speed Card while recording this means the writing speed of the memory card is too slow Please replace it with a higher speed memory card 5 If Card is too fragmented is displayed while recording it means the card is unable to save the rec...

Страница 6: ...he supplied charger only Do NOT use other power chargers to avoid camera damage or cause battery explosion 2 When using the VDR 100 for the first time please fully charge the camera battery 3 Please note if the environment temperature reaches 113 F or above the car adapter will continue to supply power to VDR 100 but will not charge the Lithium ion battery for safety reasons Battery Status Indicat...

Страница 7: ...ch up to the OFF position Before removing the memory card please wait until power off sequence is completed and the screen turns off Do not remove memory card during power off sequence to prevent video loss or file corruption 2 5 1 3 Reset the camcorder On rare occasions the VDR 100 may experience an error for unknown reasons In this case please press OK button for at least 8 seconds to turn off t...

Страница 8: ... Press the button to enter the OSD menu 4 Guide Icon Playback Press the button to switch to Playback mode 5 Battery Indicates remaining battery power 6 Guide Icon Stop Press the button to stop the recording 7 Guide Icon Emergency Press the button to continuously record the emergency video in one file until the recording is manually stopped The alert message of Emergency files are full will pop up ...

Страница 9: ... button to enter the Delete menu 6 Press the button to select an Option 7 Press the button to confirm delete Important Note Deleted files cannot be recovered Ensure the files have backup beforedeletion Number Item Description 1 Date and time Indicates the recordeddate and time 2 Stamp Print Indicates the file name date and time stamp if it was enabled in the Settings menu 3 Guide icon Back Press t...

Страница 10: ...tween 2 0 2 0 1 If recording is in progress press the button to stop recording 2 Press the button to enter the OSD menu 3 Press the button to select a menu optionand press the button to enter the selected menu 4 Press the button to select the desired settings and press the button to confirm the setting 5 Pressthe button to exit themenu customize it between 2 0 2 0 ADAS Detect Enable Disable On Off...

Страница 11: ... TFT 262K pixels Lens Wide Angle Fixed Focus lens F 2 0 f 2 6mm Focusrange 0 5m Infinity Video Format MOV Resolution WFHD 2560 x 1080 30fps Super HD 2304 x 1296 30fps Full HD 1920 x 1080 30fps HDR HD 1280 x 720 60fps Stillimage Photograph Format DCF JPEG In Photo mode available resolutions are available from digital enhancement 13 Megapixel 4800 x 2700 9 Megapixel 4000 x 2250 4 Megapixel 2688 x 15...

Страница 12: ...ings 1 Safely remove the Memory card from the VDR 100 after it has been powered off 2 Insert Memory card to a computer A SD card slot is required 3 Select the Drive the SD card is located and select the file folder to view Normal Emergency Date and Time Stamp are watermarked if feature is enabled 4 Select the file to view via Media Player 19 18 ...

Страница 13: ... has been made to ensure the accuracy of the information certain specifications are based on approximate figures All trademarks service marks trade names product names and logos are the property of their respective owners Ventra Technology Inc T 888 418 3833 Web www ventrainc com Email info ventrainc com 20 21 To obtain service within the warranty period please contact Ventra at 888 418 3833 or te...

Отзывы: