6
D. WIRING
WARNING: THE MULTIVENT AND ANCILLARY CONTROL EQUIPMENT MUST BE ISOLATED
FROM THE POWER SUPPLY DURING THE INSTALLATION / OR MAINTENANCE.
THE MULTIVENT UNIT MUST BE EARTHED.
A. MVDC-MS (437634B):
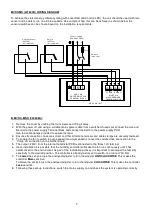
1. Remove the cover by undoing the four screws and lifting it away.
2. With the power off, connect a suitable mains power cable from a switched, fused spur to the power supply PCB.
Use the cable clamps and clip provided to secure the lead.
3. Ensure all connections are correct and that all terminal screws and cable clamps are securely fastened.
4. To enable the fan to switch to boost or purge speed when a light is turned on, connect the switched live
connection from the lighting circuit to one of the LS connections on the mother board.
5. The switched live output (230V) from any other switch or controller (such as a pullcord or push button switch,
humidistat or PIR detector) can be connected to the LS terminal instead of connecting to a lighting circuit.
6. Following these set-up instructions, switch the mains supply on and check the system is operating correctly.
MVDC-MS (437634B) CONNECTION DIAGRAM
Содержание Lo-Carbon MULTIVENT MVDC-MS
Страница 2: ...2...


