


3. Remove the Inner Grille [A]. Insert a small bladed screwdriver between the bottom blade of the Inner Grille and
the Outer Bezel [B]. Gently lever the bottom grille blade upwards and away from the Outer Bezel.
4. Remove the Outer Bezel. Remove the two screws retaining the Bezel to the Base Housing [D]. Note that the
Outer Bezel is also secured into position via the central section and will require a small force to remove it.
5. Remove the Cable Grommet [C], and push the cable through the grommet including the outer core secondary
insulation. Please ensure the correct cable is used as outlined in
Section C WIRING
.
6. Slide the Base Housing into the Wall Liner and secure into position by tightening the Quick Clip screws [F]
(
fig. 2
).
7. Ensure the fan blade rotates freely.
8. Select and follow the appropriate wiring diagram in
Section C WIRING
.
9. Replace the Outer Bezel ensuring the centre section positively clips into the Base Housing by carefully pushing
from the centre.
10. Switch the mains power supply on and check the fan is operating correctly.
B.
SETUP
WARNING: THE FAN AND ANCILLARY CONTROL EQUIPMENT MUST BE ISOLATED FROM
THE POWER SUPPLY DURING THE INSTALLATION / OR MAINTENANCE.
TIMER ADJUSTMENT (T model)
The overrun time period is factory set to 15 minutes. The overrun time period may be adjusted from 5-30
minutes by altering the adjuster on the control PCB.
i.
To REDUCE the operating time, turn the adjuster (fig. 3.) CLOCKWISE.
ii.
To INCREASE the operating time, turn the adjuster (fig. 3.) ANTI-CLOCKWISE.
C. WIRING.
WARNING: THE FAN AND ANCILLARY CONTROL EQUIPMENT MUST BE ISOLATED FROM
THE POWER SUPPLY DURING THE INSTALLATION / OR MAINTENANCE.
This product is designed for fixed wiring installations only. Flexible cord should not be used.
1. 1mm
2
or 1.5mm
2
solid/rigid core flat cable should be used.
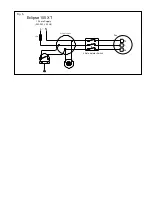
2. Select and follow the appropriate wiring diagram (fig. 4/5).
3. Check all connections have been made correctly and ensure all terminal connections are securely fastened.
4. Ensure the integrity of the seal between the cable outer insulation and grommet and replace in the Base
Housing.
THERE MUST BE NO GAPS BETWEEN THE GROMMET AND CABLE.
5. Ensure the impeller rotates and is free from obstructions.
D. SERVICING AND MAINTENANCE.
WARNING: THE FAN AND ANCILLARY CONTROL EQUIPMENT MUST BE ISOLATED
FROM THE POWER SUPPLY DURING MAINTENANCE.
1. At intervals appropriate to the installation, the fan should be inspected and cleaned to ensure there is no build
up of dirt or other deposits.
2. Wipe the inlets and front face with a damp cloth until clean.
The fan has sealed for life bearings, which do not require lubrication.
Содержание Eclipse 100X
Страница 7: ......