background image

INST
ALLA
TION MANUAL

INST
ALLA

TION

13

DUCTED INSTALLATION ONLY

TIP

:  Insert a small length of duct over the 3¼” x 10” damper assembly (for rectangular ducting) or 


7” round (for round ducting) and seal the joint using aluminum foil duct tape to ease connection 


with the house ductwork.

9 ]  

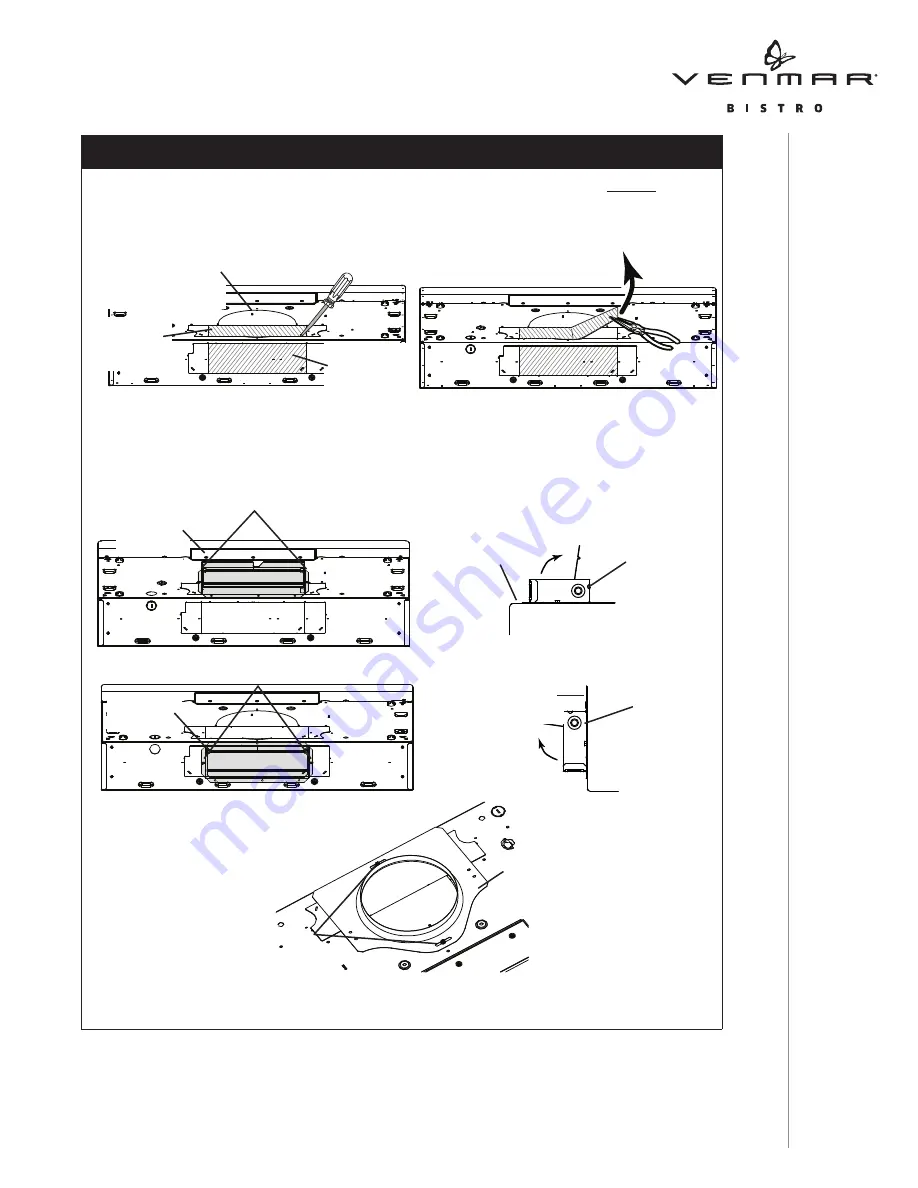
Remove 3¼” x 10” vertical, 3¼” x 10” horizontal (both are the rectangular 

central


knockout plates, see hatched areas) or 7-inch round knockout plate as appropriate for 
your ducting method (see 

F

IGURES

 1 A 

and

 1 B

). 

NOTE:  To accommodate off-center ductwork, the 7” round duct plate can be installed up 
 

to 1/2” on either side of the hood center.

7” ROUND KNOCKOUT 

PLATE (

ALSO


REMOVE


3¼” 

X

 10” 

VERTICAL


KNOCKOUT


PLATE

)

3¼” 

X

 10”

VERTICAL

KNOCKOUT

PLATE

3¼” 

X

 10”

HORIZONTAL

KNOCKOUT

PLATE

F

IGURE

 1 A

7” ROUND 

DUCT

PLATE

SCREWS

F

IGURE

 3

3¼” 

X

 10”

DAMPER 

ASSEMBLY

TOP/BACK

EDGE OF

HOOD

DAMPER

FLAP

PIVOT

SCREWS

F

IGURE

 2 A

F

IGURE

 2 B

F

IGURE

 1 B

3¼” 

X

 10”

DAMPER 

ASSEMBLY

BACK OF 

HOOD

DAMPER

FLAP

PIVOT

SCREWS

10 ]  

Attach 3¼” x 10” Damper Assembly on top OR back of hood (if using 3¼” x 10” duct; 
shaded part in 

F

IGURE

 2 A

 below) or 7” Round Duct Plate (if using 7-inch round duct, 

F

IGURE

 3

) over the knockout opening. When installed, the 3¼” x 10” damper assembly 

must open as shown in 

F

IGURE

 2 B

.

Содержание Bistro VBLDN1 Series

Страница 1: ...WWW VENMAR CA Serial number 99045653 004H RANGE HOOD Series VBLDN1 INSTALLATION USE AND CARE MANUAL...

Страница 2: ...Installation 8 21 Recommended Tools and Accessories for Installation 8 Install Ductwork Ducted Installations Only 8 Contents 9 Prepare the Hood 10 13 Prepare the Hood Location 14 EZ1 Person Installat...

Страница 3: ...fficient air is needed for proper combustion and exhausting of gases through the flue chimney of fuel burning equipment to prevent backdrafting Follow the heating equipment manufacturer s guidelines a...

Страница 4: ...d you know how to operate it B The fire is small and contained in the area where it started C The fire department has been called D You can fight the fire with your back to an exit Based on Kitchen Fi...

Страница 5: ...ipped with a protective device that activates the blowers when an abnormally high heat level is detected while the blowers are activated During the Heat Sentry activation this device takes control of...

Страница 6: ...vated temperatures of cooking offering bright lighting and lasting up to 25 times as long as a standard bulb and greater reliability than typical replacement LED bulbs MASTER ON OFF Press this push bu...

Страница 7: ...leaned frequently Use a clean cloth soaked with warm detergent solution STAINLESS STEEL CLEANING Do Regularly wash with clean cloth or rag soaked with warm water and mild soap or liquid dish detergent...

Страница 8: ...ABOVE COOKING SURFACE CABINET 3 X 10 DUCT FOR HORIZONTAL DISCHARGE WALL CAP ROOF CAP 3 X 10 OR 7 ROUND DUCT FOR VERTICAL DISCHARGE HOUSE WIRING TOP OR BACK OF HOOD HOOD NOTE Distances over 30 are at...

Страница 9: ...ce bord au mur arri re Utiliser ce gabarit pour marquer vos rep res ne pas tenter de d couper le trou pour le conduit travers le gabarit NOTE Les d coupes incluent le jeu n cessaire l installation el...

Страница 10: ...e finger cup remove the grease filters from the hood by pushing down and tilting filters out 4 Using a 11 32 nutdriver or socket remove the lock nut retaining the flange of the right blower cover plat...

Страница 11: ...nstall an appropriate strain relief 1 2 diameter not included For knockout removed from top of hood the strain relief will be installed later ELECTRICAL POWER CABLE KNOCKOUT 5 Remove the parts bag tap...

Страница 12: ...LATE SCREWS NON DUCTED INSTALLATION ONLY 7 Remove 3 screws retaining the recirculation cover plate to the hood Discard this plate with its screws 8 Peel off and discard the membrane covering the recir...

Страница 13: ...er ductwork the 7 round duct plate can be installed up to 1 2 on either side of the hood center 7 ROUND KNOCKOUT PLATE ALSO REMOVE 3 X 10 VERTICAL KNOCKOUT PLATE 3 X 10 VERTICAL KNOCKOUT PLATE 3 X 10...

Страница 14: ...10 3 x 14 RECTANGULAR DUCTING 7 ROUND DUCTING OR Use this template for marking do not attempt to cut out the ducting hole through it NOTE These cutouts are clearance holes they do not need to be the e...

Страница 15: ...ws Repeat for the other side frame 7 Install the proper installation brackets according to the type of cabinet framed or frameless See below 4 Drill a 1 8 dia pilot hole for house wiring at B location...

Страница 16: ...ine on the outer edge of the bracket as shown Slide the bracket towards the center of cabinet and align outside edge of the bracket to marked line keeping the rear end edge leaning on the wall Use a p...

Страница 17: ...EAR HOLES A and B While holding the hood run the house power cable into the hood through the strain relief previously installed in step 6 on page 11 4 Unhook the rear holes from the brackets and hang...

Страница 18: ...arts bag Insert two 2 screws per side in the slots as shown in insets on illustration below 8 For frameless cabinet secure the hood to the cabinet using four 4 no 8 x 5 8 round head wood screws includ...

Страница 19: ...ing screws are not included VERTICAL DUCT ACCESS HOLE 5 5 CENTER LINE ELECTRICAL ACCESS HOLE IN CABINET BOTTOM WOOD SHIMS RECESSED BOTTOM CABINETS ONLY CABINET FRONT 3 4 1 1 9 12 47 16 CABINET BOTTOM...

Страница 20: ...ards wall until mounting screw heads are engaged in narrow end of keyhole slots in top of hood Tighten screws securely and maintain a hold on the hood until completing step 3 3 Secure the hood to the...

Страница 21: ...l wiring must be done by qualified personnel in accordance with all applicable codes and standards Before connecting wires switch power off at service panel and lock service disconnecting means to pre...

Страница 22: ...verride W W W W Transformer Heatshrink W R BK Ref 990729478A LED 2 1 LED 2 1 Note The control board is viewed with the connectors on the opposite side of the board W R BK O G Y 1 2 3 5 4 6 W R BK O G...

Страница 23: ...020796 WIRE HARNESS WITH AUTOTRANSFORMER AND FUSE 1 1 S97020360 PARTS BAG INCLUDING 4 METAL SCREWS NO 8 18 X 1 2 6 ROUND HEAD NO 8 X 5 8 WOOD SCREWS 6 NO 8 X 1 2 COUNTERSUNK WOOD SCREWS 1 1 S97020466...

Страница 24: ...UANTITY 30 STAINLESS 30 WHITE 1 S97020030 RECIRCULATION COVER PLATE WHITE INCLUDING SCREWS 1 S97020031 RECIRCULATION COVER PLATE STAINLESS STEEL INCLUDING SCREWS 1 2 S97020534 3 X 10 DAMPER ASSEMBLY I...

Страница 25: ...t or replacement parts to you at no charge You are responsible for all costs for removal reinstallation and shipping insurance or other freight charges incurred in the shipment of the Product or part...

Страница 26: ...WWW VENMAR CA Num ro de s rie 99045653 004H HOTTE DE CUISINI RE S rie VBLDN1 MANUEL D INSTALLATION D UTILISATION ET D ENTRETIEN...

Страница 27: ...res recommand s pour l installation 8 Installation des conduits installations avec conduits seulement 8 Contenu 9 Pr paration de la hotte 10 13 Pr paration de l emplacement de la hotte 14 Syst me d in...

Страница 28: ...ns et aux standards de s curit des manufacturiers d quipement de chauffage tel qu ils sont publi s par la National Fire Protection Association NFPA et l American Society for Heating Refrigeration and...

Страница 29: ...aissez le fonctionnement B Le feu est petit et limit l endroit o il a d but C Les pompiers ont t avis s D Vous pouvez combattre le feu en ayant acc s une sortie de secours Tir es du Kitchen Fire Safet...

Страница 30: ...te est munie d un dispositif de protection qui active les ventilateurs lorsqu un niveau anormalement lev de chaleur est d tect lorsqu ils sont en fonction Lors de l activation du Heat Sentry ce dispos...

Страница 31: ...ronnement chaleur lev e Leur durabilit est jusqu 25 fois sup rieure celle d ampoules standards et ils sont plus robustes que les ampoules DEL typiques MARCHE ARR T PRINCIPAL Appuyer sur ce bouton pous...

Страница 32: ...haude et de d tergent NETTOYAGE DE L ACIER INOXYDABLE faire Laver r guli rement les surfaces l aide d un chiffon propre imbib d eau chaude et de savon doux ou de d tergent liquide vaisselle Toujours n...

Страница 33: ...l installateur et de l utilisateur 1 D terminer si l vacuation se fera verticalement 3 po x 10 po ou 7 po rond ou horizontalement 3 po x 10 po seulement 2 tablir o le conduit passera entre la hotte et...

Страница 34: ...trav s de la plantilla NOTA To be translated in Spanish MARK WHERE INDICATED FOR THE APPROPRIATE SIZE DUCT OPENING MARQUER LES REP RES AUX ENDROITS INDIQU S SELON LE FORMAT DE CONDUIT UTILIS TITLE TO...

Страница 35: ...s graisses en ins rant un doigt dans la prise concave de chaque filtre graisses puis en poussant vers l arri re de la hotte et en les basculant 4 l aide d un tourne crou ou d un douille de 11 32 po re...

Страница 36: ...rre fils appropri de 1 2 po de diam tre non inclus Pour une ouverture pr amorc e retir e du dessus de la hotte le serre fils sera install plus tard OUVERTURE PR AMORC E DU C BLE D ALIMENTATION LECTRIQ...

Страница 37: ...er les 3 vis retenant la plaque couvrant la grille de recirculation en gris dans l illustration ci dessous la hotte Se d faire de cette plaque et de ses vis 8 Soulever et se d faire de la membrane rec...

Страница 38: ...lat ralement jusqu 1 2 po de chaque c t pour s ajuster un conduit d centr OUVERTURE PR AMORC E DE 7 PO RONDE RETIRER AUSSI L OUVERTURE PR AMORC E VERTICALE OUVERTURE PR AMORC E VERTICALE DE 3 PO X 10...

Страница 39: ...U POUR C BLE D ALIMENTATION LECTRIQUE B DANS LE DESSOUS DE L ARMOIRE LIGNE DE CENTRE DEVANT DE L ARMOIRE POUR UNE INSTALLATION SOUS UNE ARMOIRE FOND EN RETRAIT UTILISER LES LIGNES POUR MESURER L PAISS...

Страница 40: ...l op ration pour l autre c t de l armoire 7 Installer les supports d installation appropri s selon le type d armoire fond en retrait ou fond gal Voir ci dessous 4 Percer un avant trou de 1 8 po de dia...

Страница 41: ...e le mur Tracer une ligne le long du rebord externe du support tel qu il est illustr Glisser le support vers le centre de l armoire et aligner ses c t s ext rieurs sur la ligne trac e en gardant l ext...

Страница 42: ...s supports et accrocher la hotte en utilisant ses 2 TROUS ENFONC S AVANT C et D Tout en retenant la hotte aller l tape 6 5 Accrocher la hotte aux supports par les 2 TROUS ENFONC S AVANT C et D Tout en...

Страница 43: ...vis par c t dans les fentes tel qu il est d montr dans les m daillons de l illustration ci dessous 8 Pour une armoire fond gal fixer la hotte l armoire l aide de quatre 4 vis bois t te ronde n 8 x 5...

Страница 44: ...DE L ARMOIRE TROU POUR CONDUIT VERTICAL VIS DE MONTAGE ARRI RE DE LA HOTTE 2 TROU POUR FIL D ALIMENTATION LECTRIQUE DANS LE DESSOUS DE L ARMOIRE 1 PO CALES DE BOIS SEULEMENT POUR ARMOIRES BASE EN RET...

Страница 45: ...c demment Glissez la hotte vers le mur de mani re engager la t te des vis dans la partie troite des trous en forme de serrure du dessus de la hotte Serrer les vis fermement et maintenir la hotte jusq...

Страница 46: ...vis VERTE de mise la terre 2 Remettreenplacelecouvercleduventilateur engrisdansl illustrationci dessus l aidedes7vis et de l crou retir s pr c demment l tape 4 en page 10 Porter attention l emplacemen...

Страница 47: ...BLA BLA BLA Transformateur BLA R N Ref 990729478A DEL 2 1 DEL 2 1 BLA R N O V J 1 2 3 5 4 6 BLA R N O V J 1 2 3 5 4 6 N Ligne Neutre Mise la terre 120 V CA M M BR BR BLA C BR BLA C BR N N N N 2 3 J6...

Страница 48: ...97020796 FAISCEAU DE FILS AVEC AUTOTRANSFORMATEUR ET FUSIBLE 1 1 S97020360 SAC DE PI CES COMPRENANT 4 VIS M TAUX N 8 18 X 1 2 PO 6 VIS BOIS T TE RONDE N 8 X 5 8 PO 6 VIS T TE FRAIS E N 8 X 1 2 PO 1 1...

Страница 49: ...S97020030 PLAQUE DE GRILLE DE RECIRCULATION BLANCHE INCLUANT LES VIS 1 S97020031 PLAQUE DE GRILLE DE RECIRCULATION INOX INCLUANT LES VIS 1 2 S97020534 ADAPTATEUR VOLET DE 3 PO X 10 PO INCLUANT LES VIS...

Страница 50: ...u de tous autres frais de transport pour l envoi du produit ou de la pi ce la Soci t Si vous devez envoyer le produit ou la pi ce la Soci t tel que la Soci t vous l indiquera vous devrez l emballer co...

Отзывы: