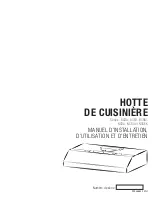
Numéro de série :
99045652-101H
HOTTE
DE CUISINIÈRE
Séries : BCDA, BCS3, BCSM,
NCDA, NCS3 et NCSEK
MANUEL D’INSTALLATION,
D’UTILISATION ET D’ENTRETIEN
Страница 1: ...Serial number 99045652 101H RANGE HOOD Series BCDA BCS3 BCSM NCDA NCS3 and NCSEK INSTALLATION USE AND CARE MANUAL...
Страница 2: ...Tools and Accessories for Installation 8 Install Ductwork Ducted Installations Only 8 9 Contents 9 10 Prepare the Hood 11 13 Prepare the Hood Location 14 EZ1 One person Installation 14 16 Install the...
Страница 3: ...standards including fire rated construction Sufficient air is needed for proper combustion and exhausting of gases through the flue chimney of fuel burning equipment to prevent backdrafting Follow th...
Страница 4: ...d you know how to operate it B The fire is small and contained in the area where it started C The fire department has been called D You can fight the fire with your back to an exit Based on Kitchen Fi...
Страница 5: ...push on this button to turn ON the blower at the last selected speed Push on this button again to turn OFF the blower NOTE If there is no speed selected all blower speed push buttons up the blower wi...
Страница 6: ...p sound ends this will turn off the blower and save this blower speed to memory LIGHT BUTTON When lights are OFF press once on this button to turn ON the lights at the last saved setting If there was...
Страница 7: ...LADE The fan blade should be cleaned frequently Use a clean cloth soaked with warm detergent solution STAINLESS STEEL CLEANING Do Regularly wash with clean cloth or rag soaked with warm water and mild...
Страница 8: ...CABINET 3 X 10 DUCT FOR HORIZONTAL DISCHARGE WALL CAP ROOF CAP 3 X 10 OR 7 ROUND DUCT FOR VERTICAL DISCHARGE HOUSE WIRING TOP OR BACK OF HOOD HOOD NOTE Distances over 24 are at the installer and user...
Страница 9: ...g graduated scale when installing to framed cabinet Pour une installation sous une armoire fond en retrait utiliser les lignes pour mesurer l paisseur du d calage caus par le mur de l armoire et plier...
Страница 10: ...tenter de d couper le trou pour le conduit travers le gabarit NOTE Les d coupes incluent le jeu n cessaire l installation elles ne doivent pas tre du format exact des conduits Use esta plantilla para...
Страница 11: ...p no EZ1 brackets in BCS3 and NCS3 Series Remove both screws holding damper assembly to hood Remove parts bag captured behind the damper assembly Remove damper assembly from inside the hood and keep t...
Страница 12: ...ve Electrical Power Cable Knockout from top vertical wiring or back horizontal wiring of hood Install an appropriate strain relief 1 2 diameter not included NON DUCTED INSTALLATION ONLY 7 Remove 3 scr...
Страница 13: ...be installed up to 1 2 on either side of the hood center 7 ROUND KNOCKOUT PLATE ALSO REMOVE VERTICAL KNOCKOUT PLATE 3 X 10 VERTICAL KNOCKOUT PLATE 3 X 10 HORIZONTAL KNOCKOUT PLATE FIGURE 1 A 7 ROUND D...
Страница 14: ...iser les lignes pour mesurer l paisseur du d calage caus par le mur de l armoire et plier le gabarit en cons quence To be translated in Spanish P C CABINET FRONT C L A B VERTICAL EXHAUST A S A A V RTI...
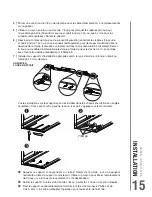
Страница 15: ...rews Repeat for the other side frame 7 Install the proper installation brackets according to the type of cabinet framed or frameless See below 4 Drill a 1 8 dia pilot hole for house wiring at A locati...
Страница 16: ...n the outer edge of the bracket as shown Slide the bracket towards the center of cabinet and align the outside edge of the bracket with the marked line keeping the rear end edge leaning on the wall Us...
Страница 17: ...s 2 recessed FRONT HOLES C and D While holding the hood attach the power cable to the hood using the strain relief 5 Hang the hood on the brackets using the 2 recessed FRONT HOLES C and D While holdin...
Страница 18: ...rts bag Insert 2 screws per side in the slots as shown in insets on illustration below 8 For frameless cabinet secure the hood to the cabinet using 4 no 8 x 5 8 round head wood screws included in part...
Страница 19: ...LINE HOOD MOUNTING SCREWS 4 ELECTRICAL ACCESS HOLE IN CABINET BOTTOM WOOD SHIMS RECESSED BOTTOM CABINETS ONLY CABINET FRONT 3 4 1 1 7 16 9 24 HOOD 12 30 HOOD 47 16 CABINET BOTTOM 9 24 HOOD 12 30 HOOD...
Страница 20: ...4 mounting screws previously installed Slide hood back towards wall until mounting screw heads are engaged in narrow end of keyhole slots in top of hood Tighten screws securely Attach power cable to...
Страница 21: ...andards Before connecting wires switch power off at service panel and lock service disconnecting means to prevent power from being switched on accidentally CAUTION Ensure both tabs on inner top of hoo...
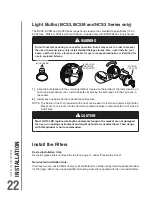
Страница 22: ...OL WARNING Do not touch lamps during or soon after operation Burns may occur In order to prevent the risk of personal injury only install shielded halogen lamps Also never install a cool beam a dichro...
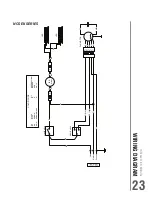
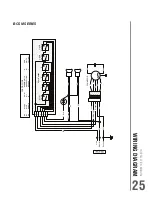
Страница 23: ...R BN BN W G Y R Low BK High W 120 V AC Line Neutral Ground BK BK Motor Switch Light Switch BL W W BK BK COLOR CODE BK BL BN BN W BLACK BLUE BROWN BROWN WHITE G Y O R W GREEN YELLOW ORANGE RED WHITE R...
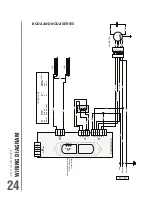
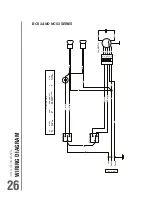
Страница 24: ...ck of control board J1 Transformer J2 Power Motor 5 4 3 2 1 5 4 3 2 1 6 7 Control Board R R BL BL BK W BK BK W G Y R Low O Medium BK High W 120 V AC Line Neutral Ground G Y W BK O R FAN MOTOR BN BN W...
Страница 25: ...Y RED WHITE YELLOW BN W G Y O BROWN WHITE GREEN YELLOW ORANGE 120 V AC Line Neutral Ground 1 2 3 4 5 6 1 2 3 4 5 6 G Y G Y W W W W W BK High BK BK BK O Medium BK O R Low R FAN MOTOR BN W BN Y Low BL...
Страница 26: ...BN BN W G Y R Low BK High W 120 V AC Line Neutral Ground BK BK Motor Switch Light Switch Y Low BL High W W BK BK COLOR CODE BK BL BN BLACK BLUE BROWN R W Y RED WHITE YELLOW BN W G Y O BROWN WHITE GRE...
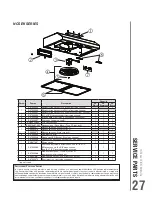
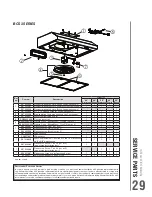
Страница 27: ...ATE WHITE INCLUDING SCREWS 1 S97020031 RECIRCULATION COVER PLATE STAINLESS STEEL INCL SCREWS 1 2 S97020534 3 X 10 DAMPER ASSEMBLY INCLUDING SCREWS 1 1 1 3 S97020408 BLOWER MOTOR INCLUDING 4 SCREWS AND...
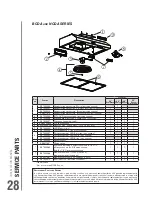
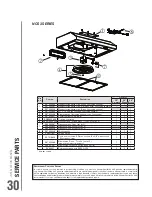
Страница 28: ...SCREWS 1 1 S97020452 WIRE HARNESS 1 1 1 1 S98011637 WIRING COVER 1 1 1 1 S97020360 PARTS BAG INCLUDING 4 METAL SCREWS NO 8 18 X 1 2 6 ROUND HEAD NO 8 X 5 8 WOOD SCREWS 6 NO 8 X 1 2 COUNTERSUNK SCREWS...
Страница 29: ...G COVER 1 1 1 1 1 S97018623 PARTS BAG INCLUDING 1 SUCTION CUP TOOL 5 ROUND HEAD NO 8 X 5 8 WOOD SCREWS 1 1 1 1 1 S97020465 NON DUCTED FILTER TYPE XB SET OF 2 NON DUCTED INSTALLATION ONLY 1 1 S97020466...
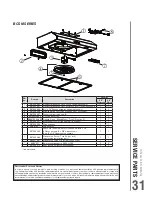
Страница 30: ...ER 1 1 1 S97018623 PARTS BAG INCLUDING 5 ROUND HEAD NO 8 X 5 8 WOOD SCREWS 1 SUCTION CUP TOOL 1 1 1 S97020466 NON DUCTED FILTER TYPE XC SET OF 2 NON DUCTED INSTALLATION ONLY 1 1 1 S99527587 NON DUCTED...
Страница 31: ...OUNTERSUNK SCREWS 1 1 S97020466 NON DUCTED FILTER TYPE XC SET OF 2 NON DUCTED INSTALLATION ONLY 1 1 S99527587 NON DUCTED FILTER CLIP KIT INCLUDES 4 CLIPS 1 1 SV05921 SHIELDED HALOGEN BULB 50 W GU10 2...
Страница 32: ...nt parts to you at no charge You are responsible for all costs for removal reinstallation and shipping insurance or other freight charges incurred in the shipment of the Product or part to the Company...
Страница 33: ...Num ro de s rie 99045652 101H HOTTE DE CUISINI RE S ries BCDA BCS3 BCSM NCDA NCS3 et NCSEK MANUEL D INSTALLATION D UTILISATION ET D ENTRETIEN...
Страница 34: ...l installation 8 Installation des conduits installations avec conduits seulement 8 9 Contenu 9 10 Pr paration de la hotte 11 13 Pr paration de l emplacement de la hotte 14 Syst me d installation par u...
Страница 35: ...riers d quipement de chauffage tel qu ils sont publi s par la National Fire Protection Association NFPA et l American Society for Heating Refrigeration and Air Conditioning Engineers ASHRAE ainsi que...
Страница 36: ...connaissez le fonctionnement B Le feu est petit et limit l endroit o il a d but C Les pompiers ont t avis s D Vous pouvez combattre l incendie en ayant acc s une sortie de secours Tir es du Kitchen Fi...
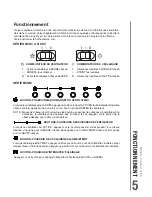
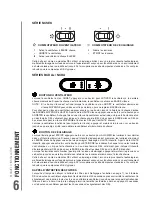
Страница 37: ...OTE Si aucune vitesse n est choisie tous les boutons poussoirs des vitesses de ventilateur non enfonc s le ventilateur ne s activera pas Si tel est le cas appuyer sur le bouton de la vitesse d sir e p...
Страница 38: ...le bip s arr te ceci arr tera le ventilateur et m morisera sa vitesse BOUTON DE L CLAIRAGE Lorsque l clairage est TEINT appuyer une fois sur ce bouton pour ALLUMER les lumi res leur dernier niveau d...
Страница 39: ...solution d eau chaude et de d tergent NETTOYAGE DE L ACIER INOXYDABLE faire Laver r guli rement les surfaces l aide d un chiffon propre imbib d eau chaude et de savon doux ou de d tergent liquide vai...
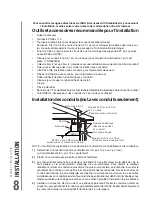
Страница 40: ...l vacuation se fera verticalement 3 po x 10 po ou 7 po rond ou horizontalement 3 po x 10 po seulement 2 tablir o le conduit passera entre la hotte et l ext rieur 3 Le conduit reliant cette hotte l ex...
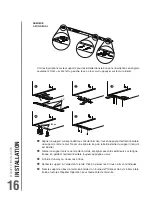
Страница 41: ...E 2 SUPPORTS D INSTALLATION POUR ARMOIRE AVEC FOND EN RETRAIT 2 SUPPORTS D INSTALLATION POUR ARMOIRE AVEC FOND R GULIER 1 GABARIT POUR CONDUITS IMPRIM SUR LES DEUX C T S COMPOSANTS EZ1 LES SUPPORTS D...
Страница 42: ...gujero del conducto a trav s de la plantilla NOTA To be translated in Spanish MARK WHERE INDICATED FOR THE APPROPRIATE SIZE DUCT OPENING MARQUER LES REP RES AUX ENDROITS INDIQU S SELON LE FORMAT DE CO...
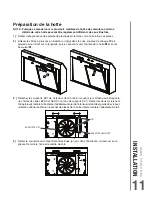
Страница 43: ...autobloquante les hottes de s ries BCS3 et NCS3 n ont pas de supports EZ1 Retirer les deux vis retenant l adaptateur volet lahotte Retirerl adaptateur voletdel int rieurdelahotteetgarderlesvispour uti...
Страница 44: ...n lectrique du dessus c blage vertical ou de l arri re de la hotte c blage horizontal Installer un serre fils appropri de 1 2 po de diam tre non inclus 7 Retirer les 3 vis retenant la plaque couvrant...
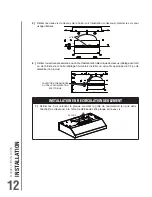
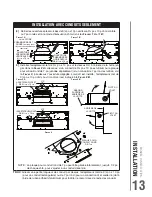
Страница 45: ...ERTURE PR AMORC E DE 7 PO RONDE RETIRER AUSSI L OUVERTURE PR AMORC E VERTICALE OUVERTURE PR AMORC E VERTICALE DE 3 PO X 10 PO OUVERTURE PR AMORC E HORIZONTALE DE 3 PO X 10 PO FIGURE 1 A PLAQUE POUR CO...
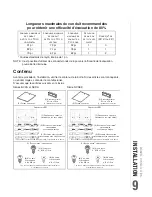
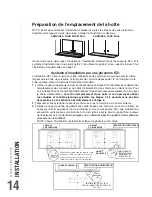
Страница 46: ...our une installation sous une armoire fond en retrait utiliser les lignes pour mesurer l paisseur du d calage caus par le mur de l armoire et plier le gabarit en cons quence To be translated in Spanis...
Страница 47: ...er l op ration pour l autre c t de l armoire 7 Installer les supports d installation appropri s selon le type d armoire fond en retrait ou fond gal Voir ci dessous 4 Percer un avant trou de 1 8 po de...
Страница 48: ...re le mur Tracer une ligne le long du rebord externe du support tel qu il est illustr Glisser le support vers le centre de l armoire et aligner ses c t s ext rieurs sur la ligne trac e en gardant l ex...
Страница 49: ...e des supports et accrocher la hotte en utilisant ses 2 TROUS ENFONC S AVANT C et D Tout en retenant la hotte fixer le c ble d alimentation lectrique la hotte l aide du serre fils 5 Accrocher la hotte...
Страница 50: ...uses dans le sac de pi ces Ins rer 2 vis par c t dans les fentes tel qu il est d montr dans les m daillons de l illustration ci dessous 8 Pour une armoire fond gal fixer la hotte l armoire l aide de 4...
Страница 51: ...LIMENTATION LECTRIQUE DANS LE DESSOUS DE L ARMOIRE LIGNE DE CENTRE CALES DE BOIS SEULEMENT POUR ARMOIRES BASE EN RETRAIT TROU POUR CONDUIT VERTICAL VACUATION VERTICALE 3 PO X 10 PO 9 PO HOTTE DE 24 PO...
Страница 52: ...des 4 vis de montage install es pr c demment Glissez la hotte vers le mur de mani re engager la t te des vis dans la partie troite des trous en forme de serrure du dessus de la hotte Serrer les vis fe...
Страница 53: ...e sont engag es dans les fentes correspondantes du couvercle du compartiment lectrique Aussi prendre garde de ne pas pincer les fils lors de la remise en place du couvercle FIL DE MISE LA TERRE DU MOT...
Страница 54: ...l installer VENTOUSE AVERTISSEMENT Ne pas toucher aux lampes durant ou peu apr s leur utilisation Peuvent causer des br lures Afin de r duire le risque de blessures corporelles n installer que des amp...
Страница 55: ...N N V J R Basse N Haute BLA Ligne Neutre Mise la terre CODE DES COULEURS BLA BLE BR BR BLA BLANC BLEU BRUN BRUN BLANC N O R V J NOIR ORANG ROUGE VERT JAUNE Commutateur d clairage Commutateur du moteur...
Страница 56: ...lectronique J1 Transformateur J2 Alimentation Moteur 5 4 3 2 1 5 4 3 2 1 6 7 Carte lectronique R R BLE BLE N BLA N N BLA V J R Basse O Moyenne N Haute BLA 120 V CA V J BLA N O R BR BR BLA Ligne Neutre...
Страница 57: ...R Basse R MOTEUR DU VENTILATEUR BR BLA BR J Basse BL Haute Moteur Marche Arr t Vitesses du moteur clairage Allum teint Intensit d clairage Haute Basse 1 2 3 CODE DES COULEURS BLA BLE BR BLANC BLEU BRU...
Страница 58: ...J R Basse N Haute BLA 120 V CA Ligne Neutre Mise la terre N N Commutateur d clairage J Basse BLE Haute BLA BLA N N CODE DES COULEURS BLA BLE BR BLANC BLEU BRUN O R V J ORANGE ROUGE VERT JAUNE BR BLA J...
Страница 59: ...INCLUANT LES VIS 1 S97020031 PLAQUE DE GRILLE DE RECIRCULATION INOX INCLUANT LES VIS 1 2 S97020534 ADAPTATEUR VOLET DE 3 PO X 10 PO INCLUANT LES VIS 1 1 1 3 S97020408 MOTEUR DU VENTILATEUR INCLUANT 4...
Страница 60: ...1637 COUVERCLE DU COMPARTIMENT LECTRIQUE 1 1 1 1 S97020379 SAC DE PI CES COMPRENANT 4 VIS M TAUX N 8 18 X 1 2 PO 6 VIS BOIS T TE RONDE N 8 X 5 8 PO 6 VIS T TE FRAIS E N 8 X 1 2 PO 1 1 1 1 S97020466 FI...
Страница 61: ...1 1 1 1 1 S97018623 SAC DE PI CES COMPRENANT 5 VIS BOIS N 8 X 5 8 PO T TE RONDE 1 VENTOUSE 1 1 1 1 1 S97020465 FILTRES DE RECIRCULATION TYPE XB ENSEMBLE DE 2 INSTALLATION SANS CONDUIT SEULEMENT 1 1 S9...
Страница 62: ...1 1 1 S97018623 SAC DE PI CES COMPRENANT 5 VIS BOIS N 8 X 5 8 PO T TE RONDE 1 VENTOUSE 1 1 1 S97020466 FILTRES DE RECIRCULATION TYPE XC ENSEMBLE DE 2 INSTALLATION SANS CONDUIT SEULEMENT 1 1 1 S9952758...
Страница 63: ...RES DE RECIRCULATION TYPE XC ENSEMBLE DE 2 INSTALLATION SANS CONDUIT SEULEMENT 1 1 S99527587 CLIPS POUR FILTRE AU CHARBON ENSEMBLE DE 4 1 1 SV05921 AMPOULE HALOG NE AVEC CRAN 50 W GU10 2 2 S97020470 E...
Страница 64: ...tous autres frais de transport pour l envoi du produit ou de la pi ce la Soci t Si vous devez envoyer le produit ou la pi ce la Soci t tel que la Soci t vous l indiquera vous devrez l emballer correc...