background image


 | 31

30 | 

PROBLEM:  UCB™ communication error.  Operator menu informs that 
system is failing to connect to UCB™.

This error indicates that the software is not able to communicate with the UCB™ 
over the serial data line.  

CHECK 1:   Verify that the UCB firmware is version 7.2L or later.  Open the door 
to power up the machine.  Watch the blue LED display above the keypad, 
firmware version will temporarily display. 

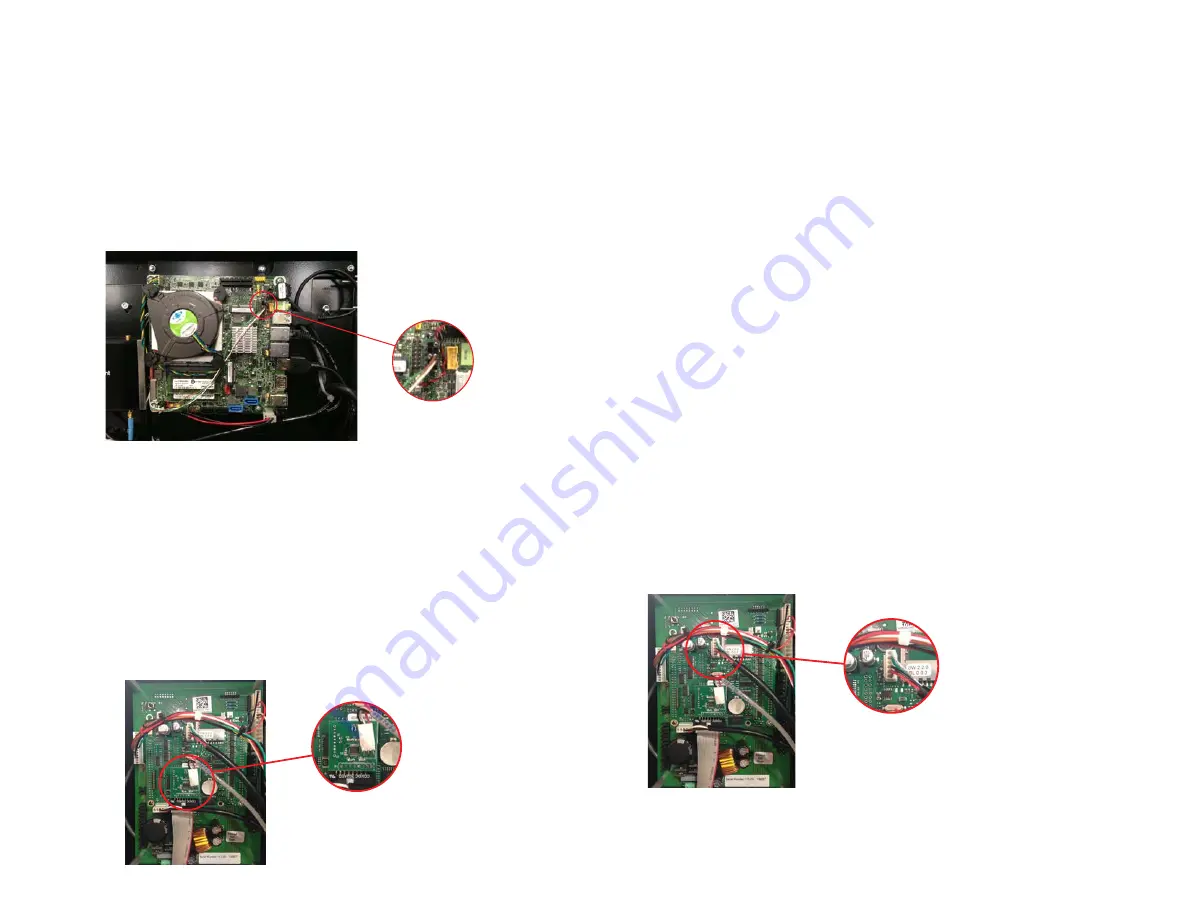
Check that the connector

is properly seated

CHECK 2:  Remove the rear cover of the CPU module (unlock and lift) and check 
that the data cable is properly seated to the motherboard. 

CHECK 3:  Remove the UCB™ cover, if present, and verify that the data cable 
is properly seated into the UCB™.  If this does not resolve the problem, please 
contact Vendors Exchange

®

 customer service department.

CHECK 4:  Follow the gray cable from the UCB back to the computer module.  
There is an in-line 4pin connector.  Examine the connector to make sure it is 
secure and that none of the terminals are loose or broken.  Continue to follow 
the cable to make sure there are no cuts or pinched wires.

PROBLEM:  Cannot connect to the internet.

If you are unable to connect to the internet, there are several possible solutions:

Wi-Fi

 – refer to instructions in this manual for setting and testing internet 

connection over Wi-Fi.  If you have a stable connection, it may be that the 
internet is not connected to the wireless router of the location.  Check with the 
location manager to discuss.

Cellular

 – refer to instructions in this manual for setting cellular connection.  

Check that the USB cable is properly seated into the CradlePoint router by 
opening the CPU module housing and examining the connection.  If you are 
still unable to get a connection, it may be that the location does not have 
sufficient reception.  Check the position of the cellular antenna on the machine.

PROBLEM:  Product is not vending.

CHECK 1:  Make sure that the trays are properly seated into the cabinet.  
Perform a motor test through the UCB™ as described in the section of this 
manual for the UCB™ and verify that the targeted motor is functioning.  

CHECK 2:  It may be that UCB™ communication is failing, see section above 
regarding UCB™ communication.

CHECK 3: Make sure that the product is assigned in the Pogo Mat to the correct 
slot.  Verify that the right tray is assigned to the right product.

PROBLEM:  Bill acceptor is not accepting bills.

CHECK 1:  Verify that 
the coin changer has 
sufficient change.  If 
it is low or empty, the 
bill acceptor may not 
function.  Add change 
to the coin changer and 
reset the machine.

CHECK 2:  Verify that the 
MDB connection is secure 
and that the bill acceptor 
is getting power. 

CHECK 3: Verify that the bill cartridge is properly seated into the acceptor.

Check that the connector 

is properly seated

Check that RS232 board and 

connector are properly connected

Check that RS232 board and 

connector are properly connected

Check that MDB connector 

is seated and follow the

wire to the bill acceptor MDB.

Check that MDB connector 

is seated and follow the 

wire to the bill acceptor MDB

Содержание VE CONNECT

Страница 1: ...Snackshop AP 113 Dixie Narco 501E AMS USI I N T E R N A T I O N A L User s Manual p o w e r e d b y...

Страница 2: ...ment System account pre configured for the content product images information categories themes and advertisements specific to the machine that you are setting up This guide does not include informati...

Страница 3: ...irmware Version 19 Homing Motor to NO Dixie Narco 501E only 21 Setting Temperature 21 Clear Sold Out 21 System Information 21 4 Equipment Testing 23 Testing Images and Content 23 Test Internet Connect...

Страница 4: ...personnel fill vending equipment as usual and then assign tray locations for specific goods using the operator menu Product images and information are downloaded through an internet connection and res...

Страница 5: ...oor or included with an adapter kit for OEM equipment where a REVISION Door is not required Laser Scanner the USB handheld laser scanner is used to scan tray locations and product UPCs to speed up the...

Страница 6: ...dard MDB connection accessible on the inside of the door near the payment slots Install payment systems as you would in other vending machines as there is no difference in this regard If you are insta...

Страница 7: ...ECT Step 1 Connect a USB keyboard to an available USB port on the inside of the door Step 2 Open the door and press F12 key Microsoft Windows desktop will appear If it does not touch the screen then p...

Страница 8: ...rd in the WPA Password field Click Submit Step 11 A pop up message will appear Settings were successfully applied Click OK Step 12 After the router connects to your network you will see green bars wit...

Страница 9: ...included you will find the cellular device connected to the CradlePoint router in the CPU module While there are several methods for achieving cellular connection at the time of this writing the meth...

Страница 10: ...product to filter results 5 SLOTS TRAY 1 5 SLOTS TRAY 2 5 SLOTS TRAY 3 5 SLOTS TRAY 4 5 SLOTS TRAY 7 10 SLOTS TRAY 5 5 SLOTS TRAY 6 3 Operator Settings The machine will startup by default directly int...

Страница 11: ...e you back to the slot selection screen Repeat this process for all slot locations in the machine Once the entire plan o gram has been set press Save Click OK to confirm and then press Exit to return...

Страница 12: ...vend bucket There are 6 drop sensor modes on the UCB Mode 04 is recommended for VE CONNECT on AP 113 and AMS To manually set or change the UCB drop sensor configuration follow these steps Step 1 Open...

Страница 13: ...ow these steps to set the motor homing NO Step 1 Open the door and locate the UCB and keypad Step 2 Press the Mode button on the UCB harness board located in the upper right hand corner of the UCB Ste...

Страница 14: ...lected and items loaded into the vendor it is recommended to view all of the products to make sure you have selected the correct files and that pricing is properly set To test the images and content f...

Страница 15: ...tep 3 Locate the icon on the desktop named Web Cam Viewer and press it to start the application Step 4 Press Connect and verify that the camera is operational you should see an image of yourself and t...

Страница 16: ...motors type the tray locations for each For example with the AP 113 press 100 then 110 or 120 depending on tray configuration Repeat this process for all tray locations to confirm the motors are funct...

Страница 17: ...he fans motherboard etc Step 4 Replace the lid and re lock the housing 6 Basic Troubleshooting PROBLEM Power up equipment and display is locked on a solid blue screen There are several possible fixes...

Страница 18: ...e location manager to discuss Cellular refer to instructions in this manual for setting cellular connection Check that the USB cable is properly seated into the CradlePoint router by opening the CPU m...

Страница 19: ...are both secure 24V POWER LINES TO DISPLAY MODULE AC INPUT GREEN LED POWER INDICATOR GREEN LED POWER INDICATOR 24V POWER LINES TO DISPLAY MODULE AC INPUT CHECK 2 Power off the machine Remove the rear...

Страница 20: ...rts PROBLEM Product is sold out even after refilling Press Clear Sold Out in the Operator Menu PROBLEM No sound First verify that the video file being played has audio in the mix Check the volume sett...

Страница 21: ...or recommended operating practices furnished by VE with respect to the use of the VE CONNECT is given without charge and VE assumes no obligation or liability for the advice or recommended operating p...

Страница 22: ...VED5124B 24V SUPPLY FROM HDV BOARD OR VENDOR PSU 110VAC FROM VENDOR 5VDC PART VED5162 19VDC PART VED5513S 24VDC 24VDC SENSE LINE PART VED5128R1 12VDC PART VED5155 24VDC PART VED5113Z 24VDC PART VE178...

Страница 23: ...LAY MODULE PART VED5111C PART VED5113V PART VED5132 PART VED5117 PART VED5110L USB HUB PART VED5107 PART VED5100R1 PART VED5136 PART VED5111 PART VED5110 TOUCHPANEL PART VED5123 1 2 3 4 5 6 7 8 9 0 UC...

Страница 24: ...3APL MOUNTING PLATE CPU ENCLOSURE 4 VED5113ABO BLOCK OUT PLATE CPU ENCLOSURE 5 VED5113ASP SPACER CPU ENCLOSURE MCMASTER CARR 94639A402 6 VED5113ALT LOCK TAB CPU ENCLOSURE 7 VED5113MP MIDDLE PLATE CPU...

Страница 25: ...IP TOP LEFT 1 8 VED5141A LED LEXAN STRIP TOP RIGHT 1 9 VED5141B LED LEXAN STRIP RIGHT BOTTOM 1 10 VED5141B LED LEXAN STRIP RIGHT TOP 1 11 VED5141C LED LEXAN STRIP BOTTOM 1 12 VED5141D LED LEXAN STRIP...

Страница 26: ...NOTES NOTES...

Страница 27: ...8700 Brookpark Rd Cleveland OH 44129 www veii com For support 1 855 888 9456 support vegv net I N T E R N A T I O N A L p o w e r e d b y...

Отзывы: