Velux KLR 100 Скачать руководство пользователя страница 59

VELUX   59

Menu

no. 1

Blind

Locate

Enter

P1

P2

Enter

Back

P1

P2

nEW PRoduCts

Room 1 

 modified

no. 1

Room 1

Room 2

new Room

House

PlaCE in

inFoRmation

Blind

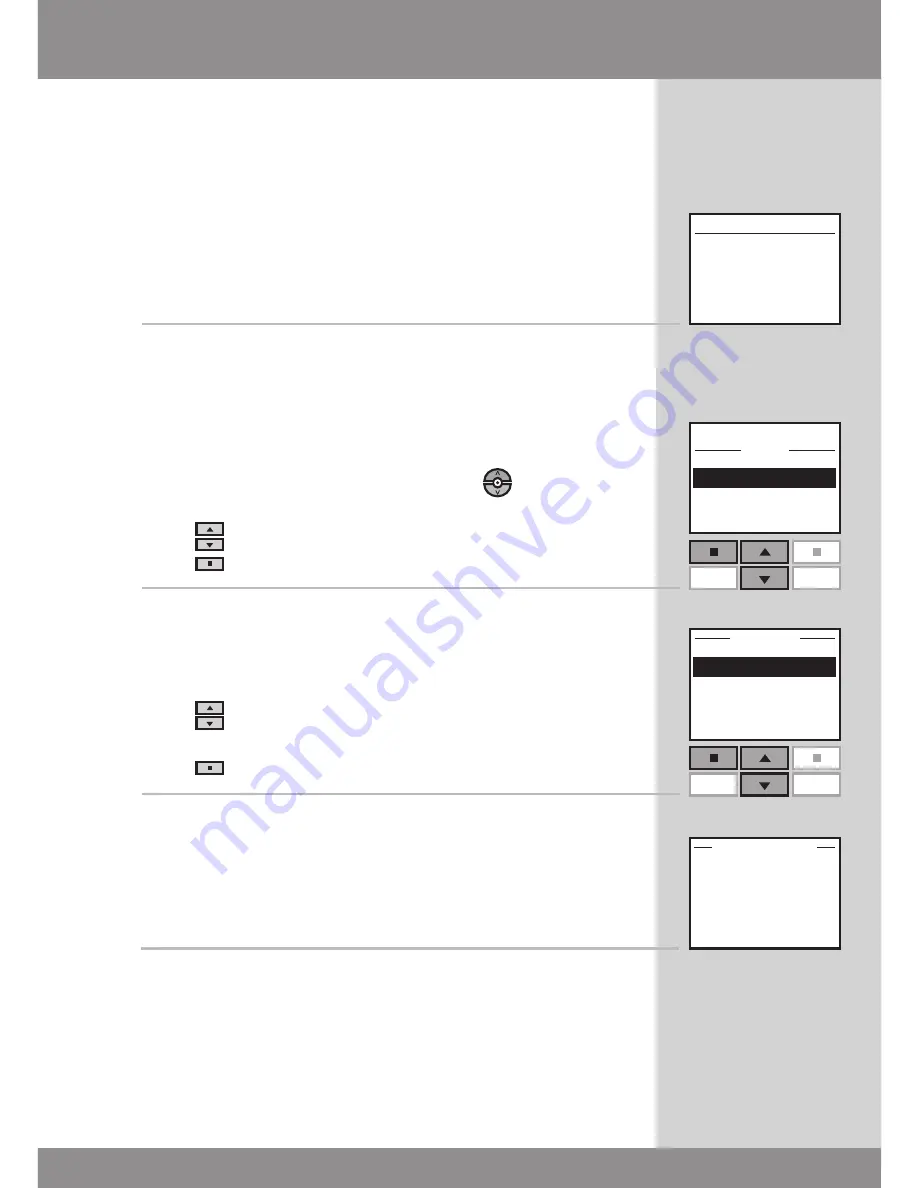
Registering new products 


Now the product must be placed.

7a 

 If 

no

 Rooms have been created, the product is automat-

ically placed in House.  
Operation can start.

7b 

 If Rooms 

have been

 created, the product has to be 

placed in the appropriate Room. 
The display shows a list of new products. The individual 
products can be identified by pressing 

 for a short 

period of time. This will activate the product briefly. 
Press 

 to highlight the product to be placed.

Press 

 "Enter" to confirm your choice.

  8 

 Displays a list of the Rooms created. 
Press 

 to highlight the Room in which the product is 

to be placed. 
Press 

 "Enter" to confirm your choice.

  9 

 The display shows that the Room has been modified.
Operation can start.


 Where more than one remote control is used, new prod-
ucts can also be operated with these. To do this, register 
the new products in each remote control by repeating 
items 2-9 for each of them.

Содержание KLR 100

Страница 1: ...VAS 452672 2011 06 VSE VCE KLR 100 User manual ENGLISH...

Страница 2: ...in sensor 17 Menu functions Menu guide 18 Navigating through the menus 19 Time and date 20 21 Changing language 22 Room Group and Zone 23 Creating a Room 24 25 Editing a Room 26 27 Creating a Group 28...

Страница 3: ...ing to a remote control in operation 64 Adding products to a remote control in operation 65 Copying products to other types of activation controls 66 67 Security key 68 69 Resetting Resetting and prep...

Страница 4: ...re that it cannot be reconnected unintentionally The main power supply cable is for indoor use only It is recommended that a remote control be placed in the room where the skylight and its electrical...

Страница 5: ...enced radio TV technician for help Changes or modifications not expressly approved by the party respon sible for compliance could void the user s authority to operate the device FCC Radiation Exposure...

Страница 6: ...er constructions with reinforced concrete metal ceilings and plaster walls with steel members may reduce the range Maintenance and service Disconnect from main power supply before carrying out any mai...

Страница 7: ...VELUX 7...

Страница 8: ...d as follows When the initial set up has been completed the registered products will appear in the display 2 Slide off the battery cover of remote control as shown Insert the three batteries supplied...

Страница 9: ...control Prepare the products for registra tion see section Resetting and preparing for registration Repeat the initial set up 8 The display shows one of the registered products Press to see the other...

Страница 10: ...tc The top line of the display states the chosen area Prod ucts are as default shown under the area House The bottom line of the display states the function of the two selection keys Note The display...

Страница 11: ...ist for scrolling through the time intervals to set the remote control to close the skylight automatically Shortcut keys P1 P2 for activating a program by pressing just one key Keys for operating a pr...

Страница 12: ...one electrical product The skylight indicated as Window in the remote display is equipped with a skylight operator only and therefore you do not have to locate the product first Press to start operat...

Страница 13: ...e skylights are equipped with skylight operators only The example shows how to locate and open skylight No 2 Press to find skylight No 2 indicated as Window Press to open the skylight Note You can rea...

Страница 14: ...e skylight is equipped with a skylight operator In addition all five skylights are each equipped with a roller shade The example shows how to locate and operate roller shade No 3 indicated as Blind 1...

Страница 15: ...old key and watch the display Each black spot corresponds to the roller shade closing in 10 incre ments Five black spots thus correspond to it closing by 50 Release key and the roller shade will trave...

Страница 16: ...45 min and 60 min The example shows how to time skylight No 1 indi cated as Window in the remote display to close after 10 minutes 1 Locate skylight No 1 indicated as Window Press to open the skylight...

Страница 17: ...be disabled for 60 minutes The example shows how to open skylight No 1 indicated as Window in the remote display even if it is raining 1 Locate skylight No 1 indicated as Window Press to open the skyl...

Страница 18: ...nable Record Delete Rename Rearrange order Enter Back House settings User settings System settings Program settings Product settings menu House settings User settings program Enter Back System setting...

Страница 19: ...e shows how to find the menu item Room by means of menu choices 1 Press Menu 2 Displays a list of menu items under Menu Press to highlight House settings Press Enter to confirm your choice 3 Displays...

Страница 20: ...for remote programming functions Time must be changed manually at the start and end of Daylight Saving Time The time and date format can be set in item 5 by choosing Set format The example shows how t...

Страница 21: ...ime clock Enter Back P1 P2 5 Press to highlight Set clock Press Enter to confirm your choice 6 Press to set minutes Press Enter to change to hours 7 Press to set hours Press Enter to confirm your sett...

Страница 22: ...use language language Information Changing language You can change the display text language The example shows how to change it into French 1 Press Menu 2 Scroll through the menus 3 The display shows...

Страница 23: ...d to one Room only Definition of Group A Group consists of at least two products of the same type eg two roller shades In each Room a Group All with all products of the same type is automatically crea...

Страница 24: ...Press Menu 2 Scroll through the menus 3 Displays the areas here the area House Press to highlight the area with the product to be as signed to Room 1 first Press Enter to confirm your choice 4 Display...

Страница 25: ...ontinue to proceed 6 Displays a list of options Press to highlight Save Room Press Enter to confirm your choice Highlight one of the other options to undo your choice 7 The display shows that a Room h...

Страница 26: ...skylight operator in skylight No 1 indicated as Window in the remote display can be moved from Room 1 to Room 2 1 Press Menu 2 Scroll through the menus 3 Displays a list of the Rooms created Press to...

Страница 27: ...essing for a short period of time This will activate the product briefly Press Enter to confirm your choice 6 Displays a list of Rooms in which the product can be placed Press to highlight the Room in...

Страница 28: ...indow in the remote display The example presupposes that Room 1 has been created Note When Room 1 was created a number of Groups All was created automatically each consisting of all products of the sa...

Страница 29: ...briefly Press Enter to confirm your choice 6 The display asks whether to move additional products to Group 1 Press More to move additional products to Group 1 You will return to the list in item 5 Re...

Страница 30: ...o change Room 1 into Kitchen Note When you have used the function Rename auto matic renumbering is disabled 1 Press Menu 2 Scroll through the menus 3 Displays a list with House Room Zone Group and Pro...

Страница 31: ...ations Press to highlight the relevant location Press Enter to confirm your choice 7 Press to highlight the save symbol Press Enter Note You can also create a new name by choosing and en tering the re...

Страница 32: ...te control has been used Selecting your favorite product The example shows how to select skylight No 2 indicated as Window in the remote display as your favorite product 1 Press Menu 2 Scroll through...

Страница 33: ...skylight No 2 indi cated as Window in the remote display as your favorite product 1 Press Menu 2 Scroll through the menus 3 Press Edit to make changes 4 The display shows a list of all products in Hou...

Страница 34: ...ange the order of the roller shades indicated as Blind in the remote display in Room 2 1 Press Menu 2 Scroll through the menus 3 Displays a list of the Rooms created containing the prod ucts in questi...

Страница 35: ...s to highlight the product in question Press Enter to confirm your choice 6 The list of the individual products of the chosen product type is still displayed Press to move the chosen product Press Ent...

Страница 36: ...36 VELUX...

Страница 37: ...hout using the remote control For instance you can record a morning program to run up the roller shades in the bedroom and open the skylights between 7 and 7 15 am on weekdays from October to April Sh...

Страница 38: ...ate and an end date The example shows how to program skylight No 1 indi cated as Window in the remote display in Room 1 to open at 6 30 pm and close again at 6 45 pm each Monday for 12 months 1 Press...

Страница 39: ...the selected product Press Continue to proceed Press Edit to return to item 3 in case of additions or changes 7 The display asks whether to save the selected product Press Yes to save the selected pro...

Страница 40: ...kylight to be opened First choose minutes Press Enter to change to hours 12 Press to set hours Press Enter to confirm your setting 13 Press to select the day of the week for the skylight to be opened...

Страница 41: ...firm your choice 17 The display shows the latest selected product Press Enter to continue Repeat items 8 16 only this time applied to the closing settings 18 The display shows various options Press to...

Страница 42: ...to highlight Enable Press Select to confirm your choice Set starting and end date to enable the program Starting date 21 Press Edit to choose a starting date Press Enter to confirm your setting End d...

Страница 43: ...ated automatically The list comprises both enabled and disabled programs The enabled programs have been ticked and the disabled programs can be enabled any time you want Note For solar products automa...

Страница 44: ...xecut ed immediately with a delay or at a certain time The example shows how to program skylight No 1 indi cated as Window in the remote display in Room 1 to open immediately and close again after 1 h...

Страница 45: ...he selected product Press Continue to proceed Press Edit to return to item 3 in case of additions or changes 7 The display asks whether to save the selected product Press Yes to save the selected prod...

Страница 46: ...that will pass from pressing P1 till the product will be activated Press Enter to confirm your choice 12 Press to set the relevant delay First choose minutes Choose 0 minutes if you want the window to...

Страница 47: ...ted product Press Yes to save the selected product 17 Press to highlight Set position Press Enter to confirm your choice 18 Press to set the closing position of the skylight 0 corresponds to fully clo...

Страница 48: ...hours Press Enter to confirm your setting 23 The display shows various options Press to highlight Add functions to add add itional operating commands for the skylight or other products to the program...

Страница 49: ...d date Monday 2011 05 30 9 46 pm 25 The display shows that Shortcut 1 has been saved 26 Check current time and date settings to ensure accurate operation of the products The display shows day date and...

Страница 50: ...trol at the same time as one or more programs have been activated Below four shortcut programs have been recorded under shortcut key P1 The example shows how to activate the program Shortcut 3 via sho...

Страница 51: ...hortcut P1 P2 Icon indicates that a program has been activated A shortcut program in progress can be interrupted as follows 1 Press P1 or P2 to find the shortcut program in progress 2 The activated sh...

Страница 52: ...ted and turned off again after 20 seconds If you do not want any light in the display and you want to prolong the battery lifetime you can opt out of this The example shows how to turn off the light i...

Страница 53: ...fter the latest key pressure Time is shown Press any key to activate the remote control again How ever a long press of the stop key will immediately stop all products in operation The example shows ho...

Страница 54: ...ing the keypad The stop key can still be used 1 Press Menu 2 Scroll through the menus 3 Press to highlight Enable Press Enter to confirm your choice The keypad lock is immediately activated Using the...

Страница 55: ...unintentional dele tion of programs The access code must consist of four digits from 0 to 9 1 Press Menu 2 Scroll through the menus 3 Press to highlight Select Change Press Enter to confirm your choi...

Страница 56: ...essing technical inquiries to your VELUX sales company you will be asked to provide the version number of the software in the remote control To find this proceed as follows 1 Press Menu 2 Scroll throu...

Страница 57: ...oms Zones Groups and Programs and all personal names are deleted The products however remain registered in the remote control 1 Press Menu 2 Select the submenu 3 Displays a list of menu items Press to...

Страница 58: ...ade indicated as Blind in the remote display in the remote control and place it in Room 1 1 Prepare products for registration in one of the two follow ing ways Disconnect the main power supply to the...

Страница 59: ...ts The individual products can be identified by pressing for a short period of time This will activate the product briefly Press to highlight the product to be placed Press Enter to confirm your choic...

Страница 60: ...60 VELUX...

Страница 61: ...ntents from one remote control to another remote control where the two remote controls have not registered the same products Adding products to a remote control in operation How to add products from o...

Страница 62: ...n to a new one so that the latter can also operate the products already registered The example shows how to copy the products and the personal settings from a remote control A in operation to a new re...

Страница 63: ...B 4 Insert the three batteries supplied type AA 1 5 volt into the remote control as shown 5 Choose language Press to highlight your language Press Enter to confirm your choice 6 Press Register to star...

Страница 64: ...ange the security key in both remote controls so that they have the same key see section Security key Step 2 Reset remote control B Reset remote control B see section Resetting the remote control Step...

Страница 65: ...th remote controls Step 1 Change security key in remote controls A and B Change the security key in both remote controls so that they have the same key see section Security key Step 2 Register the pro...

Страница 66: ...ion control can thus operate both its own and the copied products The example shows how to copy a product from remote control A to control keypad B so that the latter can oper ate the products already...

Страница 67: ...copy a product to control keypad KLI 110 please refer to section Configuring control keypad KLI 110 in addition to existing remote control KLR 100 in the instructions provided with the control keypad...

Страница 68: ...mple shows how to change the security key in remote control A and in the products registered in A step 1 If you have more than one remote control the new security key must also be transferred to these...

Страница 69: ...eive House Security key Step 2 Change security key in remote control B and others 1 Press Menu 2 Scroll through the menus 3 Press to highlight Receive Press Enter to confirm your choice The display in...

Страница 70: ...the skylight operator and connected electrical products close the sash by pressing button closest to the center of the skylight A 2 When the skylight is closed press and hold the button closest to the...

Страница 71: ...ide off the battery cover as shown 2 Press the button on the right side of the remote control with a pointed object for at least 5 seconds 3 Replace the battery cover 4 Press Yes to confirm that you w...

Страница 72: ...kylight operator cover 1 To change the opening reset the skylight as described in section Resetting and preparing for registration items 1 and 2 2 Disconnect the main power supply and if installed bat...

Страница 73: ...conds The skylight operator and other electrical products connected to the skylight will run briefly back and forth indicating that they are ready to be registered 5 To make a new registration and rei...

Страница 74: ...e control can operate the relevant products from the proposed position before it is fastened to the holder 1 Fit the back section to the wall with the two screws sup plied 2 Hook the front section ont...

Страница 75: ...wo screws sup plied 2 Place the remote control in the front section Clip the white strap around the assembled unit Hook the as sembled unit to the back section at the top Ensure that the strap fits in...

Страница 76: ...ps Note The chain can be re engaged by executing the above procedure in reverse order If the remote control has been mislaid The sash can be closed by inserting a pointed object in the skylight operat...

Страница 77: ...d ice Remove snow and ice to allow melted water to drain off from and around the skylight 2 Cleaning the rain sensor Dirt on the rain sensor may cause operating problems Therefore it is recommended to...

Страница 78: ...minutes Operation of a product The product or function requested has been ticked A program has been activated Slats louvres of a decoration and sunscreening product can be tilted turned from 0 to 100...

Страница 79: ...he product has stopped during operation Check the product Glossary Activation control An operator device for instance a remote control or a control keypad with which you can operate an electrical prod...

Страница 80: ...VELUX Group V ELUX and the VELUX logo are registered trademarks used under licence by the VELUX Group CA VELUX Canada Inc 1 800 88 VELUX 888 3589 JP VELUX Japan Ltd 0570 00 8145 US VELUX America Inc...

Отзывы: