


Velp Scientifica – Manuale AREC.X
4
2. Assembly and installation
2.1 Electrical
connection
After having unpacked the instrument, place the unit on a laboratory bench.
Before connecting the instrument to the power supply, make sure that the values
on the rating plate correspond to those of the power supply.
Connect the unit to the power supply using the cable supplied.
Ensure that the socket and the relative cut-off device conform to current safety
norms and easy to reach.
2.2 Start-up
After connecting the instrument to the power supply, place a flask containing the
sample and a suitable magnetic stir bar on the heating plate.
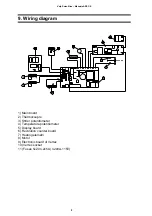
3. Operating
controls
Start the stirring function by turning the stirrer knob
“Stirrer rpm” on the front panel.
Speeds from 50 to 1.300 rpm
can be selected using the analogical scale around
the knob.
Bright bars rotating on the display indicate that the instrument is running.
The spped of rotation of the bright bars on the display is proportional to the stirring
speed.
NOTE: The rotating bars are not display when the temperature function is in use.
To start the heating function turn the heating knob “Heating °C” on the front panel.
Temperatures from 5 to 540°C can be selected at 5° intervals. The temperature
setting is shown on the display.
The HOT PLATE light remains lit when the temperature of the heating plate
exceeds 50°C.
When heating is turned Off (Heating knob OFF) and the heating plate temperature
is over 50°C, the HOT PLATE indicator flashes and OFF is shown on the display
until the temperature of the heating plate falls to below 50°C.
N.B. This warning is not active if the instrument is not connected to the power
supply.


