


153
Appendix A - (continued)
WARNING
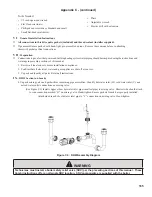
The pressure regulator has been factory set using precision instruments and must never be adjusted
in the field. The gas valve outlet pressure is the same for both natural gas and propane. Make sure that
all adjustments are made with the throttle, not the pressure regulator. Attempting to adjust the pressure
regulator will result in damage to the gas valve and may cause property damage, personal injury or loss of
life.
WARNING
The throttle adjustments shown in Table A.4 are approximate. The final throttle setting must be found using
a combustion analyzer. Leaving the boiler in operation with a CO level in excess of 200PPM air-free could
result in injury or death from carbon monoxide poisoning.
3) Before attempting to start the boiler turn the throttle (Figure A.3) clockwise until it stops (several full turns).
4) Turn throttle counter-clockwise the exact number of turns shown in Table A.4.
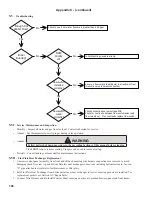
5) Attempt to start the boiler using the operating instructions located on Page 97. If the boiler does not light on the first try
for ignition, allow to boiler to make at least four more attempts to light. If boiler still does not light, turn the throttle
counter-clockwise in 1/8 turn increments, allowing the boiler to make at least four tries for ignition at each setting, until
the boiler lights.
6) After the burner lights, force the burner to high fire by entering the Adjust Menu and then High Fire Hold as described in
Section XI “Start-up and Checkout”. Allow the boiler to operate for approximately 5 minutes before taking combustion
readings. Note: after 10 minutes, the boiler is automatically released from high fire hold.
Содержание Raptor RPTR085
Страница 1: ...1...
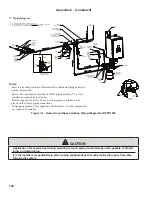
Страница 13: ...13 Figure 5 1 Wall Layout Mounting Hole Location V Mounting The Boiler continued...
Страница 14: ...14 Figure 5 2 Boiler Mounting Bracket Installation Boiler Wall Mounting V Mounting The Boiler continued...
Страница 87: ...87 Figure 10 5 Internal Wiring Ladder Diagram X Wiring continued...
Страница 88: ...88 X Wiring continued...
Страница 97: ...97 Operating Instructions XI Start Up and Checkout continued...
Страница 142: ...142 XV Repair Parts continued 3A 3B 3C 3D 3F 3E 3G 3H 3O 3P 3Q 3R 3J 3K 3I 3M 3N 3L All Models...
Страница 148: ...148 XV Repair Parts continued 6D 6B 6A 6E 6I 6G 6L 6N 6H 6C 6K 6M 6C 6C 6J 6J 6F All Models...
Страница 172: ...172...