SPBS8
•
PARKING SENSOR SYSTEM
PARKEERHULP
SYSTÈME D'AIDE AU STATIONNEMENT
RADAR DE APARCAMIENTO
RÜCKFAHRWARNSYSTEM
USER MANUAL
2
GEBRUIKERSHANDLEIDING 9
NOTICE D’EMPLOI
16
MANUAL DEL USUARIO
23
BEDIENUNGSANLEITUNG 30
Страница 1: ...ARKING SENSOR SYSTEM PARKEERHULP SYST ME D AIDE AU STATIONNEMENT RADAR DE APARCAMIENTO R CKFAHRWARNSYSTEM USER MANUAL 2 GEBRUIKERSHANDLEIDING 9 NOTICE D EMPLOI 16 MANUAL DEL USUARIO 23 BEDIENUNGSANLEI...
Страница 2: ...g of computer data it correctly detects obstacles behind and or in front of the vehicle and warns the driver with clear audio and or visual signals thus protecting the vehicle against bumping into the...
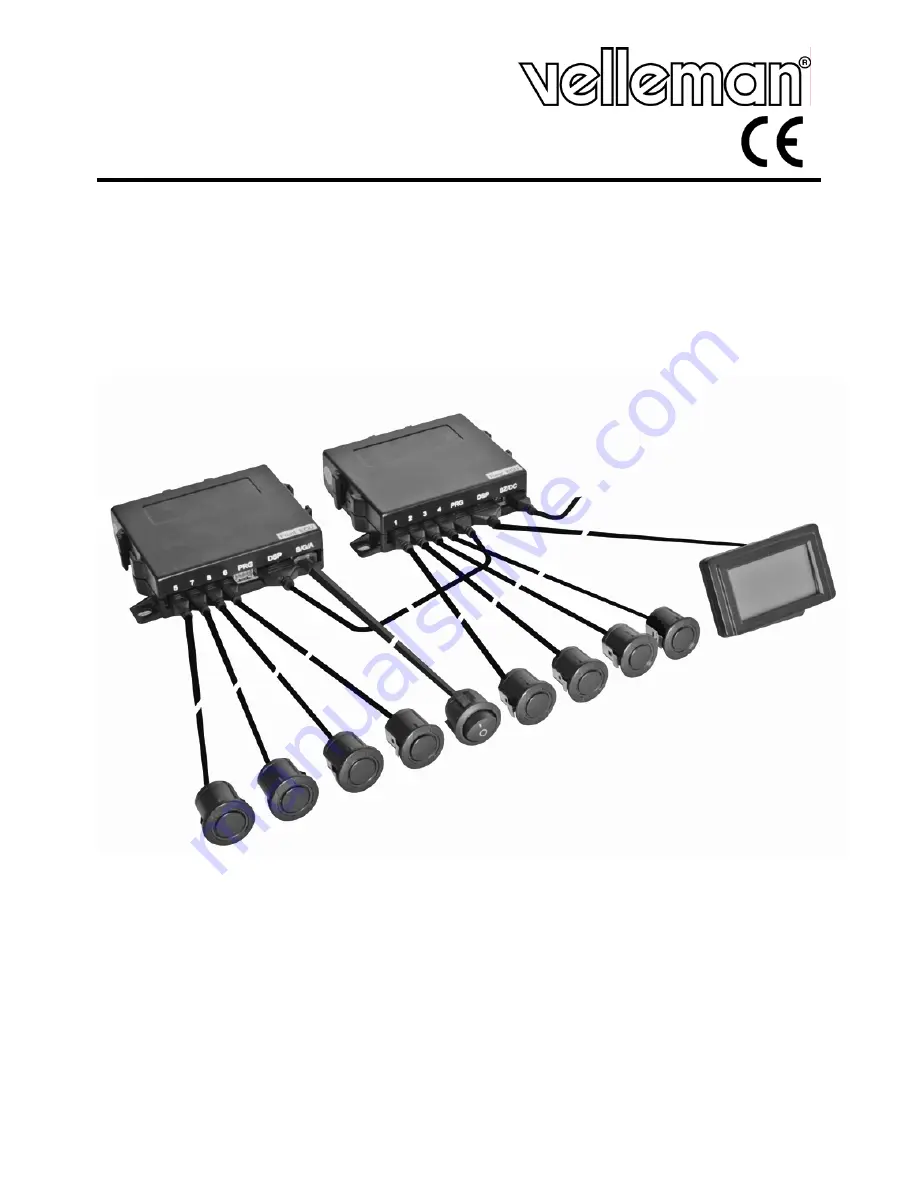
Страница 3: ...tape 5 System overview A Rear Electronic Control Unit A1 DC 12V from reverse light A2 GND B Front Electronic Control Unit B1 ACC 12V B2 GND B3 DC 12V from brake light C Display unit D1 D8 Sensor E Re...
Страница 4: ...tallation drawings or experienced advice when determining the location of the control units The control units should not be close to potential sources of interference e g cable bundles exhaust pipe Ma...
Страница 5: ...ough a cable clip Insert the brown cable marked with B in that cable clip and press the metal part of the clip tightly Close the cable clip Locate an ACC cable e g from car radio and guide it through...
Страница 6: ...me can be set 3 positions with the volume switch K at the back of the display unit The time interval between the beeps is an indication of the distance to the obstacle The shorter the interval the clo...
Страница 7: ...urface is smooth and shiny and angle A is large Obstacle height At first the obstacle Ta which is below the senor is detected However when Tc approaches the vehicle its reflection becomes stronger tha...
Страница 8: ...control switch 3 positions rear control unit sensor inputs 4 1 4 DC input 12V from reverse light dimensions 120 x 77 x 25mm front control unit sensor inputs 4 5 8 DC input 12V 2x from battery and brak...
Страница 9: ...en en onbevoegden Enkel voor gebruik binnenshuis Houd de stuureenheden uit de buurt van regen vochtigheid en opspattende vloeistoffen Elektrocutiegevaar bij installatie De garantie geldt niet voor sch...
Страница 10: ...kabelclips dubbelzijdige tape 5 Overzicht A achterste stuureenheid A1 DC 12 V van achteruitrijdlicht A2 GND B voorste stuureenheid B1 accu ACC 12 V B2 GND B3 DC 12 V van stoplicht C lcd display D1 D8...
Страница 11: ...oringsbronnen zoals kabelbomen de uitlaatpijp Zorg dat de bekabeling van de eenheden na aansluiting gemakkelijk toegankelijk blijft Beschadig geen kabels of vitale onderdelen tijdens het vastschroeven...
Страница 12: ...anje kabel gemarkeerd ACC in dezelfde kabelclip en druk het metalen onderdeel dicht Haal de GND kabel van het stoplicht door de kabelclip Steek de zwarte kabel van de voedingskabel naar de voorste stu...
Страница 13: ...tand aan tussen voertuig en hindernis Hoe sneller de pieptonen hoe dichter de hindernis Zie tabel hieronder voor een overzicht Alarmzone Vooraan Achteraan Afstand D m Audiosignaal Afstand D m Audiosig...
Страница 14: ...de hindernis bestaat uit een gepolijst en glanzend oppervlak en omdat hoek A te groot is Hoogte van de hindernis Hindernis Ta wordt als eerste waargenomen Naarmate het voertuig achteruitrijdt zal de p...
Страница 15: ...x 39 x 23 mm volumeregeling 3 standenschakelaar stuureenheid achteraan ingangen 4 1 4 DC ingang 12 V van achteruitrijdlicht afmetingen 120 x 77 x 25 mm stuureenheid vooraan ingangen 4 5 8 DC ingang 1...
Страница 16: ...s et de jeunes enfants Pour usage sous abris uniquement Tenir les unit s de contr les l appareil l cart de la pluie de l humidit et d claboussures Risque d lectrochocs pendant l installation La garant...
Страница 17: ...1 notice d emploi clips pour c bles ruban adh sif double face 5 Sch ma de connexion A unit de contr le post rieure A1 CC 12 V du feu de recul A2 masse GND B unit de contr le ant rieure B1 batterie AC...
Страница 18: ...cul L unit de contr le ant rieure s installe de pr f rence pr s de la bo te fusibles l int rieur du v hicule Consulter un technicien qualifi en cas de doute viter d installer les unit s proximit de so...
Страница 19: ...rer le conducteur marron B du c ble d alimentation dans le clips et fermer le clips Passer le c ble de la batterie ACC p ex vers l autoradio dans le clips de c ble Ins rer le conducteur orange ACC du...
Страница 20: ...tance entre le v hicule et l obstacle Voir la table ci dessous Zone d alarme Avant Arri re Distance D m Signal audio Distance D m Signal audio Danger D 0 25 Bi D 0 3 Bi 0 3 D 0 4 Bi Bi Bi Avertissemen...
Страница 21: ...rface polie et luisante angle A trop important ne sera pas d tect Hauteur de l obstacle L obstacle Ta sera d tect en premier mesure que le v hicule recule le syst me n gligera l obstacle Ta et ne tien...
Страница 22: ...upteurs 3 positions unit de contr le post rieure entr es 4 1 4 entr e CC 12 V du feu de recul dimensions 120 x 77 x 25 mm unit de contr le ant rieure entr es 4 5 8 entr e CC 12 V 2x de la batterie et...
Страница 23: ...oras 2 Instrucciones de seguridad Mantenga el aparato lejos del alcance de personas no capacitadas y ni os S lo para el uso en interiores No exponga este equipo a lluvia humedad ni a ning n tipo de sa...
Страница 24: ...1 tr pano 18 5mm para los sensores 1 manual del usuario Clips para cables Cinta adhesiva de doble cara 5 Esquema de conexi n A unidad de control trasera A1 DC 12V de la luz de marcha atr s A2 GND B u...
Страница 25: ...de marcha atr s La unidad de control delantera se instale preferentemente cerca de la caja de fusibles en el interior del veh culo Consulte un t cnico cualificado en caso de dudas No instale las unida...
Страница 26: ...entaci n en el clips y cierre el clips Introduzca el cable de la bater a ACC p ej hacia el autorradio en el clips de cable Introduzca el conductor naranja ACC del cable de alimentaci n en el clips y c...
Страница 27: ...h culo y el obst culo V ase la siguiente lista Zona de alarma Parte delantera Parte trasera Distancia D m Se al audio Distancia D m Se al audio Peligro D 0 25 Bi D 0 3 Bi 0 3 D 0 4 Bi Bi Bi Advertenci...
Страница 28: ...illante ngulo A demasiado importante no se detectar Altura del obst culo El obst culo Ta se detectar en primer lugar A medida que el veh culo da marcha atr s el sistema ignorar el obst culo Ta y s lo...
Страница 29: ...ajuste del volumen interruptores 3 posiciones unidad de control trasera entradas 4 1 4 entrada CC 12 V de la luz de marcha atr s dimensiones 120 x 77 x 25mm unidad de control delantera entradas 4 5 8...
Страница 30: ...ermeiden 2 Sicherheitshinweise Halten Sie Kinder und Unbefugte vom Ger t fern Nur f r die Anwendung im Innenbereich Sch tzen Sie das Ger t vor Regen und Feuchte Setzen Sie das Ger t keiner Fl ssigkeit...
Страница 31: ...mschreibung A hintere Steuereinheit A1 DC 12 V vom R ckfahrscheinwerfer A2 GND B vordere Steuereinheit B1 Batterie ACC 12 V B2 GND B3 DC 12 V vom Bremslicht C LCD Display D1 D8 Sensoren E R ckfahrsche...
Страница 32: ...rdere Steuereinheit installieren Sie am besten neben dem Sicherungskasten Fragen Sie im Zweifelsfall einen Techniker um Rat Installieren Sie die Einheiten m glichst weit von St rquellen wie z B Kabelb...
Страница 33: ...cken Sie das Netzkabel vom Bremslicht 12 V durch eine Kabelklemme Stecken Sie das braune Kabel B in dieselbe Kabelklemme und dr cken Sie das Metallteil zu Stecken Sie das Kabel der Batterie z B zum Au...
Страница 34: ...Schalter mit 3 Positionen K auf der R ckseite des Displays Das Intervall zwischen zwei Alarmsignalen zeigt den Abstand zwischen Fahrzeug und Hindernis Je schneller die Alarmsignale ert nen umso dichte...
Страница 35: ...das Hindernis aus einer polierten und gl nzenden Oberfl che besteht und weil Winkel A zu gro ist H he des Hindernisses Hindernis Ta wird als erstes entdeckt In dem Ma e wie das Fahrzeug r ckw rts f hr...
Страница 36: ...70 x 39 x 23 mm Lautst rkeregelung Schalter mit 3 Positionen Steuereinheit hinten Eing nge 4 1 4 DC Eingang 12 V vom R ckfahrscheinwerfer Abmessungen 120 x 77 x 25 mm Steuereinheit vorne Eing nge 4 5...