ELRAK
2
VELLEMAN
2. Introduction
Thank you for buying the
ELRAK
! With this kit, you can make a simple but effective room alarm that can be connected
to a door to signal incoming visitors and protect your privacy. Please read the manual thoroughly before bringing this
device into service. If the device was damaged in transit, don't install or use it and contact your dealer.
3. Assembly Instructions
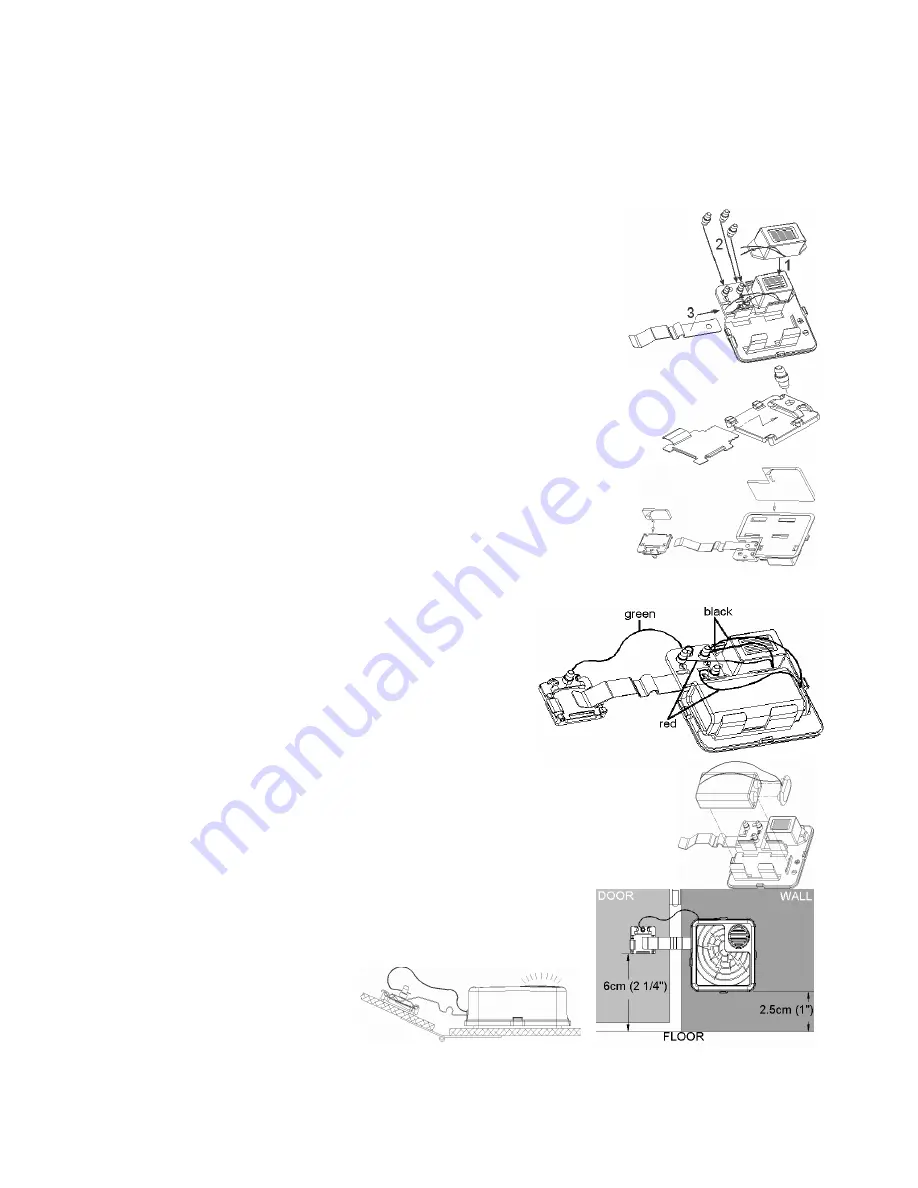
1. Click the buzzer into its place on the bottom plate. Make sure it snaps in properly.
2. Insert a spring terminal in each of the holes marked 1, 2 and 3.
3. Slide the flexible contactor into its place on the bottom plate and make sure it
inserts in the spring terminal.
4. Insert the remaining spring terminal into the hole on the contact plate holder and slide
the metal contact plate into its place, making sure it inserts in the spring terminal.
5. Stick the large foam sticker to the back of the housing bottom plate. Stick the small
foam sticker to the contact plate holder.
6. To connect a wire to a spring terminal: bend the spring to one side with your finger and insert the end of the wire
into one of the gaps on the other side of the spring and release it. It will hold the wire firmly.
7. Connect the wires as follows:
- battery clip positive wire (red) to spring terminal 3
- battery clip negative wire (black) to spring terminal 2
- buzzer black wire to spring terminal 2
- buzzer red wire to spring terminal 1
- one end of green wire to spring terminal 1, feed the wire through
the hole near the spring terminals and connect the other end to
the spring terminal on the contact plate holder.
8. Connect a 9V block battery to the battery connector and insert it in the provided clips.
Test the device by making contact between the flexible contact plate and the small one.
The buzzer should buzz. If the contact is broken, the buzzer should stop buzzing. If this
works, put the decoration sticker on the upper part of the housing and clip the 2 parts
together.
9. Stick the (small) contact plate to the door, about 6cm (2 ¼") from the ground
and stick the main unit to the wall next to the door, about 2.5cm (1") above
the ground, so that when the door opens, the small contact plate makes
contact with the flexible one and the buzzer is activated.


