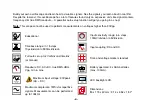
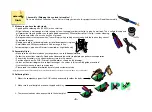
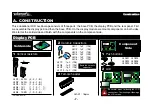


- 18 -
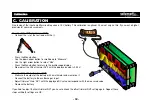
I. LET’S MEASURE
Let’s measure
First, make sure that your scope is properly
calibrated (see page 12).
•
Turn on the scope.
•
Connect the alligator clips to the battery.
Mind the polarity.
•
Connect the red clip to the (+) of the battery
and the black clip to the (-) of the battery.
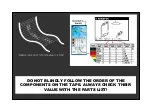
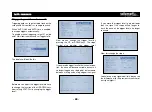
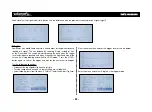
You should see something like this:
A 9V battery generates a DC voltage, that ex-
plains the flat line. Look closely at the number
of vertical divisions, the trace almost reaches
the second division and the volts/div setting is
5V/div, so the measured voltage is a little less
than 2x5V or 10V.
How much is the exact voltage supplied by
our battery?
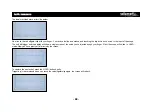
Open the menu, scroll down to Measure and
select Vdc.
Leave the menu and watch the lower right
hand corner:
Our 9V battery supplies 8.13VDC
Now, swap both alligator clips and check what
happens:
This is a nice feature of an oscilloscope, it
can measure both positive and negative DC
voltages.
Measuring DC voltage: Measuring a 9V battery (not incl.)
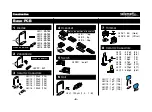
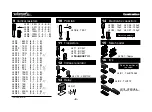
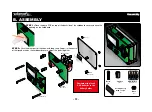
Содержание EDU08
Страница 2: ...Velleman N V Legen Heirweg 33 9890 Gavere Belgi...
Страница 27: ...27 PCB BASE PCB...
Страница 28: ...28 PCB DISPLAY PCB...
Страница 29: ...29 PCB DISPLAY PCB...
Страница 30: ...30 Diagram...
Страница 32: ...Modifications and typographical errors reserved HEDU08 2013 ED1 Velleman nv Legen Heirweg 33 9890 Gavere Belgi...


