background image

Veilux VR-412D1 & VR-412C Compact DVR’s 
www.veilux.net 


  69                                                     

Operating Instruction & User’s Guide


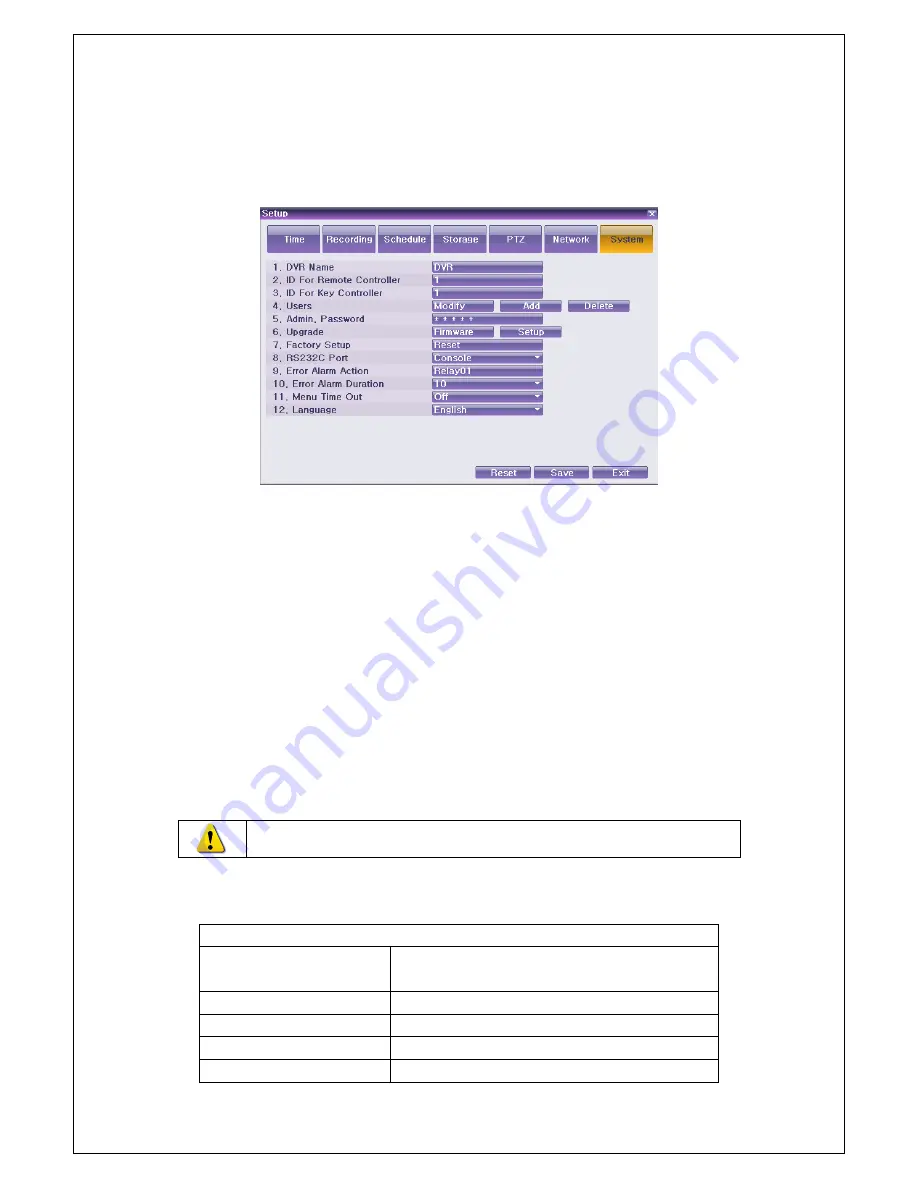
6-7-1  Enter to System Menu 


Select System at

 {Menu} 

 {Setup}


System Setup Window, as shown below, appears. 


[Figure 6-57. System Setup Window] 

6-7-2  DVR Name 


Move to

 {Menu} 

 {Setup} 

 {system}


 {1. DVR Name}


Enter the name in the input window using the arrow keys and the Select button. (It supports up to 20 

letters for the system name.) 


6-7-3  Remote Controller ID 

When  multiple  devices  are  used,  set  the  remote  controller  ID  to  identify  input  signals  from  a  remote 

controller. 

VR-412C 

doesn’t support Remote Controller ID)


6-7-4  Keyboard Controller ID (Only VR-412D1 supported) 


Select

 {Menu} 

 {Setup} 

 {System}


 {3. Keyboard Controller ID}


In the selection window, enter ID using the arrow keys and the Select button(the number 1~255 is 

available for ID). 


※ RS485 port needs to be designated to Keyboard Controller. 


6-7-5  User Registration 

Adds, edits, or deletes the users who will operate the system. 

System Access Authorization 

Network Live 

Enables  viewing  real-time  images  upon  network 
access. 

Play 

Enables viewing the Recorded Screen. 

Copy (download) 

Copies and downloads files. 

PTZ Control 

PTZ camera control 

Setup 

Data  setup,  recording  schedule,  system,  storage, 

Содержание VR-412D1

Страница 1: ... ...

Страница 2: ...s installed near a power outlet make sure it can be unplugged easily 3 Do not use the DVR in water or in wet places 4 Keep the vinyl packing materials used for the DVR or other peripheral devices out of reach of children may cause suffocation Installation Environment of the DVR 1 Maintain the following conditions operating temperature of 0 C 30 C operating humidity of 10 80 2 Install the DVR in a ...

Страница 3: ...sassemble repair or modify the product without permission 10 Incorrect system setup may cause malfunction 11 Shut down the system normally as instructed in the manual Safety Notes on the Lithium Battery 1 Replace lithium batteries as instructed to avoid danger 2 Dispose the used lithium batteries properly Warnings and Cautions are indicated as follows Possible injury or product damage Risk of mino...

Страница 4: ...ion 13 2 2 2 Connection of Other Devices Only VR 412D1 supported 13 3 Operation and Setup Tools 15 3 1VR 412C VR 412D1 Front Button 15 3 2VR 412C VR 412D1 Remote Controller 16 3 3 Mouse 17 4 DVR Operation Setup 17 4 1VR 412C VR 412D1 Storage Installation 17 4 2 Power ON 19 4 3 Storage Setup 19 4 4 Recording Setup 21 4 5 Date Time Setup 21 4 6 Screen Adjustment 21 4 7 Screen View Setup and Others S...

Страница 5: ...st Adjustment 27 5 5 5 Camera Adjustment 27 5 5 6 TV Adjustment 27 5 5 7 Camera Title Shown Hidden 27 5 5 8 Screen Border Adjustment 27 5 6 Relay Out 28 5 7 Search 29 5 7 1 Search Mode 29 5 7 2 Playback Menu 29 5 8 Calendar Search 29 5 8 1 Search Mode 29 5 8 2 Year Month Day Selection 30 5 8 3 Directory Count 30 5 8 4 Event 30 5 8 5 Multi Channel Search 30 5 8 6 Multi Time Search 31 5 8 7 Multi Da...

Страница 6: ... for Using the PTZ Features 41 5 14 2 PTZ Mode 42 5 14 3 PTZ Control 42 5 14 4 Digital Zoom 44 6 Setup 44 6 1 Time 44 6 1 1 Time Sever 45 6 1 2 Date and Time 46 6 1 3 Standard Time Zone 46 6 2 Recording 47 6 2 1 Recording Setup Start 47 6 2 2 Schedule Selection Schedule1 Schedule4 47 6 2 3 Recording Setup 48 6 2 4 Event 50 6 2 5 Alarm Out 53 6 3 Schedule 54 6 3 1 Enter to Schedule Menu 55 6 3 2 Sc...

Страница 7: ...Menu 69 6 7 2 DVR Name 69 6 7 3 Remote Controller ID 69 6 7 4 Keyboard Controller ID Only VR 412D1supported 69 6 7 5 User Registration 69 6 7 6 Administrator Password 70 6 7 7 Upgrade 71 6 7 8 initialization 72 6 7 9 RS232C Port 72 6 7 10 Alarm 72 6 7 11 Alarm Time Setup 73 6 7 12 Automatic Menu Exit 73 6 7 13 Language 73 APPENDIX 74 1 Recommended HDD 74 2 Recommended PTZ Camera Protocol 75 3 Reco...

Страница 8: ... Playback Screen 32 Figure 5 19 Playback Status and Control Window 32 Figure 5 20 Playback Menu 33 Figure 5 21 Smart Search Motion Detection Window 34 Figure 5 22 Screen Mode 35 Figure 5 23 Log View 35 Figure 5 24 Move to the log list of the certain time zone 36 Figure 5 25 Backup Window 39 Figure 5 26 NAS Backup Window 40 Figure 5 27 PTZ Control Window Max Mode Left Min Mode Right 42 Figure 5 28 ...

Страница 9: ...9 DDNS Window 64 Figure 6 50 DDNS Window with MAC Address 64 Figure 6 51 DDNS Setting 65 Figure 5 52 DDNS Domain name changed 65 Figure 5 53 DDNS Status 66 Figure 6 54 Port Window 67 Figure 6 55 E mail Window 67 Figure 6 56 Bandwidth 68 Figure 6 57 System Setup Window 69 Figure 6 58 User Authorization Setup Window 70 Figure 6 59 Firmware Upgrade File List Window 71 Figure 6 60 Firmware Upgrade in ...

Страница 10: ...723 Video Standard H 264 Audio G 723 Recording Speed Max 120 100 fps Recording Resolution Max 704 x 480 576 Max 70 4 x 480 576 Recording mode Automatic Continuous Ma nual Events Motion Schedule Recording Automatic Continuous Manual Events Sensor Motion Sound Schedule Recording Storage Internal Max 1HDD Max 2TB Video Output Resolution LCD SXGA 1280x1024 TV SDTV 720x480 576 LCD SXGA 1280x1024 TV SDT...

Страница 11: ... display images inputted from up to 4 cameras VR 412C VR 412D1 digitally records high quality images using various video recording modes and displays them as clean quality images For users convenience front touch pad remote controller and mouse are provided Powerful network functions including remote monitoring and remote system setup modification are also supported The maximum recording frame rat...

Страница 12: ... s Guide 2 Installation and C onnection 2 1 VR 412C VR 412D1 Name and Features of Each Part The front part of VR 412C VR 412D1 features an easy to use button various interfaces are located on the rear part 2 1 1 VR 412D1 Front Panel 2 1 2 VR 412C Rear Panel 2 1 3 VR 412D1 Rear Panel ...

Страница 13: ...io Input Connection Line Only Input Only VR 412D1 supported RCA 6 RS 232C System Upgrade Cable Connection for checking Only VR 412D1 supported D SUB 9P 7 Ethernet Network Connection ADSL Cable Modem Ethernet 10 100 Base T RJ 45 8 DIO RS485 PTZ Camera Control Connection Sensor Relay Connection Only VR 412D1 supported Terminal Block 9 NTSC PAL VGA TV Select the video input format Select the video ou...

Страница 14: ...er description of CONFIG SWITCH below 1 The input video type must be either NTSC or PAL these two types must not be used together 2 Select the input video format NTSC PAL using the config switch on the rear side of the product 3 Select the output monitor type VGA TV using the config switch on the rear side of the product 4 CONFIG SWITCH 1 VGA Mode Resolution of VGA Monitor is SXGA 1280 1024 Howeve...

Страница 15: ...ital Input Output 5 Key controller Rear RS 485 Terminal 1 Audio Input Output Audio is only supported in VR 412D1 1ea input and 1 ea output 2 Terminal Block Figure 2 4 Terminal Block TB Figure 2 5 Terminal Block Description Terminal Blocks in the rear of the product are for connections of PTZ Sensor Relay They are only available in VR 412D1 4 PTZ Camera Connect PTZ control cable TRX TRX to Terminal...

Страница 16: ...s such as LED and siren by relaying them to these external devices Connect Relay to R1_NC or R1_NO and R1_COM Relay types include Normal Close NC and Normal Open NO NC Normal Close Normally closed open s when a signal is received NO Normal Open Normally open closes when a signal is received 3 Operation and Setup Tools VR 412C is operated by Front Button Remote Controller and Mouse 3 1 VR 412C Fron...

Страница 17: ...Controller A System operation and setup buttons B Search Button Play mode POWER Turns the system power ON or OFF ESC Exits the current menu or selects the upper menu MENU Data Schedule System setup MODE Screen Mode Menu View SELECT Selects the category or executes Auto Sequence MOVE Moves from one category to another or changes the display mode Reverse Play Play backward Play Play forward Reverse ...

Страница 18: ...ration Setup 4 1VR 412C VR 412D1 Storage Installation Recommended HDD specification is as below Type Size Capacity Buffer RPM SATA I II 3 5 1 2 Flat supported Max 1 5TB Over 8MB Over 7200 Mouse Control supports features shown below Click on the right button Monitoring Mode Move from Play Mode to Monitoring Menu Pop up or remove Play Menu Show sub folder of the certain Menu window Click on the left...

Страница 19: ...city Static electricity may cause a malfunction of the product 3 After installing HDD Do not connect to power supply with the top case opened The top case must be covered before usage 2 Using a screw driver Unscrew and separate the HDD bay 3 Align screw holes and screw and fix additional HDD onto HDD bay 4 Connect the power cable and data cable to HDD 5 The main board of the product provides one p...

Страница 20: ...t panel as shown below Figure 4 6 Menu Window ID and Password are required for an initial installation Default ID and Password are shown below Local Admin 00000 User1 1111111 User2 2222222 User3 3333333 User4 4444444 4 3 Storage Setup Select Menu Setup Storage Device As shown below newly installed HDD is shown at NEW tab Indication of refers to one provision of the menu Indication of refers to a s...

Страница 21: ...storage into a backup storage New At least one storage shall be selected as a dedicated storage Otherwise the data cannot be stored in real time Select Direct Init and follow Direct Init procedure Direct Init procedure may take time When it is completed HDD is removed from New tab and shifted to Direct tab Move to Direct tab and select As shown below it is indicated as ACTIVE HEAL in Status SW HW ...

Страница 22: ...rded with above setting For more detail check 6 2 Recording 4 5 Date Time Setup Select Menu Setup Time Set up Time Sever Date and Time Standard Time Zone 4 6 Screen Adjustment Select Menu Others Screen Adjustment Set up for Brightness Contrast Color Hue Camera Adjustment TV OUT Adjustment are available 4 7 Screen View Setup and Others Setup Select and set up Menu Others Screen Mode Select and set ...

Страница 23: ...s the ESC Power button or Power button in the remote controller After the system is booted images of all connected channels will be displayed 5 1 2 Exiting the System The default password for the local administrator is 00000 To change the password select Main Setup System Local Administrator s Password Press the ESC Power button or Power button in the remote controller On the password input screen...

Страница 24: ...n the user can select the interval from 1 second to 10 seconds to set the interval however multiple cameras should be connected 5 2 2Menu in Monitoring Mode User can control all functions available in Monitoring Mode in Menu Press the Menu or right click mouse button The Menu will then appear Select the desired item using the arrow keys or mouse Press the ESC button or right click mouse button to ...

Страница 25: ...grade Remote network upgrade View Hidden Channels on Network Enables viewing hidden channels 5 3 2 Login For security purpose user must log in first to use Monitoring Menu Figure 5 10 Login Window On the real time monitoring window select Menu Login The login window will then appear as shown in Figure 5 9 Enter the password or select the cancel 5 3 3 Logout After logging out the user cannot use Me...

Страница 26: ...Status Window Functions available for Authorization Setup Video is not connected or covert Audio is set activated Only VR 412D1 supported Audio is set silent Only VR 412D1 supported Channel Title Channel title Time Current time Recording Mode Green Continuous Recording Red Motion Recording Blue Sensor Recording Only VR 412D1 supported Yellow Sound Recording Only VR 412D1 supported No Signal Camera...

Страница 27: ...ide Figure 5 12 Product Information Window 5 5 2 Camera Selection for Screen Setup On the real time monitoring screen select Menu Others Camera TV Setup Select a camera for Screen Setup If you tick on All Channels you can set up screen over all channels Figure 5 13 Camera TV Setup Window ...

Страница 28: ...epeating and Moving the camera down right or left excessively may cause black or gray areas to appear on the screen The level at which such condition does not occur is the proper control range for the camera 5 5 6 TV Adjustment TV Adjustment is to move the TV OUT screen Up Down Left Right On the real time monitoring screen select Menu Others Camera TV Setup TV OUT Adjustment Adjust the CCTV monito...

Страница 29: ...Off Hide the border for each channel screen in varying modes Type Internal Hide the external border line All Display all border lines Width 2 4 Set the width of the border Color Black White Red Green Blue Set the color of the border 5 6 Relay Out Relay Out is only supported in VR 412D1 Figure 5 15 Relay Control Window On the real time monitoring screen select Menu Other Control Relay Selecting a r...

Страница 30: ...moves to the search window 2 Go To The Last The user can search and play back the last recorded data by Multi Channel Mode Selecting Go To The Last shifts to the playback screen 3 Go To The First The user can search and play back the first recorded data by Multi Channel Mode Selecting Go To The First shifts to the playback screen 4 Go to The Last Played Time The user can play back from the last pl...

Страница 31: ...les saved in the folder before the time change is indicated sky blue in the file list 2 Selecting a file in blue sky leads to a selection window popup and the user can select a file in different folder before time change Searching by the file list is only available in Multi Channel Search Current A recorded image file with the current set time Old_Number A recorded image files before the time chan...

Страница 32: ...ecorded in different time zones Multi time data can be searched in Multi time Search mode The user can search data by date as in the Multi Channel Search mode Time zones and channels may be viewed by selecting the desired date Select the start time and the channel using the arrow keys The hourly recorded video of the selected channel will then be displayed as a bar graph in minute units Move the t...

Страница 33: ... Select Menu Search The Last Played Time Playback in Log View After selecting Menu Others Log View select or double click the time line listed to play Figure 5 18 Playback Screen 5 9 1 Playback and Playback Speed Control In Playback mode the user can play back video contents using the button functions below After the data is played to the end the data of the next time zone will be automatically se...

Страница 34: ...ss one time Playback reverse ⅹ1 Press two times Fast reverse ⅹ2 1ch screen mode only Press four times Fast reverse ⅹ30 Pressing one more time in x30 leads to x1 back ESC Exit to Playback Mode Status bar indicating information of the hourly recorded image data Selecting the right mouse button or menu button in Playback Mode pops up the Playback Menu Figure 5 20 Playback Menu Items in Playback Menu ...

Страница 35: ...rded image of the different day over a certain designated channel The lineup of the recorded image of the different time is the most recent bottom 5 9 6 MULTI CHANNEL Multi Channel is to play the recorded image of the different channel over a certain designated time 5 9 7 Event Event is to play the recorded image with All Motion Sensor Sound 5 9 8 Audio Audio is to play the recorded audio 5 9 9 Ba...

Страница 36: ... VR 412C VR 412D1 series DVR records all Log information over the system operation including Power on off System Setup and Network Access Move to Menu Others Log View to see the logs Figure 5 23 Log View 5 10 1 Log Type General Logs related to power ON OFF file copy backup failure setup start end playback and other basic system operations Recording Event Logs related to recording motion detection ...

Страница 37: ...he focus to a certain time zone for playing the certain time playback will start from the time point when logs are saved Click the right mouse button or select Menu button in the front panel and select Hour to move to the desired log time zone Figure 5 24 Move to the log list of the certain time zone Time Changed Log Data View The stored data folder is updated each time the user changes the time A...

Страница 38: ... is generated recording will be started according to the event frame rate Only VR 412D1 supported Sound When audio is detected recording will be started based on event frame rate오 Only VR 412D1 supported 5 11 2 Recording Setup Go to Menu Setup Recording for Recording Setup For more information move to Menu Setup Recording Recording 5 11 3 Recording Status View 1 Recording Status by Color Green Con...

Страница 39: ...backed up automatically For the remaining backup procedures see Backup Common Backup Procedure 5 12 3 Backup in Log Mode Select a date in Menu Others Log View and select a log related to the data to be backed up Click the right mouse button or select MENU button in the front panel The automatic backup time is set to 5 minutes before the selected log is generated and the end time to the time the se...

Страница 40: ... minute second for From and the 12 digits in the middle by the year month date hour minute second for To The last 2 digits are determined by the number of folders in the selected device Directory title can be made by combination of English and Number and supports max 32 digits If a device is not selected the backup time and channel cannot be changed Selecting a device enables selecting the backup ...

Страница 41: ...a red box if not If the backup storage device is not formatted in case the box displaying the size of the file to be backed up is displayed in yellow and if backup is executed by pressing the Copy Backup button a prompt asking whether to erase the device will appear as shown below Selecting YES causes the storage medium for the selected device to be erased Press the Copy Backup button A prompt ask...

Страница 42: ... playback search or log mode and back up the image data To back up the currently displayed image select Menu Backup Snapshot in real time monitoring mode or Playback Menu Backup Snapshot in Playback mode When a USB2 0 backup device excluding ODD devices is searched the JPG file is stored in the same device If there are no or more than two USB2 0 storage devices excluding ODD devices a window for s...

Страница 43: ...led as Max or Min as shown below Figure 5 27 PTZ Control Window Max Mode Left Min Mode Right A channel with PTZ set camera is activated in the yellow border Figure 5 28 PTZ Mode Initial Screen Activation mode The channel is selected and the channel screen border is highlighted in orange 5 14 3 PTZ Control 1 Camera Select the camera button Only a channel with PTZ set camera can be activated Select ...

Страница 44: ...n Focus movement of PTZ Camera zoom or focus a certain spot of the image by designating the coordinates and move to the designated coordinates quickly Move to a desired spot for Preset by using Horizontal Vertical Zoom and Focus Select 1 8 spots by pressing Preset Press Set button to complete Preset setup Repeat to another Preset Up to 8 Preset are available 8 Preset Go Select Preset Number by usi...

Страница 45: ...ization with the NTP server The time is synchronized every hour with the NTP Server A Automatic Setup The nearest server from the user s zone will be selected for connection If the connection fails the next nearest server will be chosen B User Setup The user sets the URL or IP for the NTP server If connection is not established a message will be sent to the user and the related log saved If synchr...

Страница 46: ...ever Figure 6 29 Time Server 1 Time Sever OFF The time server is not used NTP NTP is used to set the time for the time DVR 2 NTP NTP setup is available when Time Server is set as NTP 3 Server Type Setup Select Server Type using the arrow keys and the Select button In the selection box select the server type using the arrow keys and the Select button 4 Server URL Select Server URL using the arrow k...

Страница 47: ... and the Select button move the focus onto the desired field Year Month Day Hour Minute Second and press the Select button Select the field you want to change using the arrow buttons and press the Select button 2 Time Display Format Select Time Display Format among Day Month Year Month Day Year Year Month Day 6 1 3 Standard Time Zone Figure 6 31 Standard Time Zone 1 Standard Time Zone Select Stand...

Страница 48: ... End Time using the arrow keys and the Select button For a weekly setting in the Start Time and End Time fields set Day to 0 After the Summer Time is selected the existing data will be displayed as OLD_ in the search and log list 6 2Recording Set up Recording System environments and major features 6 2 1 Recording Setup Start Figure 6 32 Recording Window In real time monitoring screen select Menu S...

Страница 49: ... the real time monitoring screen even though they are not displayed in black 3 Connection Used to set whether to connect or disconnect each camera channel When the camera channel is set to disconnected the video contents will not be displayed even if the camera is actually connected Recording Resolution Used to set the resolution of the recorded channel Resolution by Video Type Type Resolution NTS...

Страница 50: ...frame setting Only VR 412D1 supported Sound When audio is detected recording will start based on event frame rate Only VR 412D1 supported Recording Conditions Recording Type Setting Continuous Record Rate Normal 1 30 Motion Event Motion Part or All Record Frame Rate Event 1 30 Sensor Event Sensor 1 4 Sound Event Sound 1 Automatic Enables setting both Normal and Event simultaneously Recording Frame...

Страница 51: ...ording for the external audio input linked to the system Only VR 412D1 is supported 6 2 4 Event Motion This function detects the movement of images Detection settings include Off Partial All Sensitivity The default value is Off however 1 All Detects all movements of images each channel Record only for the time set at Recording Event Post Event Select the channel to be set up at Recording Event Mot...

Страница 52: ...rea repeat Exit Motion Setup by ESC in the front panel or the right mouse button Method of Selecting the Zone The Select button is operated by Toggling in the above description the Select button means the button in the front panel and the same function as double click of the mouse 3 Off Motion detection in the video is disabled 4 Select the motion detection sensitivity In the selection window sele...

Страница 53: ...t up the time of the recording duration before an event is taken place It is able to record 5 seconds before the event Figure 6 36 Previous Recording Select the On Off using the arrow keys and the Select button The user can set every channel with the same duration by pressing the Select button after moving the focus on the top of Previous column Post Recording Set up the time of the recording dura...

Страница 54: ... PTZ Preset Only VR 412D1 supported When an event occurs the PTZ camera preset will be executed 1 Sensor PTZ camera goes to the preset position if the sensor is detected Select On Off 2 Sound PTZ camera goes to the preset position if the sound is detected Select On Off 3 Preset Action Select the channel at Menu Setup Recording Alarm Out PTZ Preset Select Preset Action Figure 6 38 Preset Action Set...

Страница 55: ...12D1 supported In case an alarm or an event occurs all external alarm devices connected to the relay port will be triggered 1 relays are supported in VR 412D1 1 Motion Relay the external device if the motion is detected Select On Off 2 Sensor Relay the external device if the sensor is detected Select On Off 3 Sound Relay the external device if the sound is detected Select On Off 6 3 Schedule Sched...

Страница 56: ... date and the time zone On the selection window set the data using the arrow keys and the Select button 2 Set a line Top to Bottom Go to the top of the time column using the arrow keys Select the data you want to set a Press or double click the Select button to set only one column b Select or right click the Menu button to make the setting for all time zones after the selected time zone On the sel...

Страница 57: ...edule menu select Menu Holiday On the Holiday Registration Window select the date using the arrow keys and the Select button and press the Select button After setting the holiday press the Save button at the bottom of the menu Afterward press the Select button 6 4Storage Select Menu Setup Storage Figure 6 41 Storage Window Local To apply the new setting change and save the new setting Initializati...

Страница 58: ...nitialize Changes the selected storage into a backup storage In New At least one storage shall be selected as a dedicated storage Otherwise the data cannot be stored in real time Direct The dedicated Direct storage is managed in Direct A dedicated direct storage stores data on the hard disk in real time Five commands can be executed Depending on the S W status however some commands cannot be execu...

Страница 59: ... Connected to storage or backup device functions normally Warning Connected to storage or backup device but error was detected in this case data storing or backup cannot be made for more information see the description below Fault Not connected to storage or backup device cannot perform data saving or backup 1 Fault State The storage device is completely damaged and none of the S W operations can ...

Страница 60: ...le storage device for system upgrade set to Backup Init in the New item for Main Setup Storage Device Local Storage Device Management When used in DVR equipment for the first time a backup USB device will always be detected in the New category Therefore a USB device in the New category must be set up as Backup Init prior to use for backup A USB device that has gone through this procedure will be d...

Страница 61: ...t Then the user is able to choose New Online Format Eject Select Format and formatting progress as shown below Figure 6 44 Message in Storage Format Process It may take times during formatting After formatting select the model again and set as Online Format is completed 6 5 PTZ Only VR 412D1 supported Used to set the PTZ camera connected to the system Menu Setup PTZ ...

Страница 62: ... From the PTZ Setup menu select the PTZ protocol for the channel you want to set using the arrow keys and the Select button VR 412C VR 412D1 supports 22 company s PTZ protocol Figure 6 46 PTZ Protocol Window On the selection window select the PTZ protocol using the arrow keys and the Select button 6 5 2 Camera ID setup Camera ID refers to the address used for communicating with the PTZ camera The ...

Страница 63: ...ission speed using the arrow keys and the Select button 6 5 4 Preset Duration Setup Tour interval time select between 5 and 60 seconds From the Preset Setup menu select the preset time for the channel using the arrow keys and the Select button In the selection box set the preset duration using the arrow keys and the Select button 6 5 5 Tour Setup Automatically controls the preset PTZ camera accord...

Страница 64: ...ironment Select ADSL Save after filling in User Name and Password 6 6 2 DDNS As part of the DNS system the Dynamic Domain Name System DDNS service updates the IP addresses of host names in real time and allocates fixed domain names to systems linked to dynamic IP addresses to allow users to use the same DNS name regardless of the changes in the IP address The MM MH SM SH series provides dynamic DN...

Страница 65: ...Veilux VR 412D1 VR 412C Compact DVR s www veilux net 64 Operating Instruction User s Guide Figure 6 49 DDNS Window Figure 6 50 DDNS Window with MAC Address ...

Страница 66: ...Veilux VR 412D1 VR 412C Compact DVR s www veilux net 65 Operating Instruction User s Guide Figure 6 51 DDNS Setting Figure 5 52 DDNS Domain name changed ...

Страница 67: ...h MAC Address as a DDNS you can change it whatever you like If it is not duplicated one you can see the successful sign as Figure 5 50 Finally you can check the status of DDNS thru DVR info As Figure 5 51 DynDNS On is for users who has ID of www dyndns com The default IP address of the DDNS server is 211 117 45 25 6 6 3 Port This feature is used to set up the user for the network port The default ...

Страница 68: ...number 6 6 4 E mail Alarm Out setup in case When an alarm or an event occurs To use the e mail function E mail in Menu Setup System 9 Alarm needs to be configured Figure 6 55 E mail Window Select Menu Setup Network E mail Save after entering the detail about E mail 6 6 5 Bandwidth This is to adjust Resolution Quality Frame of the image when user access to network for Live image ...

Страница 69: ...6 7 System In Menu Setup System the user can configure the system and the auxiliary features of the system 1 DVR Name Used to name the DVR device 2 Remote Controller ID Used to name the remote controller for running the system 3 System Controller ID Unique system controller number setting 4 User Registration Used to register add or delete users 5 Administrator Password Used to set the password of ...

Страница 70: ... input signals from a remote controller VR 412C doesn t support Remote Controller ID 6 7 4 Keyboard Controller ID Only VR 412D1 supported Select Menu Setup System 3 Keyboard Controller ID In the selection window enter ID using the arrow keys and the Select button the number 1 255 is available for ID RS485 port needs to be designated to Keyboard Controller 6 7 5 User Registration Adds edits or dele...

Страница 71: ...keys as shown below Figure 6 58 User Authorization Setup Window 2 Add User Move to Menu Setup System User Registration User Addition On the user registration window enter the ID and the password Up to four users can be registered the user ID and password may contain up to 30 English letters After entering the user ID and password select the user authorization 3 Delete User Move to Menu Setup Syste...

Страница 72: ... the PC and disconnect it from the USB port 2 If the USB device is disconnected from the USB port while the upgrade file is being copied the DVR system may not automatically detect the file Removing USB during the upgrade in progress may cause damage on the system Connect the storage device with an upgrade file stored in the USB 2 0 port at Left Right front panel Move to Menu Setup System 6 Upgrad...

Страница 73: ... to Menu Setup system 7 Initialization Select Yes when initialization Yes No Window appears Note that all setting data will be initialized It goes back to Factory Default Value 6 7 9 RS232C Port Move to Menu Setup System 8 RS232C Port On the selection window select the device using the arrow keys and the Select button 6 7 10 Alarm Alarm is to notify occurrences such as events Sensor Motion and Aud...

Страница 74: ...system 11 Automatic Menu Exit On the selection window select the time zone you want to set using the arrow keys and the Select button Off Automatic Menu Exit is not used The user can exit the menu by pressing the ESC button in the System menu 1 2 3 MIN If there is no input using the front button remote controller or mouse the system will shift to real time monitoring mode User Setup The user can e...

Страница 75: ...gure 6 62 Language Selection Window Move to Menu Setup System 12 Language On the selection window select the language using the arrow keys and the Select button APPENDIX APPENDIX 1 Recommended HDD Type Size Capacity Buffer RPM SATA I II 3 5 1 2 Flat support Min 80GB Max 1 5TB Over 8MB Over 7200 ...

Страница 76: ...TEL 8 GSP GSP CYBERSCAN_1 9 HITRON FASTRAX2 FASTRAX2 10 HONEYWELL SCANDOME2 HSDN 251 11 LG LG LG_MULTIX LG_OLD 12 MIKAMI MIKAMI MIKAMI 13 ORIENTAL ORX 1000 ORX 1000 14 PANASONIC WVCS854 WVCS854 15 PELCO PELCO PELCO D PELCO P 16 PHILIPS PHILIPS PHILIPS 17 PROLINE PROLINE PROLINE_UK 18 RIFATRON RIFATRON 1 RIFATRON 19 SAMSUNG TECHWIN SAMSUNG SPD 1600 SCC641 20 SUNJIN SUNJIN SUNJIN 21 VICON VICON VICO...

Отзывы: