background image

RTU-4000/RTU-4100 User Manual, D07-00-132P-RevA01 

Page 25 of 44 

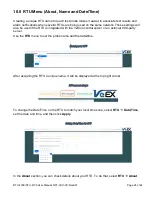
RTU About screen 


Содержание RTU-4000

Страница 1: ...RTU 4000 RTU 4100 User Manual D07 00 132P RevA01 Page 1 of 44 ...

Страница 2: ...ACK MOUNTING THE CHASSIS 13 5 5 CONNECTING POWER 15 5 5 1 Powering on off the unit 15 5 6 CONNECTING TO RTU PROBE 16 6 0 PROBE CONFIGURATION TOOL 17 6 1 OPENING CONFIGURATION TOOL 17 6 2 CONNECTING CONFIGURATION TOOL TO PROBE 18 6 3 ASSIGNING STATIC IP ADDRESS TO PROBE 20 6 4 CONNECTING THE UNIT TO ETHERNET 20 7 0 USING RTU4000 RTU4100 IN STANDALONE MODE 21 8 0 SETTING MONITORING PARAMETERS 22 9 0...

Страница 3: ...vA01 Page 3 of 44 14 1 CONNECTING TO FIBERIZER DESKTOP 36 15 0 VESION OVERVIEW 38 16 0 UPGRADING RTU 4000 RTU 4100 SOFTWARE 39 17 0 WARRANTY AND SOFTWARE 40 18 0 PRODUCT SPECIFICATIONS 42 19 0 CERTIFICATIONS AND DECLARATIONS 43 20 0 ABOUT VEEX 44 ...

Страница 4: ...s The software is confidential and proprietary of VeEX Inc The software is protected by copyright and contains trade secrets of VeEX Inc or VeEX s licensors The purchaser of this device agrees that it has received a license solely to use the software as embedded in the device and the purchaser is prohibited from copying reverse engineering decompiling or disassembling the software This user manual...

Страница 5: ...sed using the Ethernet port or optional LTE model via the embedded web based software Fiberizer Desktop or VeSion software application The RTU can be used to test monitor Point to Point PON and or DWDM networks The RTU test capability can be increased by integrating the external OXA 4000 Optical Switch The OXA 4000 is connected to the RTU 4000 via DB25 cable which is used to power the switch and s...

Страница 6: ... module installed 2 Rack mounting brackets if ordered AC DC 15V 5 33A 3 prong adapter Power cord 2m 6ft CD ROM containing RTU 4000 RTU 4100 Optical Test Probe Installation and Configuration Manual pdf RTU HTTP API Reference Guide pdf VeSion RFTS Operations Guide pdf Probe Configuration Tool software USB to Serial adapter cable driver RTU 4000 unit with RTU 4100 Optical Fiber Test Modules shipped i...

Страница 7: ...s voltages Always connect the electrical test ports to known test interfaces which carry low level signals ESD Electrostatic Discharge Sensitive Equipment The chassis could be affected by electrostatic discharge To minimize the risk of damage when handling the unit make sure to follow proper ESD procedures and dissipate any electrostatic charge from your body and tools and the use proper grounding...

Страница 8: ...below Chrome version 71 or higher Edge version 42 or higher Firefox 60 or higher Safari 12 or higher 4 2 RTU 4000 RTU 4100 Basic Operation Users should be familiar not only with the RTU 4000 hardware and cabling but also with electronic circuitry wiring practices and safety precautions Test port s are accessed via the front of the RTU 4000 RTU 4100 unit Example One An RTU 4100 that is configured w...

Страница 9: ...assis GND Ground point for the RTU unit Alarm Contacts Local alarm contacts Control interface DB25 female port Power and Communication 48V DC Return terminals available when ordered with DC power option 15V DC terminals DC1 and DC2 available when ordered with AC power option Console interface RS 232 male port used by the ORTU to communicate with the OX4100 series Optical Switch ...

Страница 10: ...t the same location as the RTU 4000 RTU 4100 regardless if the installation is at the CO or the CO LO The OXA4000 series Optical Switch is available in various configurations The OXA4000 can be configured as an optical switch or as an FWDM optical switch Below is an example of the 1U 32 port options OXA4000 Optical Switch 1U 32 Port Option OXA4000 FWDM Optical Switch The OXA4000 series Optical Swi...

Страница 11: ...ccident occurs turn off the power immediately Do not work alone if potentially hazardous conditions exist Never assume that power is disconnected from a circuit Always check If an electrical accident occurs proceed as follows Use caution Do not become a victim yourself Turn off power to the system If possible send another person to get medical aid Otherwise assess the condition of the victim and t...

Страница 12: ... unsafe use can cause physical harm and damage your equipment Read the Safety Information and Electrical Equipment Safety Guidelines sections before beginning installation 5 1 Hardware Specifications Size H x W x D 1 75in x 19in x 11 75in 1 RU Rack Units high Weight 8 lbs 3 628 kg Operating Temperature 5 C to 40 C Storage Temperature 40 C to 70 C Power 100 240 VAC 50 60 Hz 15V DC 4 6A 48V chassis ...

Страница 13: ...If you must bend down to lift the chassis bend at the knees not at the waist This reduces the strain on your lower back muscles Lift the chassis from the bottom by grasping the underside of the chassis exterior with both hands 5 4 Rack Mounting the Chassis Exercise caution when rack mounting this or any other type of equipment Ensure that all equipment is properly secured along the specified hardw...

Страница 14: ...g your equipment make sure that adequate ventilation is available Inadequate ventilation will result in higher than normal operating temperatures and may result in degraded operation Additional care must be used when installing enclosed racks or when racks are located near other equipment that may increase ambient temperatures Always ensure the system receives sufficient airflow such that it will ...

Страница 15: ...he unit On the front of the device press the ON OFF button so it is in the ON position The green power LED turns on to indicate the device is powered on The unit begins to boot up as soon as the power switch is turned on To safely power off the unit 1 Stop monitoring 2 Press the ON OFF button so it is in the OFF position The green power LED turns off to indicate the device is powered off When usin...

Страница 16: ...figured with a default IP address 192 168 100 250 To change the IP address the Probe Configuration Tool must be used See the Assigning static IP address to probe section of this user manual Assign Unique IP address The factory default IP address 192 168 100 250 must be changed for each probe to uniquely identify it ...

Страница 17: ...on Tool software from the CD provided with the chassis 3 Navigate to the folder where you installed the Probe Configuration tool 4 Double click ProbeConfigurationTool exe The Probe Configuration Tool appears To launch the Probe Configuration Tool via Serial configuration not supported at this time 1 Connect a RS232 to USB cable from the PC to the RTU 4100 device 2 If needed install the RS232 drive...

Страница 18: ...button and enter the RTU IP address The PC subnet address must match that of the RTU Probe Configuration Tool Connecting via Ethernet to Probe To connect the Probe Configuration Tool via Serial not supported at this time 1 Click the Select Probe Type drop down list box arrow and then select RTU 4000 2 Select the Serial Port option button and enter the RTU IP address 3 Select the COM port on the PC...

Страница 19: ...on the back panel of the probe Probe Configuration Tool Serial number 7 In the Status box Connection succeeded appears to indicate the Probe Configuration Tool is connected After opening the serial port and connecting the probe to the Probe Configuration Tool follow the instructions below to assign a static IP address so that you can connect to the probe via a web browser or with VeSion as well as...

Страница 20: ... Tool Assigning static IP to probe Probe Number Number that uniquely identifies the probe This number will correspond to the probe number in VeSion Probe Server Port Port number for the probe Probe Server IP VeSion server IP address Local IP IP address you want to assign to the probe Local Subnet Subnet mask number for probe Local Gateway Gateway IP for the probe 6 4 Connecting the Unit to Etherne...

Страница 21: ...ation set the local date time and enter a unique RTU ID OTAU when available view information about the OTAU Optical Test Access Unit Optical Switch and select the desired test access port OTDR View basic OTDR information Define the TCP port for Remote Control software such as the VeEX Fiberizer Desktop or other third party external software used to communicate with the RTU when making measurements...

Страница 22: ... see 10 0 RTU Menu About Name and Date Time 2 Define the OTAU port to be used if needed For more details see 11 0 OTAU Menu 3 Select the RTU 4100 hardware for measurement For remote control use VeSion Monitoring System to connect to the RTU usually RealTime or Manual mode Use this menu to connect to other external third party software also For more details see 12 0 OTDR Menu 4 If the RTU will be a...

Страница 23: ...on enter information in the corresponding fields and then click Apply Settings for VeSion integration The parameters Server IPv4 address Server TCP port Device number can be obtained from your system administrator For further details please contact VeEX technical support at www veexinc com To integrate with any other external server click Integration Notification enter information in the correspon...

Страница 24: ...f the RTU is integrated with the VeSion central server or an external third party server Use the RTU menu to set the probe name and the date time Naming your RTU After assigning the RTU a unique name it will be displayed at the top right corner RTU name is shown To change the Date Time on the RTU to match your local time zone select RTU Date Time set the date and time and then click Apply Setting ...

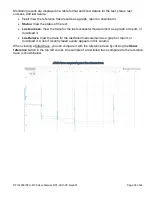
Страница 25: ...RTU 4000 RTU 4100 User Manual D07 00 132P RevA01 Page 25 of 44 RTU About screen ...

Страница 26: ...tical Test Access Unit for your test application you will need to access the OTAU menu to select the test port To do this click OTAU to view the device model serial number and available ports Set the desired port number in the Switch to port drop down list box and then click Switch to move the switch to the desired test port Setting OTAU port ...

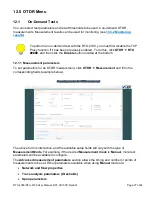
Страница 27: ...cated at the bottom 12 1 1 Measurement parameters To set parameters for an OTDR measurement click OTDR Measurement and fill in the corresponding fields example below General parameters for OTDR measurement The above form is interactive and the available setup fields will vary with the type of Measurement Mode For example if the desired Measurement mode is Manual more test parameters will be availa...

Страница 28: ...settings After the test is complete an OTDR trace will appear Use the blue icons next to the Start measurement button to view the traces as a graph or a report The results can be downloaded for future use also Resulting trace can be viewed as a graph or as a report or downloaded While viewing a trace you can also edit and or add events which is sometimes necessary for monitoring For more informati...

Страница 29: ...then click the Add a test button The Add a new test box appears Creating a test Add a new test box 2 Enter information in the corresponding fields and click Add By default the Name field is populated automatically with the date and time it was created 3 Click Monitoring Tests and then click the test name on the list The Test Settings page appears ...

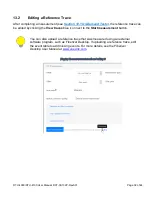
Страница 30: ...st details and set the reference traces and new test thresholds New Reference Trace To upload the reference traces click the upload link then follow the instructions on the screen You can upload several reference traces To let the RTU set reference traces automatically click the let link then set the analysis values in the Measure reference traces automatically box ...

Страница 31: ... run Because the tests are performed in succession the reference trace is not refreshed immediately but when the next test run is performed New Thresholds To set new thresholds click the Change link from the Test Settings box The Change test thresholds box appears Enter new threshold values in the corresponding fields and click Apply Setting new thresholds ...

Страница 32: ...ted by clicking the View traces blue icon next to the Start measurement button You can also upload a reference trace that was measured using an external software program such as Fiberizer Desktop If uploading a reference trace edit the event table to add missing events For more details see the Fiberizer Desktop User Manual at www veexinc com Viewing the measurement result and editing it ...

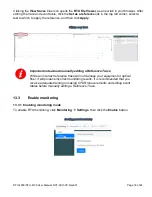
Страница 33: ...y Editing a new trace Important note about manually editing a Reference Trace While an incorrect reference trace will not damage your equipment or optical fiber it will produce incorrect monitoring results It is recommended that you receive adequate training in making OTDR measurements and editing event tables before manually editing a Reference Trace 13 3 Enable monitoring 13 3 1 Enabling monitor...

Страница 34: ...me of the test Then click the Enable button Enabling a test 13 3 2 Monitoring results After monitoring is enabled the test measurement uses the designated reference trace and any change notifications about trace events will be sent automatically You can view monitoring results and statuses by clicking Monitoring Tests Test results table ...

Страница 35: ...iew the trace for the last successful measurement as a graph or report or download it Last failure View the trace for the last failed measurement as a graph or report or download it A list of recently failed events appears in this column When viewing a failed trace you can compare it with the reference trace by clicking the Show reference button in the top left corner An example of a last failed t...

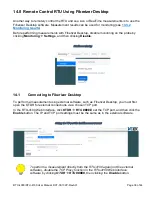
Страница 36: ...ing Disable Disable monitoring 14 1 Connecting to Fiberizer Desktop To perform a measurement using external software such as Fiberizer Desktop you must first open the OTDR for external connections via a chosen TCP port In the RTU 4100 Web Interface click OTDR RTU set the TCP port and then click the Enable button The IP and TCP port settings must be the same as in the external software Setting the ...

Страница 37: ...up Select TCP from the Interface drop down list box and enter the same IP address and TCP port that is on the RTU 4100 Web User Interface probe settings Then click Reconnect and allow several seconds for the external application to initialize After Fiberizer Desktop is initialized click OK and proceed with the measurement For more information on how to use Fiberizer Desktop see the Fiberizer Deskt...

Страница 38: ...r Billing and Work order management system Results can be accessed anywhere anytime and at any location The RTU is typically installed at the Central Office Headend or Sub Hub or Co location sites to support centralized fiber monitoring and analysis as well as data collection Optical switches OXA4000 can be used to expand the number of fibers that can be monitored by a single RTU probe For more in...

Страница 39: ...n list box arrow and then select RTU 4000 4 Select the Ethernet option button and enter the static IP address you assigned to the probe at an earlier time see the Assign a static IP address to probe and then click Connect In the Status box a Connection succeeded message appears 5 In the Software Upgrade group box click Select File navigate to the folder in which you extracted the upgrade files and...

Страница 40: ...tware and or firmware which prove to be defective provided that the products that the customer elects to replace are returned to VeEX Inc by the customer along with proof of purchase within thirty 30 days of the request by the customer freight prepaid Additionally during the warranty period VeEX Inc will provide without charge to the customer all fixes patches and enhancements to the purchased sof...

Страница 41: ...RTU 4000 RTU 4100 User Manual D07 00 132P RevA01 Page 41 of 44 Damage occurred from operating the unit outside of the environmental specifications for the product Improper installation by the customer ...

Страница 42: ...RTU 4000 RTU 4100 User Manual D07 00 132P RevA01 Page 42 of 44 18 0 Product Specifications The most recent product specifications can be found on the VeEX web site at www veexinc com ...

Страница 43: ... conforms to requirements of European Union and European Free Trade Association EFTA EN61010 1 For a copy of the CE Declaration of Conformity relating to VeEX products please contact VeEX customer service What is RoHS RoHS is the acronym for Restriction of Hazardous Substances Also known as Directive 2002 95 EC it originated in the European Union and restricts the use of specific hazardous materia...

Страница 44: ... address all stages of network deployment maintenance field service turn up and integrate service verification features across DSL Fiber Optics CATV DOCSIS Mobile backhaul and fronthaul CPRI OBSAI next generation Transport Network Fibre Channel Carrier Metro Ethernet technologies WLAN and Synchronization Visit us online at www veexinc com for the latest updates and additional documentation VeEX In...

Отзывы: