manualshive.com logo in svg
background image

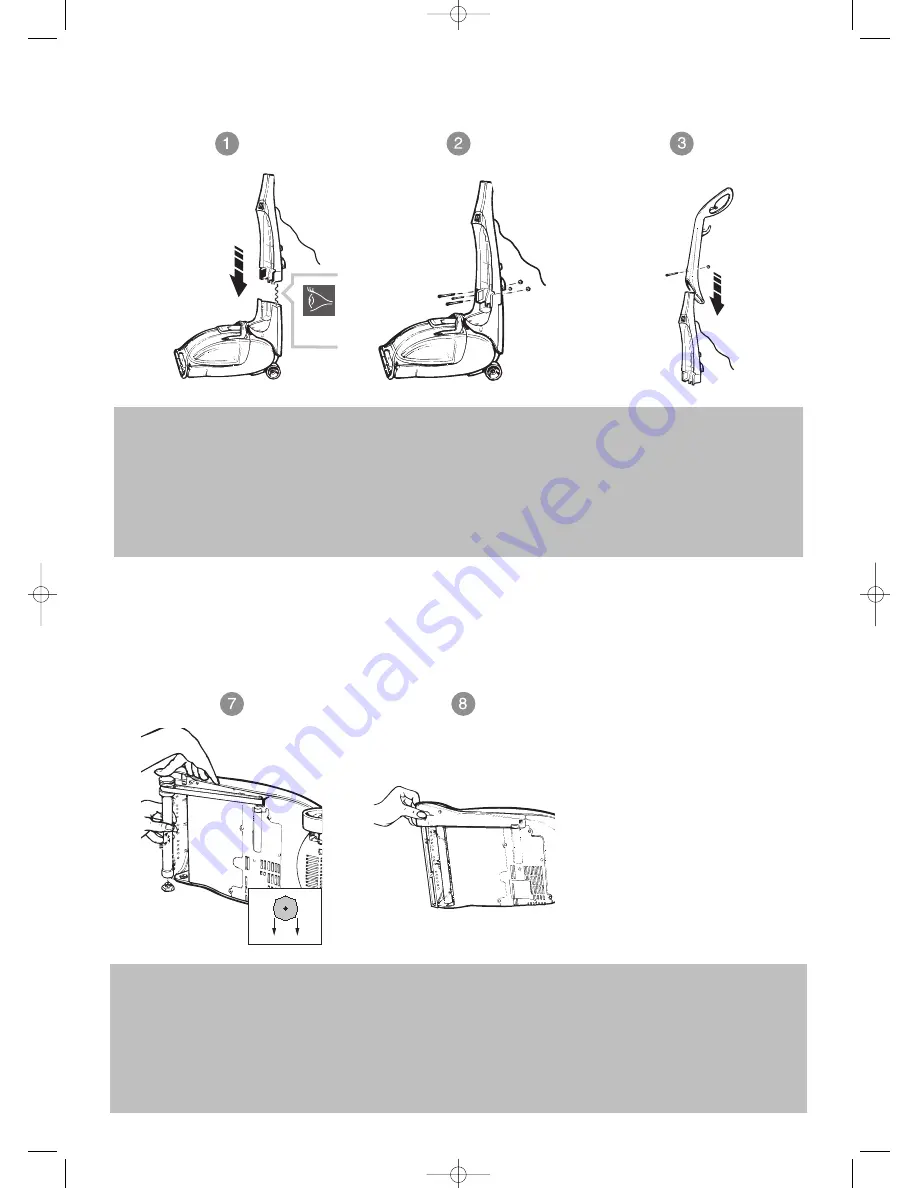
Stand the base in the upright
position. Assemble the mid section
onto the base, taking care not to
trap internal mains wire.

Insert the three nuts into the
recesses located on the left and
right sides and the middle of the
back of the base.
While holding the nuts in place
insert screws through the front of
the mid section and tighten.

Slide upper handle down onto the
unit. Insert nut into the recess in
the back of the upper handle.
While holding the nut in place
insert the screw through the front
of the upper handle and tighten.
Run the mains cable above the
upper cord hook and secure with
the cord clip.

Putting your cleaner together

Phillips screwdriver required

4

When replacing the belt first slide it
onto the motor shaft. Then slip the
brush roll through the belt. Place the belt
in the area of the brush without bristles.
Slide the brush roll into the nozzle,
ensuring that the brush roll end caps are
orientated correctly, see inset picture.
Manually turn the brush roll to
check that it is fitted properly.

Replace the belt cover by inserting
the end furthest from the brush first.
Then replace the front of the belt
cover before securing in place with
the two screws.

Belt or brush removal and replacement      

Phillips screwdriver required

13

Rapide V-025 Manual  4/2/08  10:15 AM  Page 4

Содержание Rapide V-025

Страница 1: ...r assistance or advice about any VAX please call VAXCARE on 1300 36 4040 Australia cost of a local call and 0800 800 900 NZ VAX Appliances Australia Pty Ltd A C N 009099736 296 Victoria Road Malaga We...

Страница 2: ...Australia call VAXCARE ON 1300 36 4040 2 Operates with Vacuum and Sweeper together for effective and efficient cleaning or independently as a sweeper with rotaing brush bar to pick up larger objects I...

Страница 3: ...page 8 Empty dirty water tank Refer to page 10 for fitting information See How to operate your cleaner See How to operate your cleaner Fill tank see pages 5 and 6 Troubleshooting Problem Possible Caus...

Страница 4: ...cable above the upper cord hook and secure with the cord clip Putting your cleaner together Phillips screwdriver required 4 When replacing the belt first slide it onto the motor shaft Then slip the b...

Страница 5: ...Turn off when emptying and filling the reservoir Grasp the solution reservoir under the handle and press the release lever upward Tilt the solution reservoir away from the cleaner and remove Unscrew t...

Страница 6: ...cause the float to shut off the cleaner prematurely Using other cleaners will void your warranty Place the bottom of the solution reservoir into the cleaner and push into place There will be an audibl...

Страница 7: ...y water tank 10 Plug the cord into a mains electricity socket Turn the power and brushroll switch on The switch is located on the front of the cleaner above the solution reservoir The power switch con...

Страница 8: ...the blue piece in the dirty water tank lid It will shut off the suction when the dirty water tank is full However the float may rise prematurely cutting off the suction before the dirty water tank is...

Отзывы: