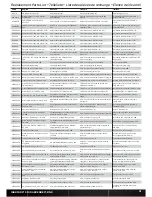
Vaterra F-100 Скачать руководство пользователя страница 4

EN

4

1968 FORD

®

 F-100 ASCENDER

®

, BND • INSTRUCTION MANUAL

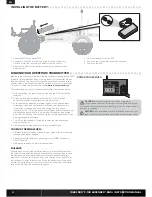
1.  Ensure the ESC is powered OFF. 

2.  Loosen the hook and loop battery strap found on the battery 

tray and install the fully charged battery in to the vehicle.

3.  Secure the battery to the battery tray using the hook and look 

battery strap.

4.  Connect the battery to the ESC. 

5.  Power on the Transmitter and wait 5 seconds. 

6.  Power on the ESC.

CAUTION: 

If using rechargeable batteries, charge only 

rechargeable batteries. Charging non-rechargeable batteries 

may cause the batteries to burst, resulting in injury to persons and/or 
damage to property.

CAUTION: 

Risk of explosion if battery is replaced by an incorrect 

type. Dispose of used batteries according to national regulations.

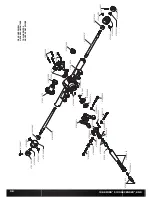
INSTALLING THE BATTERY 

/ / / / / / / / / / / / / / / / / / / / / / / / / / / / / / / / / / / / / / / / / / / / / / / / / / / / / / / / / / / / 
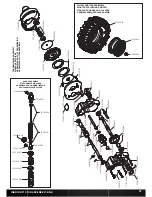
SPMSR310 RECEIVER

Binding is the process of programming the receiver to recognize the GUID 
(Globally Unique Identifi er) code of a single specifi c transmitter. When a 
receiver is bound to a transmitter, the receiver will only respond to that 
specifi c transmitter. Follow the binding instructions for your transmitter. 
For a list of compatible transmitters, visit 

www.losi.com/bindndrive.

To bind the receiver to your Spektrum transmitter, follow these steps:

1.  With the receiver off , insert the bind plug into the BIND port on the 

receiver.

2.  Power the receiver through any other port. The LED will fl ash 

continuously, indicating the receiver is in bind mode.

3.  With the steering wheel and throttle trigger in the desired preset 

failsafe positions (see the Failsafe section on this page for more 
information), press and hold the bind button and turn on the 
transmitter. The LED on the transmitter will fl ash within three seconds, 
indicating the transmitter is in bind mode. Release the bind button 
when the LED fl ashes. Continue to hold the failsafe positions until the 
binding process is complete.

4.  The LED on the receiver will glow solid when the transmitter and 

receiver are bound.

5.  Remove the bind plug and store it in a convenient place.

YOU MUST REBIND WHEN:


»

Diff erent failsafe positions are desired e.g., when throttle or steering 
reversing has been changed.


»

Changing receiver types e.g., changing from a DSM2

®

 receiver to 

DSMR

®

 receiver.


»

Binding the receiver to a diff erent transmitter.

FAILSAFE

Failsafe positions are also set during binding. In the unlikely event that 
the radio link is lost during use, the receiver will drive the servos to their 
preprogrammed failsafe positions (normally full brakes and straight 
steering). If the receiver is turned on prior to turning on the transmitter, 
the receiver will enter failsafe mode. When the transmitter is turned on, 
normal control is resumed. For more information on setting the failsafe, 
refer to the Binding a Receiver section above.

BINDING YOUR SPEKTRUM TRANSMITTER 

/ / / / / / / / / / / / / / / / / / / / / / / / / / / / / / / / / / / / / / / / / / / / / /

Содержание F-100

Страница 1: ...icle please read all printed materials thoroughly Horizon Hobby is not responsible for inadvertent errors in this manual OWNER S MANUAL BEDIENUNGSANLEITUNG MANUEL DE L UTILISATEUR MANUALE DELL UTENTE...

Страница 2: ...VATERRARC COM and follow the product registration link to stay connected COMPONENTS Vaterra 1968 Ford F 100 Ascender 4WD RTR VTR03093 Spektrum 3 Channel DSMR Surface Receiver SPMSR310 Spektrum 9KG 23T...

Страница 3: ...ease torque and motor life when running in mud deeper puddles or any wet conditions that will increase the load on the motor for an extended period of time WET CONDITIONS MAINTENANCE Drain any water t...

Страница 4: ...eiver 2 Power the receiver through any other port The LED will ash continuously indicating the receiver is in bind mode 3 With the steering wheel and throttle trigger in the desired preset failsafe po...

Страница 5: ...Connect a fully charged battery pack to the ESC 5 Power on the ESC 6 Re install the body on the vehicle BEFORE RUNNING YOUR VEHICLE 1 Check for free suspension movement All suspension arms and steerin...

Страница 6: ...The ESC checks radio signal input when it is pow ered ON If a problem is detected the ESC continuously sounds 1 beep with a 2 second pause x x x Power OFF the ESC and ensure the radio system is opera...

Страница 7: ...ged or plugged in Charge battery plug in ESC switch not ON Turn on ESC switch Transmitter not ON or low battery Turn on replace batteries Motor runs but wheels do not rotate Pinion not meshing with sp...

Страница 8: ...rvice you in the event that you may need any assistance For questions or assistance please visit our website at www horizonhobby com submit a Product Support Inquiry or call the toll free telephone nu...

Страница 9: ...distance of at least 20 cm between your body excluding ngers hands wrists ankles and feet and the antenna to meet RF exposure safety requirements as determined by FCC regulations EU Compliance Stateme...

Страница 10: ...slipper 2 Pastiglie slipper 2 Twin Hammers VTR232026 Slipper Spring Cup Spacer Washer Slipperfeder Au enring Distanzscheibe Unterlegscheibe TH ASN Rondelle entretoise ressort et coupelle de slipper Mo...

Страница 11: ...Bleeder Screw 4 Glamis Uno Fear Hal Rap Ral O Ring Entl ftungsschraube 4 Glamis Uno Fear Hal Rap Ral Glamis Uno Fear Hal Rap Ral Joint torique de vis de purge d amortisseurs 4 O ring vite s ato 4 Glam...

Страница 12: ...235101 VTR246000 VTR230055 VTR43042 VTR230055 VTR43018 VTR236046 VTR236046 Part English Deutsch Fran ais Italiano VTR334022 One Piece Lower Link Alum 66mm 2 ASN Anlenkung unten einteilig Alu 66mm 2 AS...

Страница 13: ...R237020 VTR232073 VTR237020 VTR232076 VTR237004 VTR234025 VTR237004 VTR235108 VTR246001 VTR234025 VTR234025 VTR235108 VTR232076 VTR232074 TLR5961 VTR236012 VTR236012 VTR235113 VTR232074 VTR235223 VTR2...

Страница 14: ...E SOSPENSIONE POSTERIORE WB2 290mm VTR235330 VTR235328 VTR234027 VTR246005 VTR246005 VTR234027 VTR234029 66mm FRONT UPPER LINK ASSEMBLY WB2 290mm MONTAGE QUERLENKERARM VORNE OBEN WB2 290mm ASSEMBLAGE...

Страница 15: ...078 VTR232078 VTR237004 VTR235174 VTR246001 VTR235174 VTR234025 VTR232077 VTR232078 VTR232074 VTR235223 VTR235223 VTR237020 VTR237020 VTR232075 VTR236012 VTR236012 VTR235009 VTR235008 VTR232073 VTR232...

Страница 16: ...ONE VTR232001 VTR237009 VTR232068 VTR232017 VTR237009 VTR232068 VTR237004 VTR237004 VTR236137 VTR232017 VTR232017 VTR232068 VTR232017 VTR232068 VTR232068 VTR237003 VTR232068 VTR232068 VTR232017 VTR235...

Страница 17: ...TR235320 VTR243010 VTR235025 VTR232067 MOTOR INSTALLATION MOTOREINBAU INSTALLATION DU MOTEUR INSTALLAZIONE DEL MOTORE DYNS1216 VTR235110 VTR235110 VTR231038 BATTERY TRAY ASSEMBLY MONTAGE DES AKKUHALTE...

Страница 18: ...VTR231037 VTR231035 VTR231035 VTR231003 VTR235176 VTR231003 VTR235106 VTR246002 VTR235107 VTR231034 VTR230040 VTR235176 VTR231003 VTR236110 VTR235107 VTR235222 VTR236110 VTR235107 VTR235113 VTR235113...

Страница 19: ...sed under license to Horizon Hobby LLC Super Swamper is a registered trademark of Interco Tire Corportion and is used under license by Horizon Hobby LLC All other trademarks service marks and logos ar...

Отзывы: