background image


POWXG6490 

EN


Copyright © 2014 VARO NV 

P a g e

 | 

7


www.varo.com 

ASSEMBLY 

6.1 

Preparing the Log Splitter for Use 

Carefully remove the log splitter from its packaging and place it on the accompanying 
Styrofoam block so that the wheels and foot can be mounted. 

Careful: Not placing the log splitter on the block can cause damage to the 
motor’s ventilation cap or the motor casing itself. 

Before using the log splitter, the foot at the front of the machine must be mounted and 
fastened with the proper screws and bolts. Next, mount the wheels on their axel. Place the 
wheel on the axel, and fasten it with a washer. Never use the log splitter if it is not in perfect 
operating condition or if it needs service.  
Familiarize yourself with the instruction manual and its operating and safety mechanisms, as 
well as the log splitter’s functions before using the machine for the first time. 

6.2 

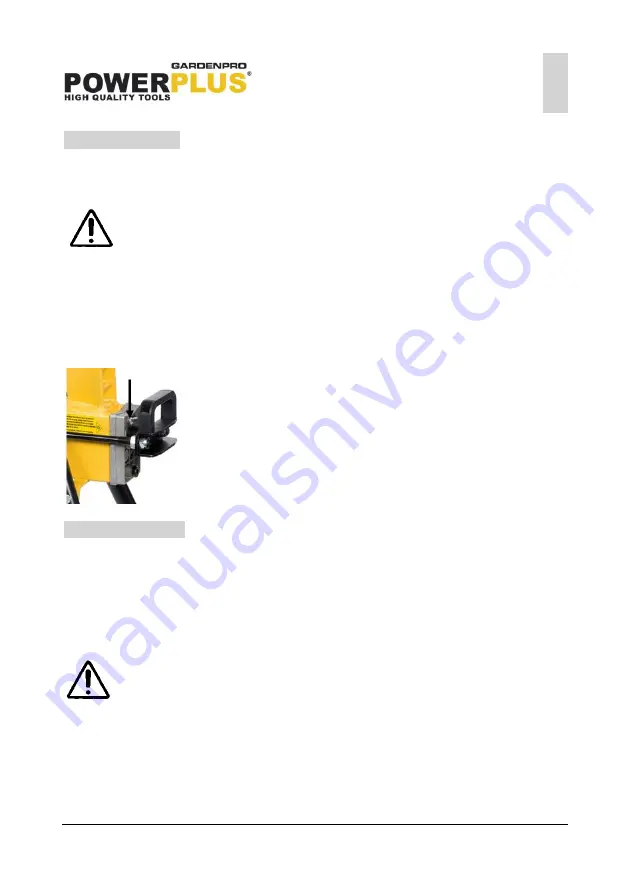
Bleed screw 


On the back of the machine is a bleed screw (#14) that must be 
loosened 3 to 4 rotations before the log splitter may be used for 
the first time. When moving the log splitter, the screw must be 
tightened again to avoid oil leakage 

OPERATION 


Place the log splitter on a table that is 60-75 cm high. 


Connect the electric log splitter to 230 Volt power supply. 


When using an extension cord, keep it away from the wood-splitting wedge or places 
where it could be damaged or torn. 


Place the log on the push plate. The push plate ensures that the log is positioned correctly 
in relation to the wedge. If the log is not steady, try turning it over. 


Press the ON/OFF button (6) of the motor with your right hand and activate the operating 
handle (3) with your left. Push the push plate forwards to split the log. 

Caution: if the switch is not fully depressed the switch contacts may burn 
in. 


If the log does not split at once do not keep the cylinder depressed. Draw the push plate 
back and try again. A small piece of wood can be difficult to split when it is somewhat 
knotty. Logs with a uniform structure are easy to split even when large. When the wood is 
too hard do not use this machine as damage to the motor may occur. 


Repeat the process for short sawed pieces of wood. 


When you have finished you work, pull the plug from the socket, but do not yank on the 
cord. 

Содержание POWERplus GardenPro POWXG6490

Страница 1: ...and care 4 4 5 Service 5 5 SPECIAL SAFETY INSTRUCTIONS FOR LOG SPLITTERS 5 5 1 General Safety Provisions 5 6 ASSEMBLY 7 6 1 Preparing the Log Splitter for Use 7 6 2 Bleed screw 7 7 OPERATION 7 8 MAINT...

Страница 2: ...Remove remaining packaging and transit supports if existing Check the completeness of the packing content Check the appliance the power cord the power plug and all accessories for transportation dama...

Страница 3: ...must not be plugged into a power socket while being serviced Standing within the machine s work area is prohibited No animal or person other than the machine operator may be within a 5m radius from t...

Страница 4: ...sult in serious personal injury Use safety equipment Always wear eye protection Safety equipment such as dust mask non skid safety shoes hard hat or hearing protection used whenever conditions require...

Страница 5: ...ter and provides instructions for proper handling to prevent injury or material damage Warning This log splitter is designed and manufactured for splitting of logs of the recommended dimensions Any ot...

Страница 6: ...d or under the influence of drugs or medicine For safety reasons the operator must be able to think clearly at all times Never accept help from another person to loosen a log that has become stuck Che...

Страница 7: ...the first time When moving the log splitter the screw must be tightened again to avoid oil leakage 7 OPERATION Place the log splitter on a table that is 60 75 cm high Connect the electric log splitte...

Страница 8: ...served 8 1 Changing the Hydraulic Oil After 400 operating hours the oil must be replaced see recommended oil type point 3 Perform as following Make sure that the machine s push plate is fully retracte...

Страница 9: ...rheat causing damage to the pump 10 TROUBLE SHOOTING Dislodge lodged wood as follows Push the push plate completely back by fully releasing the operating handle Place a wooden wedge squarely under the...

Страница 10: ...first user This warranty covers all material or production flaws excluding batteries chargers defective parts subject to normal wear tear such as bearings brushes cables and plugs or accessories such...

Страница 11: ...t you take it in a sealed container to your local service station for recycling Do not throw it into the refuse or pour it on the ground 14 DECLARATION OF CONFORMITY VARO N V Joseph Van Instraat 9 BE2...

Отзывы: