background image


POWXG2015 

EN


Copyright © 2014 VARO 

P a g e

 | 

4


www.varo.com 

SYMBOLS 

The following symbols are used in this manual and/or on the machine: 


Denotes risk of personal 
injury or damage to the 
tool. 


Wear a mask In dusty conditions 


Read manual before use 


Never operate the machine in the 
rain or in damp or wet conditions. 
Moisture is an electrical shock 
hazard. 


Wear noise protection     


Wear gloves 


Wear eye protection   


Wearing of protective shoes advised 


In accordance with 
essential safety standards 
of applicable European 
directives 


No smoking 


No naked flame 


Fuel and oil mixture 


Keep hands away from blades. Do not touch the blades when starting or while 
operating the unit. 

GENERAL SAFETY WARNINGS 

Read  all  safety  warnings  and  all  instructions.  Failure  to  follow  all  warnings 
and instructions may result in electric shock, fire and/or serious injury. Save 
all warnings and instructions for future reference. 

5.1 

Work area 


Keep work area clean and well lit. Cluttered and dark areas invite accidents. 


Do not operate tools in explosive atmospheres, such as in the presence of flammable 
liquids, gases or dust. Tools create sparks which may ignite the dust or fumes. 


Keep children and bystanders away while operating a tool. Distractions can cause you to 
lose control.  

5.2 

Personal safety 


Stay alert, watch what you are doing and use common sense when operating a tool. Do 
not use a tool while you are tired or under the influence of drugs, alcohol or medication. A 
moment of inattention while operating tools may result in serious personal injury. 


Use safety equipment. Always wear eye protection. Safety equipment such as dust mask, 
non-skid safety shoes, hard hat, or hearing protection used whenever conditions require 
will reduce personal injuries. 


Avoid accidental starting. Ensure the switch is in the off position before plugging in. 
Carrying tools with your finger on the switch or plugging in tools that have the switch on 
invites accidents. 

Содержание Powerplus GardenPro POWXG2015

Страница 1: ...RNINGS 5 7 FUEL 6 7 1 Fuel and oil mixture 6 7 1 1 Mixing fuel 6 7 2 Refuelling 6 7 3 Storage of fuel 6 8 OPERATING INSTRUCTIONS 7 8 1 Starting the engine 7 8 1 1 Cold starting 7 8 1 2 Hot starting 8...

Страница 2: ...100 hours of use 12 9 7 2 Maintenance before storage 12 10 CLEANING 12 11 STORAGE 12 12 STARTING UP AFTER LONGER PERIODS OF INACTIVITY 13 13 TECHNICAL DATA 13 14 NOISE 13 15 SERVICE DEPARTMENT 13 16 T...

Страница 3: ...ld 3 Front handle 4 Choke lever 5 Silencer cover 6 Air filter cover 7 Primer pump 8 Starter rope 9 Fuel tank 10 Fuel cap 11 Ignition switch 12 Throttle lock 13 Throttle trigger 14 Rear handle 3 PACKAG...

Страница 4: ...nd instructions for future reference 5 1 Work area Keep work area clean and well lit Cluttered and dark areas invite accidents Do not operate tools in explosive atmospheres such as in the presence of...

Страница 5: ...ck and are easier to control Use the tool accessories and tool bits etc in accordance with these instructions and in the manner intended for the particular type of tool taking into account the working...

Страница 6: ...ither fuel or oil in order to prevent soil contamination environmental protection Clean the hedge trimmer immediately after fuel has been spilt Do not spill any fuel onto the engine Wipe up if necessa...

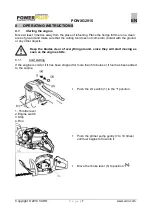
Страница 7: ...act with the ground or any other objects Keep the blades clear of everything around since they will start moving as soon as the engine starts 8 1 1 Cold starting If the engine is cold or if it has bee...

Страница 8: ...eed before moving up to full speed Note When restarting the engine immediately after stopping it leave the choke open Note Overchoking can make it hard to start the engine due to excess fuel If the en...

Страница 9: ...se only as much throttle as is needed to do the job Excessive engine speed is unnecessary Tilting the trimmer 5 to 10 towards the object to be cut will make things easier and produce good results Alwa...

Страница 10: ...ry Sparking plug Clean and readjust electrode gap V GAP 0 6 0 7mm replace if necessary Cylinder fins intake air cooling vent Clean V Silencer spark arrester cylinder exhaust port Clean V Shaft Throttl...

Страница 11: ...leaner cover and remove the dust If the element is dirty clean it by tapping it or by blowing away the dirt If the element is bent or damaged replace it After you have cleaned the element reattach it...

Страница 12: ...ntil it stops naturally Remove the sparking plug and put in 1 2cc of 2 stroke oil in the engine Pull the starter rope 2 3 times set the plug back and stop it at the contraction position Apply anti rus...

Страница 13: ...ngth 600mm Blade speed 1650r min Max engine speed 8500r min Engine idle speed 3400r min Clutch engagement speed 4300r min Output power 900W Engine oil gasoline mixed ratio 1 40 14 NOISE Noise emission...

Страница 14: ...Remove clean and reinstall filter Have carburettor adjusted by an Authorized Service Centre Engine sputters Incorrect carburettor mixture adjustment setting Air filter is plugged Old or improperly mix...

Страница 15: ...tration intentional damage on purpose or by gross carelessness inappropriate usage use for purposes for which the device is not suitable incompetent usage e g not following the instructions given in t...

Страница 16: ...odification of the apparatus voids this declaration European Directives including if applicable their amendments up to the date of signature 2004 108 EC 2006 42 EC 2000 14 EC Annex V LwA 107dB A 114dB...

Отзывы: