Vapac VapaNet LFE Series Скачать руководство пользователя страница 14

14 


Other Maintenance: 


Should  only  be  carried  out  by  a  qualified 
electrician. 


The  steam  cylinder  should  be  drained  prior  to 
carrying out any maintenance in the steam section 
– This must be done prior to isolating the electrical 
supply, i.e. before removing the front access panel. 


The  unit  should  be  isolated  from  the  electrical 
supply  before  any  cover  or  access  panel  is 
removed. 


2.2 

Service and Maintenance 

 
As  the  operation  of  the  Vapac  is  entirely  automatic,  it 
normally  requires  no  attention  on  a  day-to-day  basis.  
General  cleaning  and  maintenance  of  the  component  parts 
of  the  Vapac  are  recommended  at  intervals  of  about  one 
year, but this is largely dependent upon the frequency of its 
use and the quality of the water supply.  Where the Vapac is 
part  of  an  air-conditioning  system  being  serviced  regularly, 
the Vapac should be inspected at the same time. 


2.2.1 

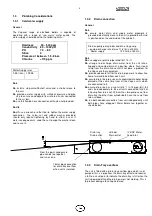
Feed Valve with Strainer 

 
The nylon bodied solenoid valve incorporates a small nylon 
strainer which is a push fit in the 3/4" inlet of the valve.  With 
a  new  plumbing  installation,  residual  loose  solid  material  in 
the pipework could partially block the strainer after start-up.  
If for this or any other reason a restriction of the water flow is 
suspected  (outside  of  supply  pressure  considerations),  it 
would be possible to clean the strainer as follows:- 
Turn off the water supply to the Unit. 
Undo  the  nylon  nut  connecting  the 
flexible  connection  to  the  valve  
inlet . 
The strainer can be removed using 
‘long-nosed’ pliers to grip the centre 
flange  provided  on  the  strainer  for 
this purpose. 
Withdraw the strainer. 
Wash and replace it. 
Reconnect  and  turn  on  water 
supply. 
Reconnect electrical supply to allow 
unit to operate. 

 
Note:    Always  replace  the  strainer 
after  cleaning  as  it  is  required  to 
prevent  material  lodging  in  the 
valve  seat  or  blocking  the  small 
flow control restrictor which is fitted 
in the valve. 

2.2.2 

Drain Pump


The pump should be inspected and cleaned regularly.  It 
is  recommended  that  this  is  done  at  each  cylinder 
exchange especially in hard water areas. Failure to keep 
the  pump  clear  and  operational  will  result  in  reduced 
cylinder life. 
 
To  remove  the  pump for maintenance  purposes  proceed 
as follows: 


Depress  and  hold  the  manual  drain  switch  to 
empty  the  cylinder.  The  pump  sound  changes 
distinctly when the cylinder is empty. When this 
occurs release the switch. 


Disconnect unit electrical supply and follow the 
steam  section  removal  instructions.  Once  the 
steam  section  has  been  removed,  the  pump 
can be removed. 


Ease  the  pump  body  away  from  the  cylinder, 
sliding it fully off its base plate and release the 
connecting  tube..  As  the  pump  inlet  is 
withdrawn  from  its  ‘O’  ring  connection,  some 
hot  water  may  be  released,  so  care  should  be 
taken. 


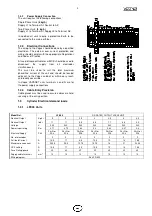
To  dismantle  and  re-assemble  pump  refer  to 
the diagram below. 


In  operation  the  stainless  steel  shaft  remains 
stationary while the rotor and impeller rotate on 
it.  Remove  all  scale  build-up  on  the  shaft  so 
that the impeller can rotate freely. 


Ensure  that  the  ‘O’  ring  seal  is  correctly 
positioned  when  fitting  the  inlet  housing  to  the 
main pump body. 

When re-assembling, make 

sure  the  brass  spinner  is  replaced  on  the 
shaft  in  front  of  the  impeller. 

A  smear  of 

multipurpose  grease  should  be  applied  to  the 
‘O’  ring  so  that  the  impeller  housing  can  be 
rotated  into  position  without  distorting  the  ‘O’ 
ring  underneath  it  and  so  maintain  the  water 
seal. 


The  steam  section  should  be  refitted  by  following  the 
removal  instructions  in  reverse  order,  reversing  all 
instructions. 


Steam and Condensate Hoses 

 
The hoses used with and in the Vapac should be inspected 
at the normal service visits as part of normal maintenance. 
At the first signs of deterioration, a hose should be removed 
and replaced.


Valve with flow  

restrictor 


3/4 Nylon nut with washer as 

 part of flexible connector


Strainer 

Shaft 

‘O’ 
Ring


Rotor


Impeller


Spinner


Содержание VapaNet LFE Series

Страница 1: ...s This product meets the requirements of the RoHS Directive 2002 95 EEC This product will meet the requirements of the Low Voltage Safety Directive 2006 95 EEC and the EMC Directive 2004 108 EEC when installed in accordance with the instructions contained in this manual Failure to comply with these instructions may invalidate the manufacturer s warranty or any certificate declaration of conformanc...

Страница 2: ...al Selection 10 1 6 5 Security Circuit E P O Shutdown 10 1 6 6 Drain operation 11 2 0 Start Up Operation 11 2 0 Start Up Operation 12 2 0 1 Start up check list 12 2 0 2 Start Up Instructions 12 2 0 3 Commissioning Start Up 12 2 0 4 Features of VAPANET Electrode Boiler Unit 12 2 1 Service Advice 12 2 1 1 Procedure for Cylinder Exchange 12 2 2 Service and Maintenance 14 2 2 1 Feed Valve with Straine...

Страница 3: ...ht Check that the transformer primary winding connection is correct for the supply voltage at Vapac terminals A1 A2 The Vapac transformer must not be used to power other equipment To comply with EMC aspects see recommendations on page 8 Use a high limit humidistat to ensure positive interruption of unit operation when over humidification is detected It is important to note that the control signal ...

Страница 4: ...uld prevent access to the under side Don t mount the unit in an area which will be hosed down Don t install the unit where the ambient temperature can exceed 35 C or fall below 5 C Don t mount the unit inside a cold room or other place where temperature and humidity conditions can cause condensation on electrical components Don t mount the unit where the sound of a contactor opening closing and wa...

Страница 5: ...with the four blanking plates provided with unit The spigot should be placed in one of three positions as shown below the other two outlets should be blanked off Duct work connections view from under side of unit Discharge end Inlet end Note only one spigot is required each end the other two ports must be blanked off with blanking plates provided The spigot dimensions are The unit can have free ai...

Страница 6: ...in at 60 Hz Do s Do use copper or plastic pipe rated for 110 oC Do arrange to discharge drain water from the unit into a trapped and vented drain at a position where flash steam rising from the drain line vent will not pose a problem for the Vapac or other equipment Do provide adequate fall for the drain pipe work to allow free flow of water drained from each unit Do ensure drain line pipe size wi...

Страница 7: ...Arrangement Control Cable Security Circuit Screening Arrangement Tail to be kept short less than 50mm Cables to control terminals Screen left intact Outer insulation Earthed back panel Note 24 V a c Control Circuit Transformer Primary Circuit 3 15 A 20 mm T Time Lag fuse Pt No 1080096 mounted on VAPANET Echelon PCB Pt No 1150655 There is one control fuse which protects the transformer primary circ...

Страница 8: ...o the Vapac cabinet or within easy reach and readily accessible In Vapac VAPANET units terminals L and N are for the power supply connections 1 4 4 Cable Entry Provision Cable glands must be used to ensure cables are held securely at the entry position 1 5 Cylinder Electrical demand loads 1 5 1 LFE05 Units Model Ref LFE 05 DE RATED OUTPUT LFE 05 UNIT Nominal Output Kg hr 5 5 2 5 3 3 5 4 4 5 Nomina...

Страница 9: ...l Selection below 1 6 3 Proportional Control The VAPANET Electrode Boiler LFE models can all be operated by either a potentiometric signal or by one of the following standard proprietary DC analogue signals Input signal Standard On Off 1 0 5 V dc 2 0 10 V dc 3 2 10 V dc 4 1 18 V dc 5 0 20 V dc 6 4 20 mA 7 Pot Response 20 100 NB The control signal is connected to ground at the PCB if the controller...

Страница 10: ... P O Shutdown As standard units are shipped such that terminals 9 10 are provided for connection of an E P O Emergency Power Off switch or fire shutdown facility Other control interlocks such as high limit humidistat airflow switch and or fan interlock and time switches etc should also be connected here Use of the 24V supply of the VAPANET unit to power other items of equipment will invalidate the...

Страница 11: ...nk 58 DI3 Link for Additional drainage If required 1 6 6 Drain operation As standard the unit is set for Economy mode which has a reduced automatic drain rate which will reduce the amount of hot water and therefore energy which is expelled to drain If the supply water is very conductive or if the unit experiences operational difficulties it may be necessary to introduce additional drain cycles thi...

Страница 12: ...d the unit is switched on the user LED s will flash green amber at a rate depending on the demand input and the actual current drawn The actual run current is monitored and until the actual current has two feeds above 95 the LED will flash green amber when the current is above 95 for two consecutive feeds the LED s will flash red 2 0 4 Features of VAPANET Electrode Boiler Unit The VAPANET system o...

Страница 13: ... clear the right hand mounting support When it is clear lower the drain tray clear of the unit B Remove the cylinder as follows 1 Slide the drain pump and feed adaptor away from the cylinder until they are clear of the cylinder feed drain boss and the pump body is clear of the pump mounting plate Take care to note the orientation of the pump on the mounting plate as it will fit on more than one fa...

Страница 14: ... flow control restrictor which is fitted in the valve 2 2 2 Drain Pump The pump should be inspected and cleaned regularly It is recommended that this is done at each cylinder exchange especially in hard water areas Failure to keep the pump clear and operational will result in reduced cylinder life To remove the pump for maintenance purposes proceed as follows Depress and hold the manual drain swit...

Страница 15: ...15 3 0 Location of Indicators and Controls 3 1 Positioning of Indicators and Controls on Vapac Vapanet LEFC Units ...

Страница 16: ... RED Flashing 2 second period Unit initialising If remains in this state then unit does not a valid UCP1 fitted Prior to the start of the initialisation process the LEDs will flash Green Red Amber repeatedly for 10 seconds to check that the LEDs are operating correctly Remedy 1 Check that UCP1 is fitted to plug fitted to CR4 pins 7 8 see page 12 ...

Страница 17: ...nit Online The variable period is determined by the demand signal Demand LED ON RED LED OFF 12 5 0 5 seconds 3 5 seconds 25 1 0 seconds 3 0 seconds 37 5 1 5 seconds 2 5 seconds 50 2 0 seconds 2 0 seconds 62 5 2 5 seconds 1 5 seconds 75 3 0 seconds 1 0 seconds 87 5 3 5 seconds 0 5 seconds 87 5 ON RED Continually The above are purely indications of the current state of the unit and require no action...

Страница 18: ...ne voltage can be measured here check the wiring between CR1 pins 5 6 of the same daughter board and CR2 pins 1 3 of the main control PCB If this is also correct then either the daughter board or the main control PCB is faulty Once the fault has been cleared the LED indications will revert back to the cylinders current state 5 Service the unit by following the instructions on pages 15 16 User LED ...

Страница 19: ...19 3 3 Facia Label symbols 1 ...

Страница 20: ... cylinder Water in cylinder and overflowing Checks Check water stop valve is open Check internal Vapac hose connections for a leak Check internal hoses for kinks or obstructions Unit On Line but inadequate or no steam production Possibilities Contactor not made Cylinder scaled up Checks Contactor coil Control PCB Cylinder Inspection replace if necessary Automatic Stop Drain Fault indicated Possibi...

Страница 21: ...21 ...

Страница 22: ...umber 1150656 8 8 3 1 2 P1 93 92 90 91 2 1 SHUTDOWN EPO TEMPERATURE INPUT ALARM FAULT RUN STATUS INPUT CONTROL DAUGHTER BOARD PART NO 1150636 RIBBON CABLE CONNECTION 230 VOLT SUPPLY 50 60 Hz N PE A1 A2 2 1 1150599 ELECTRO BOILER CYLINDER Pink 0 75mm2 21 BLUE 1 5mm2 BLUE 1 5mm2 N BROWN 2 5mm2 L1 BROWN 2 5mm2 Pink 54 53 Rosa 50 Violet Violet 50 N BLUE 2 5mm2 FAN MOTOR RECYCLING EC PART No 1240049 P1...

Страница 23: ...e in England by Vapac Humidity Control Ltd 041xxxx August 2011 Vapac Humidity Control Ltd reserve the right to change the design or specification of the equipment described in this manual without prior notice ...

Отзывы: