background image

31

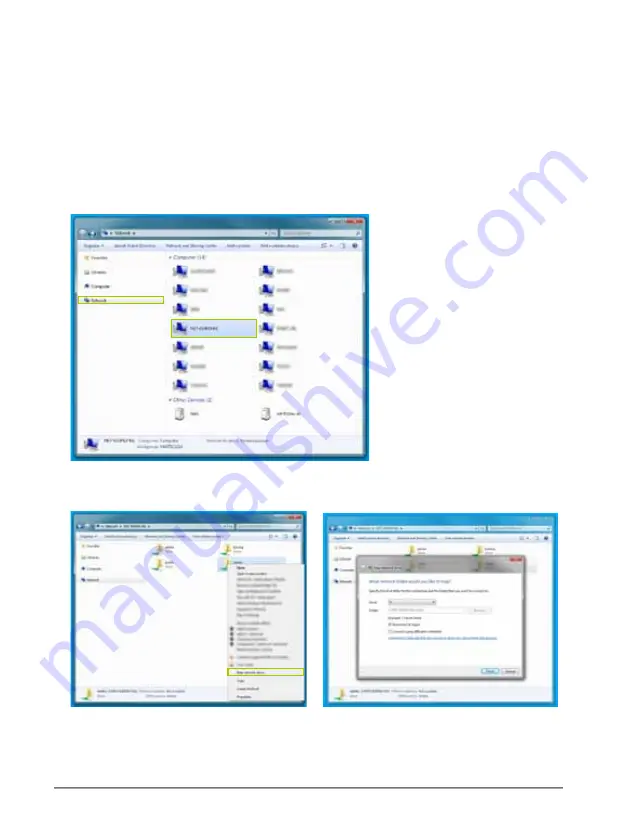
10. Mapping Network Drives

Below are directions to map the shared folders on your NexStar FX Gigabit NAS Adapter as 

Network Drives on your computer system (Showing NAS disk drive in network).

1. Press the “Start” button on Windows desktop.

2. Open up “Computer” and navigate to “Network.”

3. Search through the list of devices connected to your network for the NexStar FX.

4. Double click to enter the NexStar FX (Eg. NST-610NU-N1).

5. You may be asked for authentication. Please enter the User login and Password you have 

created under SMB.

6. Choose the folder you wish to map.

7. Right-click the mouse button and select “Map Network Drive”.

8. You can designate the drive path for the respective folder.

Note:

 For faster connection and usability, we recommend that you map folders which you 

use constantly as network drives. This creates a direct access to the shared folders on the 

NAS from My Computer.

Содержание NexStar FX

Страница 1: ...Copyright 2010 Vantec Thermal Technologies All Rights Reserved User s Manual...

Страница 2: ...5 6 7 TRADEMARKS MS DOS Xbox Microsoft Windows NT 2000 XP Vista 7 are trademarks of Microsoft Corporation PS3 and Playstation are trademarks of Sony Corporation Apple iTunes Macintosh and Mac are trad...

Страница 3: ...t 3 NexStar FX NAS Manager 4 NexStar FX NAS GUI 5 SAMBA Server SMB 6 FTP Server 7 Media Server Connection Xbox PS3 8 Printer Server 9 Mac Installation Mac 10 5 4 or above 10 Mapping Network Drives 11...

Страница 4: ...s a flexible economical and powerful unit for your network Please follow the instructions below which will help you to connect to set up and to configure the device Network environment There are 3 dif...

Страница 5: ...3 2 Parts Layout LAN Connection Operation System Power Indicator Connect to LAN Reset Button Connect to USB Storage Connect Power Adapter Connect to USB Printer...

Страница 6: ...SearchDisk 1 Run the Utility CD enclosed in package and navigate to the Search Utility folder Run SDisk jar 2 Select Search Next and when the NexStar FX is found click Connect 3 The default login is...

Страница 7: ...gabit NAS Adapter by using Windows Internet Explorer 1 Open IE browser and type in the default host name NST 600NU in the search bar 2 The default login is admin for both user name and password click...

Страница 8: ...ease click on the respective flags to select your language 4 1 Hard Disk format For first time installation you need to format the hard disk into FAT32 file system This procedure can be done by clicki...

Страница 9: ...ent name type in the new name and click Apply to save setting Group Name This should be same as your workgroup In general the default WORKGROUP will be OK But if your workstation belongs to a differen...

Страница 10: ...is avail able we recommended setting SNTP to Network time service instead 4 5 LAN Config By default the IP Setting is set to Automatic IP This is the recommended setting and will allow the NexStar FX...

Страница 11: ...emand The router will ONLY connect itself to your ISP when there s internet request demanded by any LAN user and disconnect itself when the transaction is done Idle Time Seconds Idle time means the st...

Страница 12: ...setting Format For the first time installation you need to format the hard disk into FAT32 system file this procedure applies to both new or used hard disk Scan Disk After the scan it will show the n...

Страница 13: ...art the update Wait and DO NOT power off or remove the device during the firmware update This might take a few minutes Once the update is complete it will prompt you to reboot the device Click on Rebo...

Страница 14: ...t guest folder is created and shared to all users from under the same network as the NexStar FX NAS Note Use only English alphabet for folder names and no special characters when creating new folders...

Страница 15: ...1 to demonstrate enter password and click Next to enter share management You can Run from Windows start button type and follow by the NexStar FX s IP address eg 192 168 1 10 and click OK to continue T...

Страница 16: ...14 Now you have successfully set up the folder that you wish to share on your NexStar FX NAS This folder can be accessed from other computers on your local network...

Страница 17: ...nt name User1 and than click Modify Enter new password and click Apply to save setting 5 3 How to delete a user account Select an account you wish to delete click Delete to proceed Please note that al...

Страница 18: ...ransfer files with a different encoding different language choose the corresponding language from the drop down list In order to transfer and view the files correctly it is important that you select t...

Страница 19: ...before setting up FTP server Select FTP server and clicks Add button and enter a name and password for the new FTP account and click OK to continue In the account list you can see an overview of the e...

Страница 20: ...or FTP account name 6 2 How to delete FTP account In the Account List you can see an overview of the existing accounts and status you can change them at any time by selecting the account and modifying...

Страница 21: ...7 1 Xbox When you turn on the Xbox 360 DLNA Media Servers on the same network are automatically detected 1 Move to the My Xbox page Router Modem ADSL DSL Cable etc To Internet Ethernet Cable NAS DLNA...

Страница 22: ...ay 7 1 PS3 When you turn on the PS3 system DLNA Media Servers on the same network are automatically detected and icons for the detected servers are displayed under Photo Music and Router Modem ADSL DS...

Страница 23: ...a network For details on network settings see Settings Network Settings Internet Connection Settings in this guide You can initiate a search for DLNA Media Servers on the same network Use this feature...

Страница 24: ...ted to the NAS you must install PL 6200L driver into your computer first After driver installation please click Start Setting Printer and Faxes Add a printer Next 2 Connect the USB printer to NexStar...

Страница 25: ...23 4 Select Create a new port Type of port choose Standard TCP IP Port and click Next to continue...

Страница 26: ...24 5 Enter the NexStar FX NAS IP address Eg 192 168 15 100 then click Next to continue 6 Select Custom and go to Setting...

Страница 27: ...TCP IP printer setup 9 Go to Printer server page and check printer server status If status shows OK the printer is setting up successfully Notes NexStar FX Printer server does not support GDI Host ba...

Страница 28: ...lity SDisk jar 1 Copy the software tool SDisk jar from the CD ROM 2 Run SDisk jar Click Search Next and the NexStar FX s IP address will be listed Click connect to load your Web Browser and proceed wi...

Страница 29: ...will appear under Shared Devices If the Workgroup is different please click All and look for the NexStar FX 3 After you enter into the NexStar FX you can choose the existing folders and access its con...

Страница 30: ...to the NexStar FX you can choose the existing folders and access its contents 4 You will be prompted for log in You can use Guest or other identities you have created 5 Once you have properly logged i...

Страница 31: ...g Connect to Server 1 Click Go and navigate to Connect to Server or use Command K 2 Type in the following smb 192 168 1 112 Eg If the NexStar Fx s IP is 192 168 1 112 3 You must log in You can use Gue...

Страница 32: ...30 4 Once the authentication has gone through the NexStar FX folder will be listed under...

Страница 33: ...ork for the NexStar FX 4 Double click to enter the NexStar FX Eg NST 610NU N1 5 You may be asked for authentication Please enter the User login and Password you have created under SMB 6 Choose the fol...

Страница 34: ...can t I create share folders in SMB or FTP server A To avoid languages support issue we suggest to create share folders with English characters only Q Why can t I upload the files via LAN connection o...

Страница 35: ...o the NexStar FX or fail during file transfer A Due to software design it s possible that certain FTP software is not compatible with the NexStar FX The NexStar FX NAS is tested with the most popular...

Страница 36: ...arranty exchange or repair Cosmetic defects and missing parts are not covered under this warranty Please check the content of the unit to make sure you received all parts Also check for any cosmetic f...

Отзывы: