


I N S T A L L A T I O N
©Vantage, 8/16/2016 / IS-0583-B
Equinox 41 LCD Keypad – MODEL: EQ41TB-TI
page 2 of 4
RJ45
connector
mounting
plate
Equinox 41
LCD Screen
PoE / PoE+
Ethernet Bus
Screws*
*Use flat-head screws provided
US – 6-32 x 0.75
″
*
Ethernet POE,
or POE+
Home
Network
Panel
Or
Switch
Equinox
TouchScreen
Set 1/16” hex screw
in station bottom
Press and hold here on
front, bottom center
Press and
hold on
front,
bottom
center
↓
I.
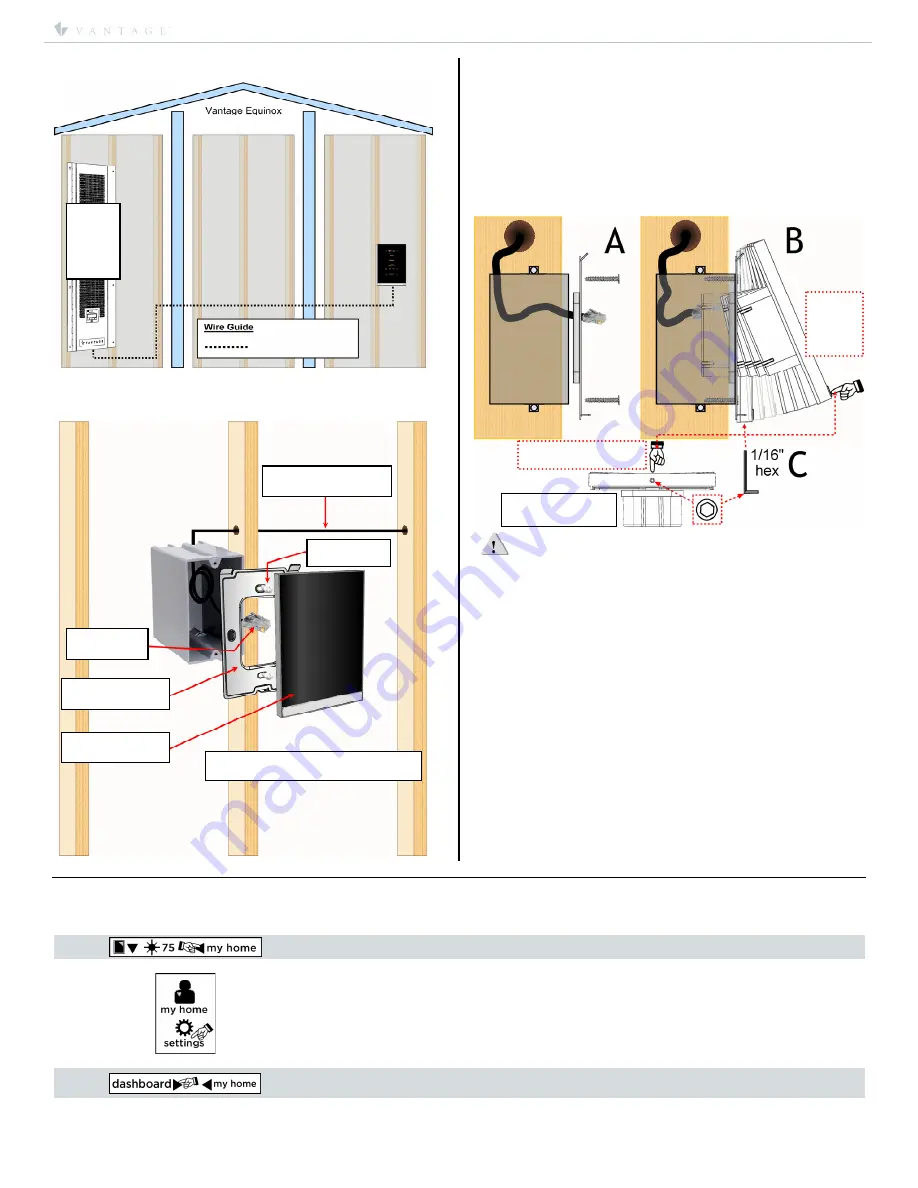
Installation Overview
*Ethernet Bus: Power & communication; Ethernet, PoE or
PoE+, (
Optional)
- Ethernet 4 Port PoE Injector part# DA2400.
Station Install Steps
1.
Run PoE Ethernet bus to single-gang box.
2.
Install mounting plate
with screws provided
(see
A
in
*
Side
View Illustration
)
. Do not bend mounting plate
3.
Connect RJ45 to station.
4.
Install station by rotating
(see
B
in
*
Side View Illustration
)
and
connecting the top first. Then press station in and hold on
bottom center while securing the hex screw with provided
allen wrench
(see
C
in
*
Side View Illustration
)
.
*Side View Illustration:
CAUTION:
Do not over tighten the 1/16” hex screw in station
bottom. If screw will not go in, the mounting plate may need
slightly loosened and/or have a thin spacer inserted between the
wall and mounting plate. The wall must be made flat if there is
still a problem.
II.
Configuration
1.
Connect PoE Ethernet bus.
2.
Highlight station in Design Center; click
Configure Stations
.
a.
In
Settings | System Preferences | General
Preferences,
Make sure
Exclude Ethernet bus when
configuring stations,
is not checked.
3.
Station displays
configure mode, touch to configure
– tap
station.
-OR-
4.
The station may also be configured by typing the serial
number in the project file. Using this method the station will
be configured when the system is programmed.
Device & Info Settings
Device Settings are accessed through the
Profile
pages.
NOTE:
Changes on the device page are specific to the device and are not part of any profile setting
.
1.
Press the profile button,
my home,
upper right, in this example.
2.
Press the
settings
button on the next screen.
3.
The first time
settings
is pressed the screen will go to the dashboard edit screen.
Press dashboard, upper left, to open the
settings
menu.


