


vM CT360 STEREO CD TRANSPORT
7
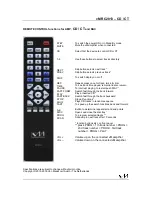
Controls
Precautions
Connections
Maintenance and advice
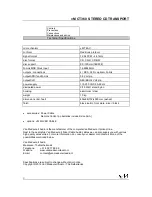
Technical Specifications
The digital outputs are clocked for the different digital inputs.
By switching over between inputs, there can be a synchronicity moment occur where by the
transport stays in the mute mode. In that situation, the CT360 can be reset by switching off with the
power switch for approximately 10 seconds and then again to on.
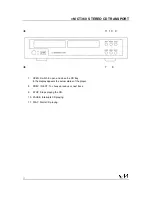
The SPDif XLR, RCA and optical outputs are able to transmit digital stereo signals to converters
capable to receive 16bit/44.1kHz. This is the standard CD format.
The Q-Link outputs send the DATA, LRCK and BCK from the CD transport to the DAC. The MCK
master clock input must receive a frequency of 16.9344MHz from the DAC.
When this MCK is received, in the front display the indication LED (5) goes on.
All audio CD’s, CD-R’s and CD-RW’s can be played without a problem only when they are
produced following the Red Book protocol.
For your convenience you will find a red sticker, indicating the mains
“phase”. The phase of your
electricity system can be determined with a voltage seeker.
The transport must only be cleaned with a cloth, impregnated with a Ph-neutral cleaning fluid. And
it must be mildly moist! NEVER use strong fluids and/or erasers. Before cleaning ALWAYS remove
the power cord from its wall socket, by its plug not by its cord.
The optimum operating temperature is reached after approx. several hours of continuous play.
Then it will be possible to start enjoying the superb van Medevoort audio qualities of this transport.
Test this time in your own setup.
We strongly recommend that you use a high quality interconnect cable. E.g. the renowned van
Medevoort Silver Cable. Also for the power cords.
Содержание CT360
Страница 1: ...C T 3 6 0 INSTRUCTION MANUAL...