


Pay attention
•
This manual is not project specific.
•
This manual is not legally binding.
•
No rights may be derived from this installation manual.
•
See
datasheet ValkCableCare
for cable management.
•
The system is placed in the middle zone of the roof.
Index
Disclaimer
Select
wind
area Page
-
Required
ballast
Page
-
Required
tools
Page
00a
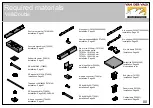
Required
materials
Page
00b
General
dimensions
Page
00c
Placing roof carriers
Page 01
A-frame
connector
Page
02
Push
rods
Page
03
Aluminium
profile
Page
04
Aluminium
profile
Page
04.2
Push
rods
Page
05
Ballast
Page
06
Placing
panels
Page
07
Placing
panels
Page
08
Cable
clamp
Page
09
Installation manual
Valk
Double
Содержание ValkDouble
Страница 1: ...Version 01 December 2021 Installation manual ValkDouble...
Страница 28: ...09 Mount cable clamp on the panel...


