background image

10.

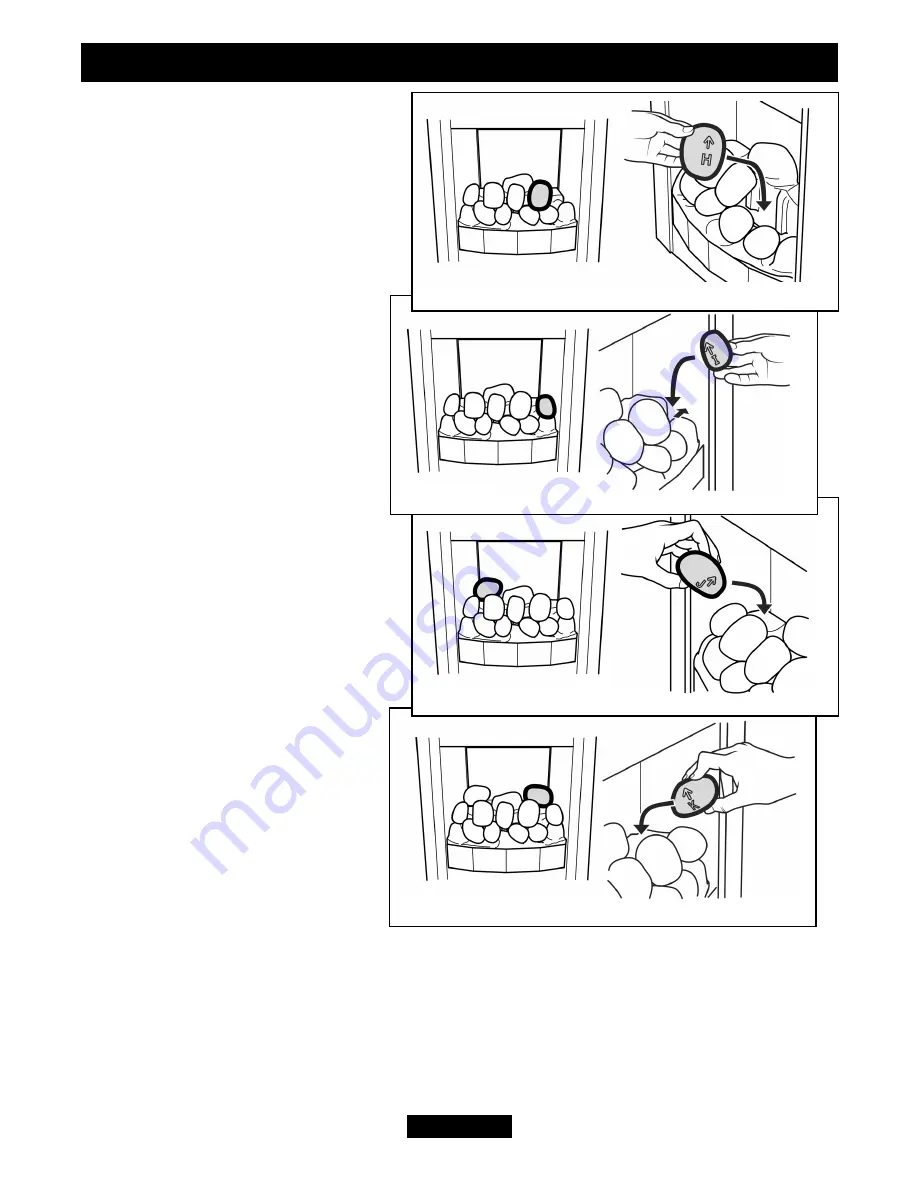
Hold pebble ‘H’ upright with the

arrow pointing to the top. Place
pebble ‘H’ between the front and rear
base pebbles. It should rest in
between pebbles ‘C’ & ‘D’ and
against the moulded pebble in the rear
pebble base. (See figure 20).

11.

Hold pebble ‘I’ upright with the

arrow pointing to the top. Place
pebble ‘I’ between the front and
rear base pebbles. It should rest
against the side of the firebox (See
figure 21).

12

. Hold pebble ‘J’ upright with the

arrow pointing to the top. Place
pebble ‘J’ on top of the base pebble
rear. (See figure 22)

13.

Hold pebble ‘K’ upright with the

arrow pointing to the top. Place
pebble ‘K’ on top of the base pebble
rear. (See figure 23)

Page 15

OWNER GUIDE

Figure 23.

Figure 22.

Figure 21.

Figure 20.

Содержание quantum 746

Страница 1: ...NCE IS FOR USE WITH PROPANE GAS G31 THIS APPLIANCE IS SUITABLE ONLY FOR INSTALLATION IN THE UNITED KINGDOM GB AND THE REPUBLIC OF IRELAND IE We trust that these instructions give sufficient details to...

Страница 2: ...s a member of the Society of British Gas Industries which works to ensure high standards of safety quality and performance Careful Installation Valor is a CORGI registered company All our gas fires mu...

Страница 3: ...REFITTING CERAMIC PEBBLES 12 MAINTENANCE 16 Owner Replaceable Parts 16 Regular maintenance 16 Servicing 16 USEFUL TELEPHONE NUMBERS 17 This gas fire is designed to meet the most stringent quality perf...

Страница 4: ...the installation instructions Do provide a minimum clearance of 750mm from the top surface of the hearth to any shelf made of wood or other combustible material where the shelf is not more than 150mm...

Страница 5: ...discoloured when close to a heating appliance Please bear this in mind whenever you are considering redecorating Do provide a minimum side clearance as detailed in figure 1 Please bear this in mind if...

Страница 6: ...APPLIANCE DIMENSIONS Page 6 OWNER GUIDE Figure 1 Appliance dimensions Quantum Urban...

Страница 7: ...Carbon Monoxide detector The device will also automatically shut off the gas supply to the fire if the pilot flame goes out due to lack of oxygen or for any other reason If this device starts to repe...

Страница 8: ...en repeat the ignition procedure Lighting the Main Burner Once the pilot light is established the main burner can be lit by depressing and turning the control knob anticlockwise to the High position S...

Страница 9: ...s with a slightly damp cloth and then dry Do not use abrasive cleaners as these will scratch the fire surface Front surround Clean the metal parts with a slightly damp cloth and then dry If this does...

Страница 10: ...ble fuel bed see section fuel bed refitting ceramic pebbles 1 Place the rear base coal in the firebox It should rest on the ledges at the rear sides of the burner unit When located gently move the rea...

Страница 11: ...uld be upright 5 Place a type A coal between the front and rear base coals with the letter A upright The top of the coal should rest against the centre coal of the rear base coal as shown in figure 8...

Страница 12: ...ect fuel bed only For Coal fuel bed see section Fuel bed refitting ceramic coals 1 Place the rear base pebble in the firebox It should rest on the ledges at the rear sides of the burner unit When loca...

Страница 13: ...re 13 3 Hold pebble A upright with the arrow pointing to the top Place pebble A on top of the front base pebble The pebble should rest against the moulded pebble to its left See figure 13 4 Hold pebbl...

Страница 14: ...rest against the side of the firebox See figure 17 8 Hold pebble F upright with the arrow pointing to the top Place pebble F between the front and rear base pebbles It should rest on top of pebble A B...

Страница 15: ...th the arrow pointing to the top Place pebble I between the front and rear base pebbles It should rest against the side of the firebox See figure 21 12 Hold pebble J upright with the arrow pointing to...

Страница 16: ...flues wherever situated are checked annually Servicing In the United Kingdom servicing can be carried out either by a Valor service engineer or a CORGI registered installer If you require your fire t...

Страница 17: ...065 for all enquiries USEFUL TELEPHONE NUMBERS General advice about gas and your gas fire VALOR TECHNICAL HELPLINE 08706 061 065 To report faults or arrange for your fire to be serviced VALOR SERVICE...

Отзывы: