17.Elapsed playing time
18.Playback information
19.Volume indicator
Playing CD Files
After inserting a CD disc, files will play in the sequence of the directory. In playing back, you can
press the numeric button on the remote control or touch a track on the onscreen directly to play.
Previous/Next Page
Touch the
or
on the screen to navigate through the pages/files.
Fast backward/fast forward
Touch the
or
on the screen to Fast backward or fast forward play.
MP3/WMA Discs
This player allows you to playback MP3/WMA files recorded on CDROM, CD-R, CD-RW,
DVD+R/RW and DVD-R/RW. For CD-RW discs, please make sure they are formatted using the
full method and not the quick method to prevent improper disc operation. Use the following
settings when compressing audio data for your MP3 disc:
• Transfer Bit Rate: 320kbps
• Sampling Frequency: 48kHz
When recording MP3 up to the maximum disc capacity, disable additional writing. For recording
on an empty disc up to maximum disc capacity, use the "Disc at once" setting.
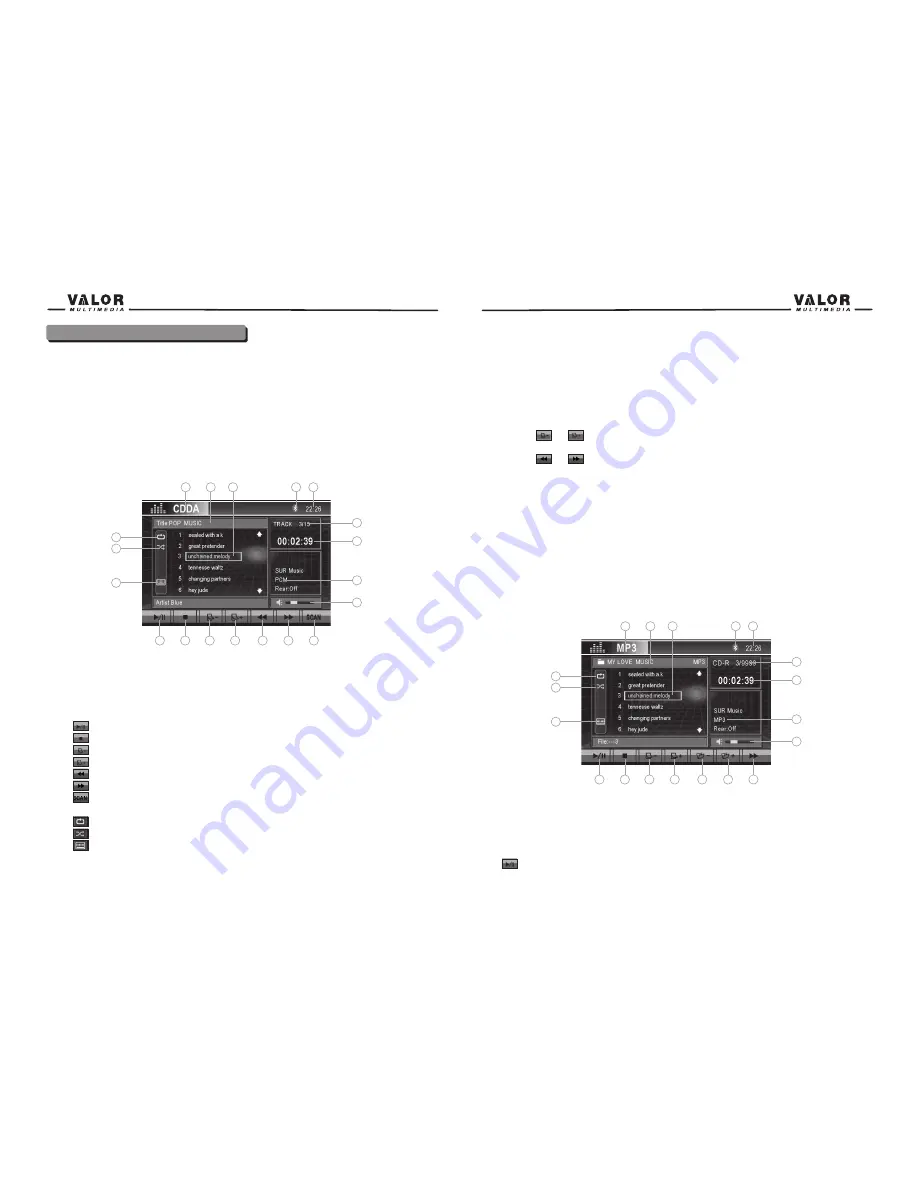
The touch keys for MP3/WMA CD/DVD playback are described below.
1
2
6
7
15
3
4
5
17
16
18
13
14
19
12
8
9
10
11
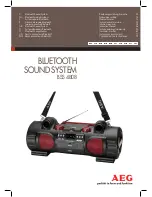
1.Current source indicator, touch this area to access MAIN menu.
2.Disc title
3.Track title
4.Bluetooth indicator
5.Current time
6.
: Touch to play/pause
37
36
CD/MP3/WMA/JPEG Operation
Instructions for Insert/Eject, Play/Pause, Stopping Playback, Track Selection, Fast
Forward/Fast Reverse, Scan, and Random Play are the same for DVD, CD and MP3 operation.
Please see the DVD Player Operation section for information about these topics.
The file naming formats listed below are compatible with this unit:
• ISO 9660 – file name: 12 characters, file extension: 3 characters
• ISO 9660 – file name: 31 characters, file extension: 3 characters
• Joliet – 64 characters
If the file or folder name does not conform to ISO 9660 file system standards, it may not be
displayed or played back correctly.
CD Player User Interface
1
2
6
7
15
3
4
5
17
16
18
13
14
19
12
8
9
10
11
1.Current source indicator, touch this area to access MAIN menu.
2.Disc title
3.Track title
4.Bluetooth indicator
5.Current time
6.
: Touch to play/pause
7.
: Touch to stop disc playback
8.
: Touch to turn to the previous page
9.
: Touch to turn to the next page
10.
: Touch to fast backward current track
11.
: Touch to fast forward current track
12.
: Touch to activate/deactivate Scan And you can press the (Title) button on the remote
control to toggle the scan function “on/off”
13.
: Touch to activate/deactivate Repeat Single Mode
14.
: Touch to activate/deactivate Random Mode
15.
: Touch to display the numeric keypad on the screen and then you can use the numeric
keypad to access a track directly.
16.Current track and total number of tracks on disc
Содержание ITS-710W
Страница 1: ...ITS 710W...