background image

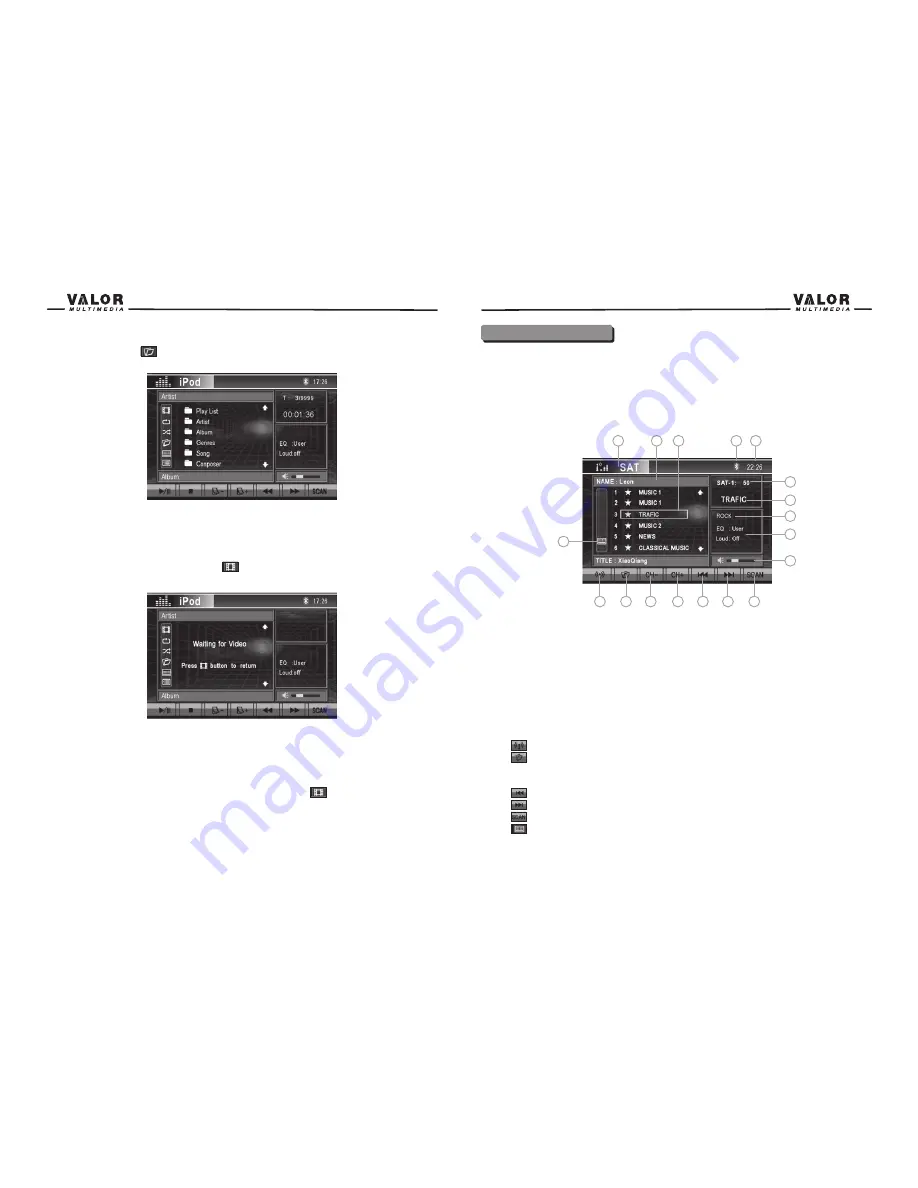
Accessing Sat Radio Mode


To switch to Sat Radio mode, press the 

MODE

 button on the front panel or the (

SRC


button on the remote control until SAT appears at the top of the screen. The touch keys for 


Sat Radio playback are described below.


NOTE:

 An optional Terk XM Direct Universal Tuner box and XM Antenna is required to receive 


XM Radio, along with a subscription to XM Radio. Check with your dealer for these optional 


Devices.


1. Current source indicator, touch this area to access MAIN menu.


2. The artist information of the channel the playing back currently.


3. The preset channel currently playing back.


5. Current time indicator.


6. Current Band and channel number indicator.


7. Current channel name indicator.


8. Current channel category indicator.


9. Playback information.


10. The volume indicator.


11.

 : Touch to change among the following bands: SAT, SAT-1, SAT-2, SAT-3.


12.

 : Touch to open the category folder list.


13. Touch to scan to the previous channel.


14. Touch to scan to the next channel.


15.

 : Touch to scan the previous available channel of current category.


16.

 : Touch to scan the next available channel of current category.


17.

 : Touch to activate/deactivate Scan Mode.


18.

 : Touch to display the numeric keypad on the screen to access a channel directly.


4. Bluetooth Indicator

Sat Radio Operation

32


when you press the  


 button, the touch screen will display the following.


The TFT displays the root directory list classified in the iPod, from which you can select your 


favorite songs.


You can choose a play list from your iPod play lists and then select a song to listen to. 

Playback of video on iPod


For playback of video on iPod, press the   


button to enter, the touch screen will display the 


following.


If there are videos on iPod, you will regain control of your iPod by use of the ClickWheel. Using 


your iPod, select your video of choice. Press play on the iPod to start playback. To end 


playback, press the MENU button on your iPod. Ensure your iPod TV OUT setting is turned ON. 


Otherwise there will be nothing on the display. 


However, you can return to listen to your music by pressing the   


button again.

31

1

2

3

5

6

7

8

9

10

11

12

13

14

15

16

17

18

4

Содержание ITS-703W

Страница 1: ...ITS 703W...

Страница 2: ...Menu System Reset Mute System Setup Menu MAIN Menu Screen Setting General Setup Menu Standby Tuner Operation Tuner TFT Display Switch to Radio Tuner source Select FM AM Band Auto Tuning Manual Tuning...

Страница 3: ...PEG Discs iPod Operation Accessing iPod Mode iPod Instructions Playback of video on iPod Sat Radio Operation Accessing SAT Mode Auto Scan Manual Scan Storing a Channel Recalling a channel Bluetooth Op...

Страница 4: ...ed these tools and supplies to install the unit Torx type flat head and Philips screwdrivers Wire cutters and strippers Tools to remove existing radio screwdriver socket wrench set or other tools Elec...

Страница 5: ...picture settings in picture setup 17 TFT DISPLAY 18 DISC INDICATOR LIGHT It is blue when there is no disc in the slot otherwise it is red 19 OPEN Press the OPEN button to open the motorized monitor fo...

Страница 6: ...or not 4 Loudness indicator Indicates the LOUD function is activated or not 5 Satellite SAT radio indicator The key areas of touch screen The touch key areas are outlined below for DVD VCD mode and al...

Страница 7: ...the following methods Press the or buttons on the front panel to adjust the tilt angle of the screen one step at a time Press and hold the or buttons to continuously adjust the tilt angle Adjust the...

Страница 8: ...measurements To get the best possible sound quality from your new system be sure to adjust the settings for the speakers as well Proper setting of the Fader and Balance enhances the effects of the ca...

Страница 9: ...10 13 12 12 NOTE The Bass and Treble levels are only adjustable when EQ is set to User mode The Loudness function compensates for deficiencies in sound ranges at low levels When the Loud function is o...

Страница 10: ...pad on the screen to adjust the hour or minutes 5 Press the OK button on the remote control or on the keypad of the screen to confirm setup Return to normal playback The system will automatically retu...

Страница 11: ...to Radio Tuner source Press the MODE button on the front panel or SRC button on the remote control to switch to the Tuner source Select FM AM Band Touch the BAND button on the screen or press the BAN...

Страница 12: ...7 8 9 18 Auto Tuning Press the button on remote control or touch the button on the screen to seek the next available channel by increasing the tuning frequency Press the button again to stop searching...

Страница 13: ...DVD main menu Controlling Playback Stopping Playback Touch the stop button on the screen or press the button on the remote control to stop DVD play and touch the play pause button on the screen or th...

Страница 14: ...ack directly Viewing an Alternate Picture Angle DVD Only Some DVD contain scenes that have been shot simultaneously from different angles For discs recorded with multiple angles press the ANGLE button...

Страница 15: ...a Feature for Adjustment Once inside a menu press the on the remote control or touch the item directly to select the feature to be adjusted Adjusting a Feature 1 Enter the option field for the featur...

Страница 16: ...se refer to the disc description ADULT 26 VIDEO Menu VIDEO Menu Features NOTE For standard discs not formatted for widescreen use of the 16 9 aspect ratio will result in image distortion RATING Parent...

Страница 17: ...topping Playback Track Selection Fast Forward Fast Reverse Scan and Random Play are the same for DVD CD and MP3 operation Please see the DVD Player Operation section for information about these topics...

Страница 18: ...k directly 19 Current track and total number of tracks on disk 20 Elapsed playing time 21 Playback information 22 Volume indicator 4 Bluetooth Indicator 1 2 3 5 6 7 8 9 10 11 12 13 14 15 16 17 18 19 2...

Страница 19: ...he next channel 15 Touch to scan the previous available channel of current category 16 Touch to scan the next available channel of current category 17 Touch to activate deactivate Scan Mode 18 Touch t...

Страница 20: ...button at the top of the touch screen to access Bluetooth mode directly Bluetooth User Interface Dial Interface 1 8 6 2 3 4 7 5 1 Current source indicator touch this area to access MAIN menu 2 Touch...

Страница 21: ...ctive Making a phone call There are four ways to make a phone call from this unit 1 Make use of the Number dial on the screen to make a call 2 You can enter the phone number using the numeric keypad a...

Страница 22: ...andsets are compatible with the Bluetooth hands free system Please check the compatibility list if you are experiencing connectivity problems If you are experiencing operation problems please contact...

Страница 23: ...40 39...

Страница 24: ...into the player as the mechanism can be damaged by foreign objects 5 Do not attempt to use a 3 8 cm CD Single disc in this unit either with or without an adaptor as it will damage the player and disc...

Страница 25: ...DVD RW DVD R DVD RW CD R CD RW CD DA MP3 WMA HDCD SVCD VCD MPEG JPEG MP3 WMA files burned onto a DVD R W or DVD R W and CD R RW Signal to Noise Ratio 85dBA Dynamic Range 95dB Frequency Response 20Hz...

Страница 26: ...es and Wires Manuals Others 1 2 3 4 5 6 7 8 9 10 11 12 13 14 No Item Front Remote Control Power Harness SAT Radio Cable iPod Cable Extended Parking Wire Main User Manual Compatible Phones BT list Wiri...

Отзывы: