background image

LIST OF CONTENTS

Section

Page

SAFETY 43
APPLIANCE DIMENSIONS 

45

GAS CONSUMPTION 

46

OPERATING YOUR FIRE 

47

The Oxysafe flame sensing and flue blockage safety system. 

47

To gain access to the control knob. 

47

To light the fire. 

47

Glass bowing. 

49

Lighting with a taper (For models that do not have glass panels). 

49

To turn off. 

49

CLEANING YOUR FIRE 

49

Glass parts. 

50

Metal Parts. 

49

Ceramic fuel effect. 

50

Burner. 51

FUEL BED REFITTING 

51

MAINTENANCE 51
WARRANTY AND SERVICE 

52

This gas fire is designed to meet the most stringent quality, performance and safety
requirements to provide you with many years’ trouble-free service.

This guide aims to improve your understanding and appreciation of your gas fire by
providing simple and informative instructions to ensure that you benefit from the
excellent performance and features it has to offer.

Page 42

© 

Baxi Heating U.K. Limited 2008.

OWNER GUIDE

Содержание Artura 958

Страница 1: ...ease leave this guide with the owner INSTALLATION AND OWNER GUIDE We trust that this guide gives sufficient details to enable this appliance to be installed and maintained satisfactorily However if fu...

Страница 2: ...address The Company Secretary Baxi Heating UK Limited The Wyvern Business Park Stanier Way Derby DE21 6BF Warning Any person who does any unauthorised act in relation to a copyright work may be liable...

Страница 3: ...the British Standards Institute The Highest Standards Valor Fires is a member of SBGI and HHIC Heating and Hot water Industry Council that work to ensure high standards of safety quality and performa...

Страница 4: ...Page 4 Baxi Heating U K Limited 2008 INSTALLER GUIDE INSTALLER GUIDE FOR OWNER GUIDE SEE PAGES 41 TO 55...
Страница 5: ...FITTING THE CERAMIC FUEL EFFECT 28 13 FULL OPERATING CHECKS 28 13 1 Check the control settings 28 13 1 1 Lighting the burner 28 13 1 2 Operating the burner 29 13 2 Check for spillage 29 13 3 Flame su...

Страница 6: ...hen lifting always keep your back straight Bend your legs and not your back Avoid twisting at the waist It is better to reposition your feet Avoid upper body top heavy bending Do not lean forward or s...

Страница 7: ...pect Glass and Tranquility Input Max Gross 5 2kW 17 742 Btu h Not available Aspect Glass and Tranquility Input Min Gross 3 3kW 11 256 Btu h Not available Fascination Input Max Gross 5 5kW 18 766 Btu h...

Страница 8: ...atory tract Consequently it is important to take care when handling these articles to ensure that the release of dust is kept to a minimum To ensure that the release of fibres from these RCF articles...

Страница 9: ...Wales the current edition of the Building Regulations issued by the Department of the Environment and the Welsh Office In Scotland the current edition of the Building Standards Scotland Regulations is...

Страница 10: ...at least 160mm The minimum shelf height will have to be taken from the base of the fireplace opening All models except Fascination Tranquility and Aspect Glass that are glass fronted appliances To pro...

Страница 11: ...and restrictive flues e g mortar extrusions too many bends flue heights below three metres restrictive terminations etc See figure3 4 2 4 If the fireplace opening is greater than the acceptable dimens...

Страница 12: ...ages 4 8 If the fireplace opening is an underfloor draught type it must be sealed to stop any draughts 4 9 The appliance must be mounted behind a non combustible hearth unless the conditions of sectio...

Страница 13: ...m height 700mm For a shelf deeper than 150mm Minimum height 700mm 12 5mm for every 25mm depth over 150mm See graph 1 4 15 Normal adventitious ventilation is usually sufficient to satisfy the ventilati...

Страница 14: ...l the installation and appliance have been thoroughly checked The A S D will shut the appliance down if an unacceptable amount of harmful products of combustion accumulate Under no circumstances shoul...

Страница 15: ...Landscape Serenity Visia Tranquility Aspect Glass A Appliance height mm 599 607 640 612 B Appliance width mm 520 976 930 505 C Appliance depth into room mm 61 72 40 50 D Minimum mandatory clearance t...

Страница 16: ...and Serenity fascia 2 Self tapping screws For securing the sides of Landscape Serenity and Visia fascia 6 Fibre wooden plugs Page 16 Baxi Heating U K Limited 2008 Figure 6 Pack contents 4 Woodscrews 2...

Страница 17: ...Page 17 Baxi Heating U K Limited 2008 INSTALLER GUIDE Figure 6 Pack contents continued...

Страница 18: ...ment area shown in figure 7 must be kept clear of obstructions 6 1 2 Fireplace general condition The fireplace floor should be reasonably flat to ensure that the hotbox can be installed without it roc...

Страница 19: ...ry make sound with suitable cement If method 2 is chosen make sure that the areas at the back and towards the centre of the fireplace floor are sound enough to take the eyebolts and screws If these ar...

Страница 20: ...T connector includes a valve for isolating the gas supply and a pressure test point The supply pipe must be rigid material Flexible pipe must not be used Concealed supply pipe connection If a conceale...

Страница 21: ...a little For this reason it is important to hold the edges firmly when removing 5 Remove the protective film from the inner reflector Place the inner reflector in a safe place away from the work area...

Страница 22: ...the fireback spacer as shown in figure 13 Secure the fireback spacers using the screws removed previously and the two supplied with the fire 14 This appliance is supplied with a flue restrictor for u...

Страница 23: ...oodscrews If necessary make sound with suitable cement 2 Place the hotbox centrally in the fireplace in the position in which it is to be permanently installed If a concealed connection is being used...

Страница 24: ...ebolts into the plugs Make sure that the bolts are secure 4 Place the hotbox unit close to the fireplace but allow sufficient access into the fireplace opening so that the cables can be threaded throu...

Страница 25: ...cables by turning the hexagonal adjusters by hand See figure 21 12 Inspect the installation of the hotbox against the fireplace surround If the hotbox is aligned squarely and the sealing is satisfacto...

Страница 26: ...ace of the burner cover Secure using six screws removed previously 4 Refit the spillage plate Secure using the four screws removed previously 11 2 Supply pipe installation A nut and olive is provided...

Страница 27: ...kwise to HIGH Depress the knob slightly to get past the pilot ignition position The main burner should now light Depress the control knob slightly to release from the HIGH position and turn back clock...

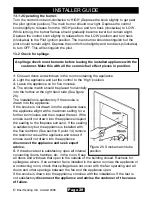
Страница 28: ...ating the fire for the first time some vapours may be given off which could set off smoke alarms in the vicinity These vapours are quite normal with new appliances They are totally harmless and will d...

Страница 29: ...nce alight at the maximum setting for a further ten minutes and then repeat the test If the smoke is still not drawn into the appliance inspect the sealing to the fireplace surround If the sealing is...

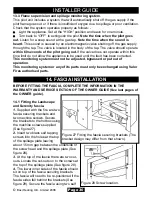
Страница 30: ...s parts must only be exchanged using Valor Fires authorised parts 14 FASCIA INSTALLATION BEFORE FITTING THE FASCIA COMPLETE THE INFORMATION IN THE WARRANTY AND SERVICE SECTION OF THE OWNER GUIDE See l...

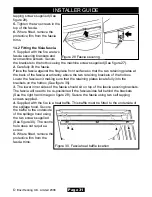
Страница 31: ...at the retaining plates locate fully into the brackets on the hotbox See figure 36 3 The lower inner sides of the fascia should sit on top of the fascia securing brackets The fascia will need to be re...

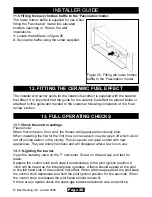
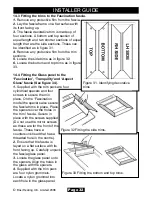
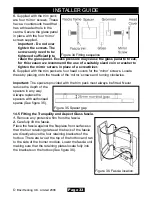
Страница 32: ...indrical spacers and four screws to secure them in place On the Fascination model the spacers also secure the fascia trims in place Place the spacers over the holes in the trim fascia Secure in place...

Страница 33: ...ning clockwise Important The spacers provided with the trim pack must always be fitted Never reduce the depth of the spacers in any way Always replace the spacers with authorised spares See figure 35...

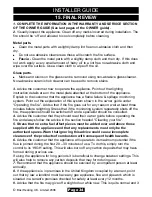
Страница 34: ...onitoring system repeatedly shuts off the fire the appliance should be switched off and a specialist should be consulted 4 Advise the customer that they should read their owner guide before operating...

Страница 35: ...we recommend that you use a HEPA filtered vacuum to remove any dust and soot accumulated in and around the fire before and after working on the fire When replacing these articles we recommend that th...

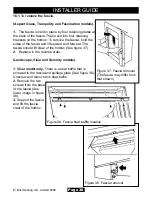
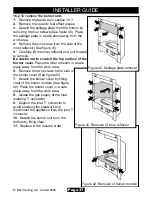
Страница 36: ...ure 37 2 Replace in the reverse order Landscape Visia and Serenity models 1 Visia model only There is a heat baffle that is screwed to the fascia and spillage plate See figure 38 Unscrew and remove th...

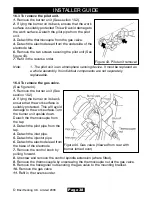
Страница 37: ...tor in a safe place away from the work area 6 Remove the two screws to the side of the burner cover See figure 42 7 Detach the burner cover by lifting clear of the burner module See figure 42 Place th...

Страница 38: ...emove the burner unit See section 16 2 2 If lying the burner on its back ensure that the work surface is suitably protected This will avoid damage to the work surface Turn the burner unit upside down...

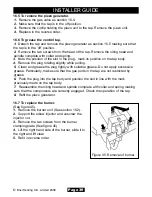
Страница 39: ...e plug lightly with suitable grease Do not apply excessive grease Particularly make sure that the gas ports in the tap are not restricted by grease 6 Push the plug into the tap body and position the s...

Страница 40: ...e retention is as method 1 See section 10 1 of installation instructions remove the screws If the fire retention is as method 2 See section 10 2 of installation instructions slacken the hexagonal adju...

Страница 41: ...Page 41 Baxi Heating U K Limited 2008 OWNER GUIDE FOR WARRANTY AND SERVICE INFORMATION SEE PAGES 52 TO 55 OWNER GUIDE...

Страница 42: ...49 Glass parts 50 Metal Parts 49 Ceramic fuel effect 50 Burner 51 FUEL BED REFITTING 51 MAINTENANCE 51 WARRANTY AND SERVICE 52 This gas fire is designed to meet the most stringent quality performance...

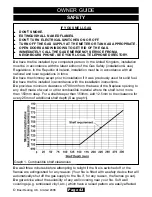
Страница 43: ...the clearance for every 25mm of additional shelf depth See graph1 Do wait three minutes before attempting to relight if the fire is switched off or the flames are extinguished for any reason Your fire...

Страница 44: ...ons 1991 The glass panel is very hot when the appliance is in use and should not be touched It does not give full protection for young children the elderly the infirm or pet animals The appliance shou...

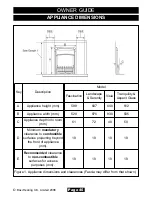
Страница 45: ...scination Landscape Serenity Visia Tranquility Aspect Glass A Appliance height mm 599 607 640 612 B Appliance width mm 520 976 930 505 C Appliance depth into room mm 61 72 40 50 D Minimum mandatory cl...

Страница 46: ...nimum natural gas input of 3 3kW Gross Has a minimum natural gas output of 1 48kW Model 958 when fitted with Fascination fascia Has a maximum natural gas input of 5 5kW Gross Has a maximum natural gas...

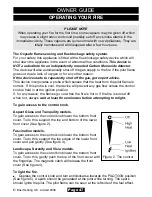
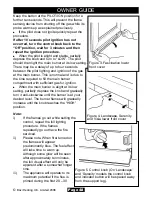
Страница 47: ...gain access to the control knob lower the bottom front cover To do this support the top and bottom of the lower front cover See figure 2 Fascination models To gain access to the control knob lower the...

Страница 48: ...alight at its low setting partially depress the knob and gradually turn it anti clockwise until the burner is at your desired level The burner flames will gradually increase until the knob reaches the...

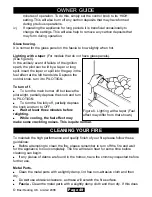
Страница 49: ...partially depress the knob and turn to PILOT IGN To turn the fire fully off partially depress the knob and turn to OFF Wait at least three minutes before relighting While cooling the fuel effect may m...

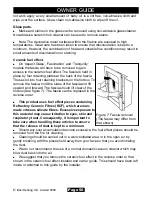
Страница 50: ...fascia should lift clear of the hotbox See figure 7 The fascia can be replaced in the reverse order This product uses fuel effect pieces containing Refractory Ceramic Fibres RCF which are man made vit...

Страница 51: ...important that the installer and owner guide for the ceramic fuel effect is followed correctly If replacing the ceramic fuel effect where a new guide is supplied follow the installer and owner guide...

Страница 52: ...your new fire we aim to provide a safe and high quality repair service supported by our dedicated national network of highly skilled engineers If your installer can t resolve the problem for you we wi...

Страница 53: ...lacement of the complete unit providing the failure is related to a manufacturing fault that cannot be repaired or is uneconomic to repair What this warranty does not cover Repairs to fires which have...

Страница 54: ...Page 54 Baxi Heating U K Limited 2008 OWNER GUIDE Installer Details Block Capitals Installer Name Corgi Registration Number Company Name Company Address Company Telephone number Company Fax number...

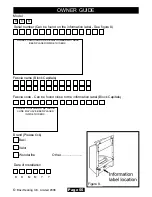
Страница 55: ...Fascia name Block Capitals Fascia code Can be found close to the information label Block Capitals Model 9 5 8 Serial number Can be found on the information label See figure 8 A LABEL CONTAINING THE SE...

Страница 56: ...Baxi Heating U K Limited 2008...

Отзывы: